Beginner’s Guide to CE
These instructions are written for users, newbies, or non-developers. This Hubs Community Edition installation uses Scaleway for an email service, Porkbun for a web domain, and DigitalOcean (DO) for hosting. If you vary from this path, your mileage may vary (YMMV).
Preparation
Before you start, you need:
- An email address that you can reliably access. We’ll refer to this as your admin email in these instructions.
- Safe password storage.
- A Windows computer. (Anyone using a Mac or Linux system should be able to follow this and just make adjustments.)
- Confidence to use a command line interface or terminal. These are step by step instructions. We’ll walk you through this.
What you will get:
This Hubs build at DO supports 30-60 maximum concurrent users. Of course, heavy concurrent use can lower that number. YMMV
The cost is $38 USD per month minimum, plus ~$1 USD annual for the first year domain (August 2025 prices). Additional taxes may be added depending on your location. For example, "customers with a tax location in the United Kingdom" will be charged the VAT of an additional 20% which makes the monthly price equivalent to approximately $46 USD.
Scaleway provides you magic link log-in emails (SMTP), and Porkbun provides a web domain with DNS service.
You will be the captain of your own Hubs. You have control and privacy.
Note: images in this set of instructions have some lines blurred where there is personally identifiable information.
What will you do?
- Download stuff and open accounts: Steps 1 through 9
- Connect to DigitalOcean: Steps 10 through 11
- Upload your Hubs: Steps 12 through 15
- Kick the tires and light the fires: Step 16
How long will this take?
We estimate that proficient users might get this done in 45 minutes to 2 hours. It might take several days if you proceed very carefully and slowly. Parts of these instructions do take time on servers. Patience is necessary.
How much will this cost?
We estimate $1 USD per year for the first year of a domain and ~$5 USD for renewals each year. ~$38 USD per month minimum for the services at DigitalOcean (this will include 1 node - $24 USD, 1 load balancer - $12 USD, and ~$2 USD for storage, one dollar for each 10 Gi volume). Your email SMTP service might be free or might cost a small amount of money ($1-$5 USD per month). It might be safe to estimate $40 USD per month.
You may be charged additional taxes depending on your location. For example, it might be safe to estimate a total of $48 for customers with a tax location in the United Kingdom
Got questions?
Check our FAQs. Also, our community Discord is standing by.
Icons
🤔 Advice icons mean that we think this is the best choice.
💡Tips are extra information! Not necessary, but helpful.
☑️ Check your work. Extra instructions to make sure everything is working.
Section 1 Download stuff and open accounts
1. Download and install Node.js
a. Go to Node.js package manager.

b. Select Download. It does not matter where you save this; it can stay in Downloads.

c. In your Download Folder, double-click on the node file, or right-click and select Open to install. The Node.js setup wizard will begin.


d. Select Next

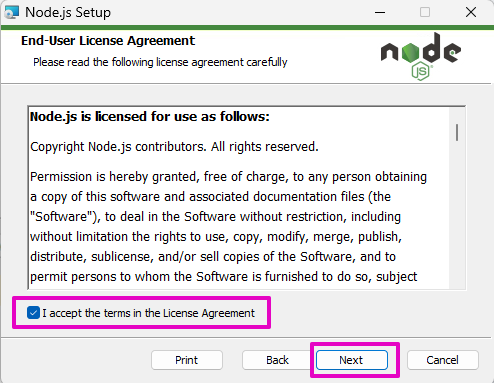
e. For End-User License Agreement, select the checkbox for I accept the Terms in the License Agreement. Then, select Next.
f. For Destination Folder, select Next.

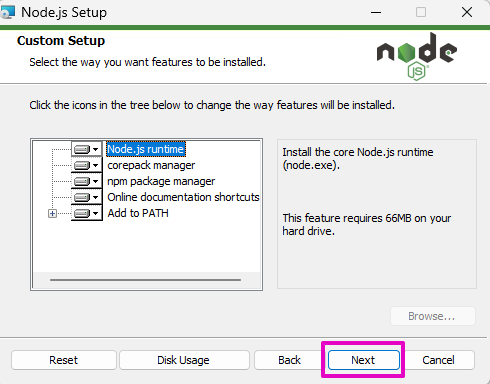
g. For Custom Setup, select Next.
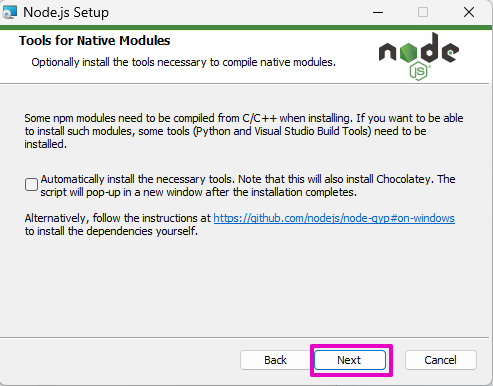
h. For Tools for Native Modules, do not select the checkbox for Automatically install… Select Next.
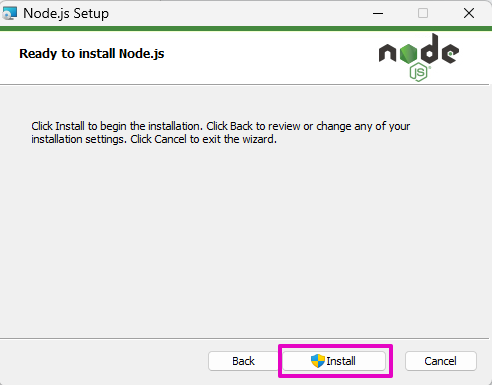
i. For Ready to install Node.js, select Install.
Installation notification window:
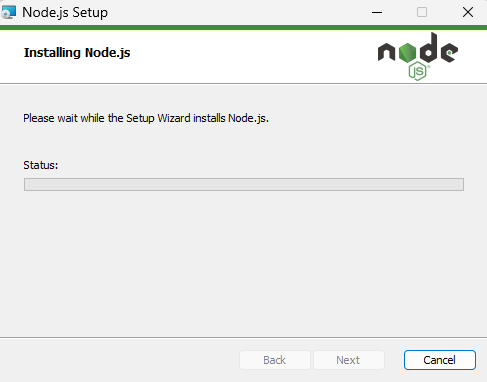
j. In a separate pop-up window, User Account Control prompts ‘Do you want this app to make changes to your device?’ Select Yes.

k. For Completed the Node.js Setup Wizard, select Finish.

2. Download and install VS Code
a. Go to Visual Studio Code. This page should automatically detect what your system is and offer you the matching VS Code version. Select Download for Windows.
If you don’t like all of the extra tracking that Microsoft inserts into VS Code, you can download VS Codium.

It is ~95MB. 💡 Your version number might not match this shown version. Don’t worry. It’s fine that you download the most recent version.

b. In your Downloads folder, double-click the VS Code file or right-click and select Open.

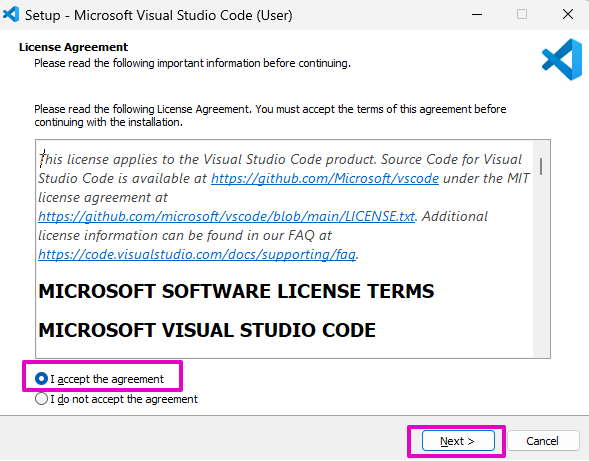
c. For License Agreement, select I accept the agreement. Select Next.
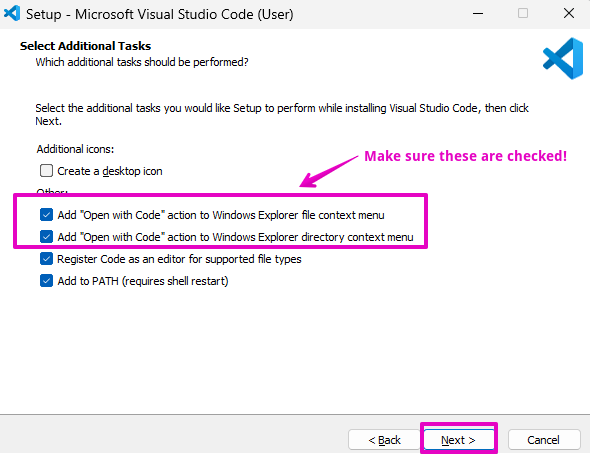
d. For Select Additional Tasks, select these statements:
i. Add “Open with Code” action to Windows Explorer file context menu
ii. Add “Open with Code” action to Windows Explorer directory context menu
iii. The other two statements, Register Code and Add to Path, should be checked by default.
iv. Select ‘Next’.
e. Select Install

While installing, there is an “Installing” notification.
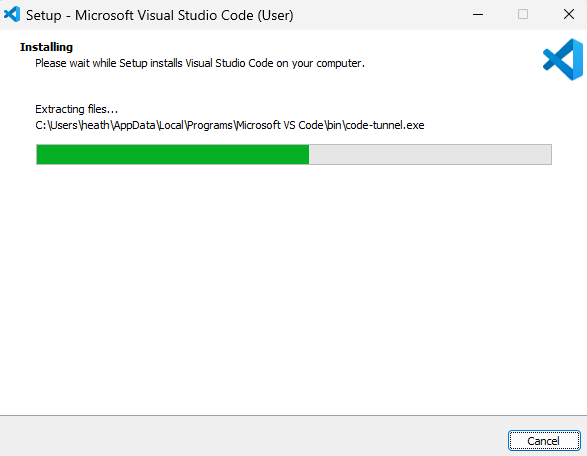
f. After Visual Studio Code has installed, select Finish.

🤔 Advice: If at any time when you go to use VS Code, the Terminal Window is not appearing for you (the part where you will enter commands), select View, Terminal.
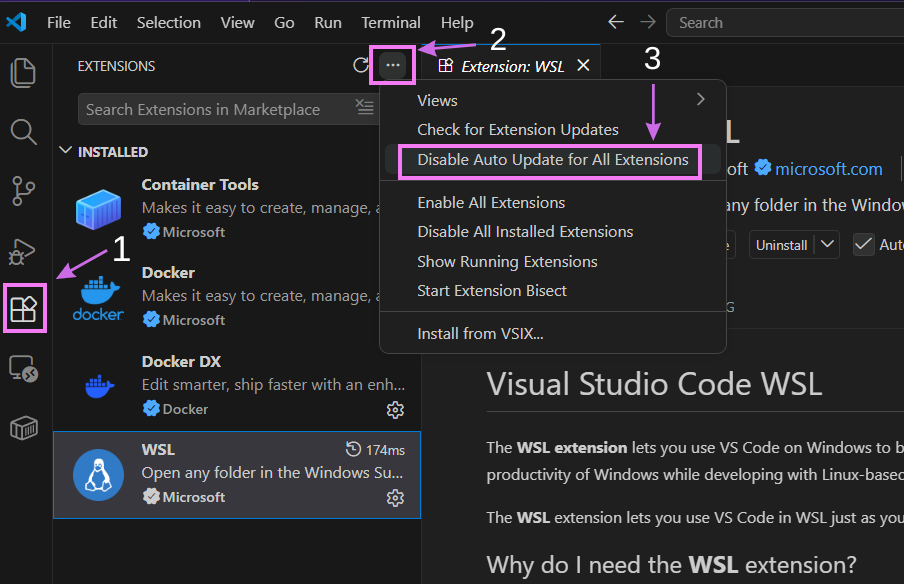
🤔 Advice: VS Code allows the installation of extensions to provide additional functionality. If you install any of these, we recommend that you disable automatic updates for extensions as a security measure.
In VS Code:
1. Select the Extensions tab
2. Select the 3 dot button
3. Select Disable Auto Update for All Extensions
3. Purchase a web domain at Porkbun
a. Go to Porkbun.com.
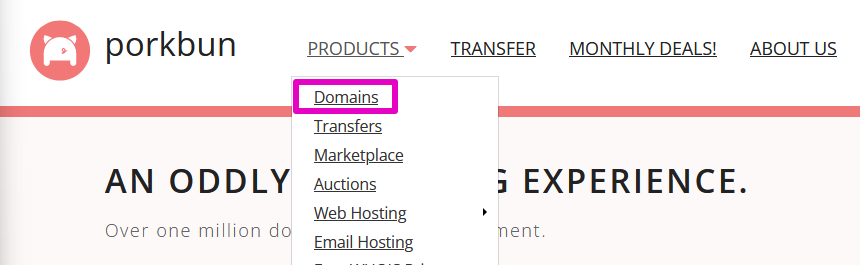
b. Under Products, select Domains.
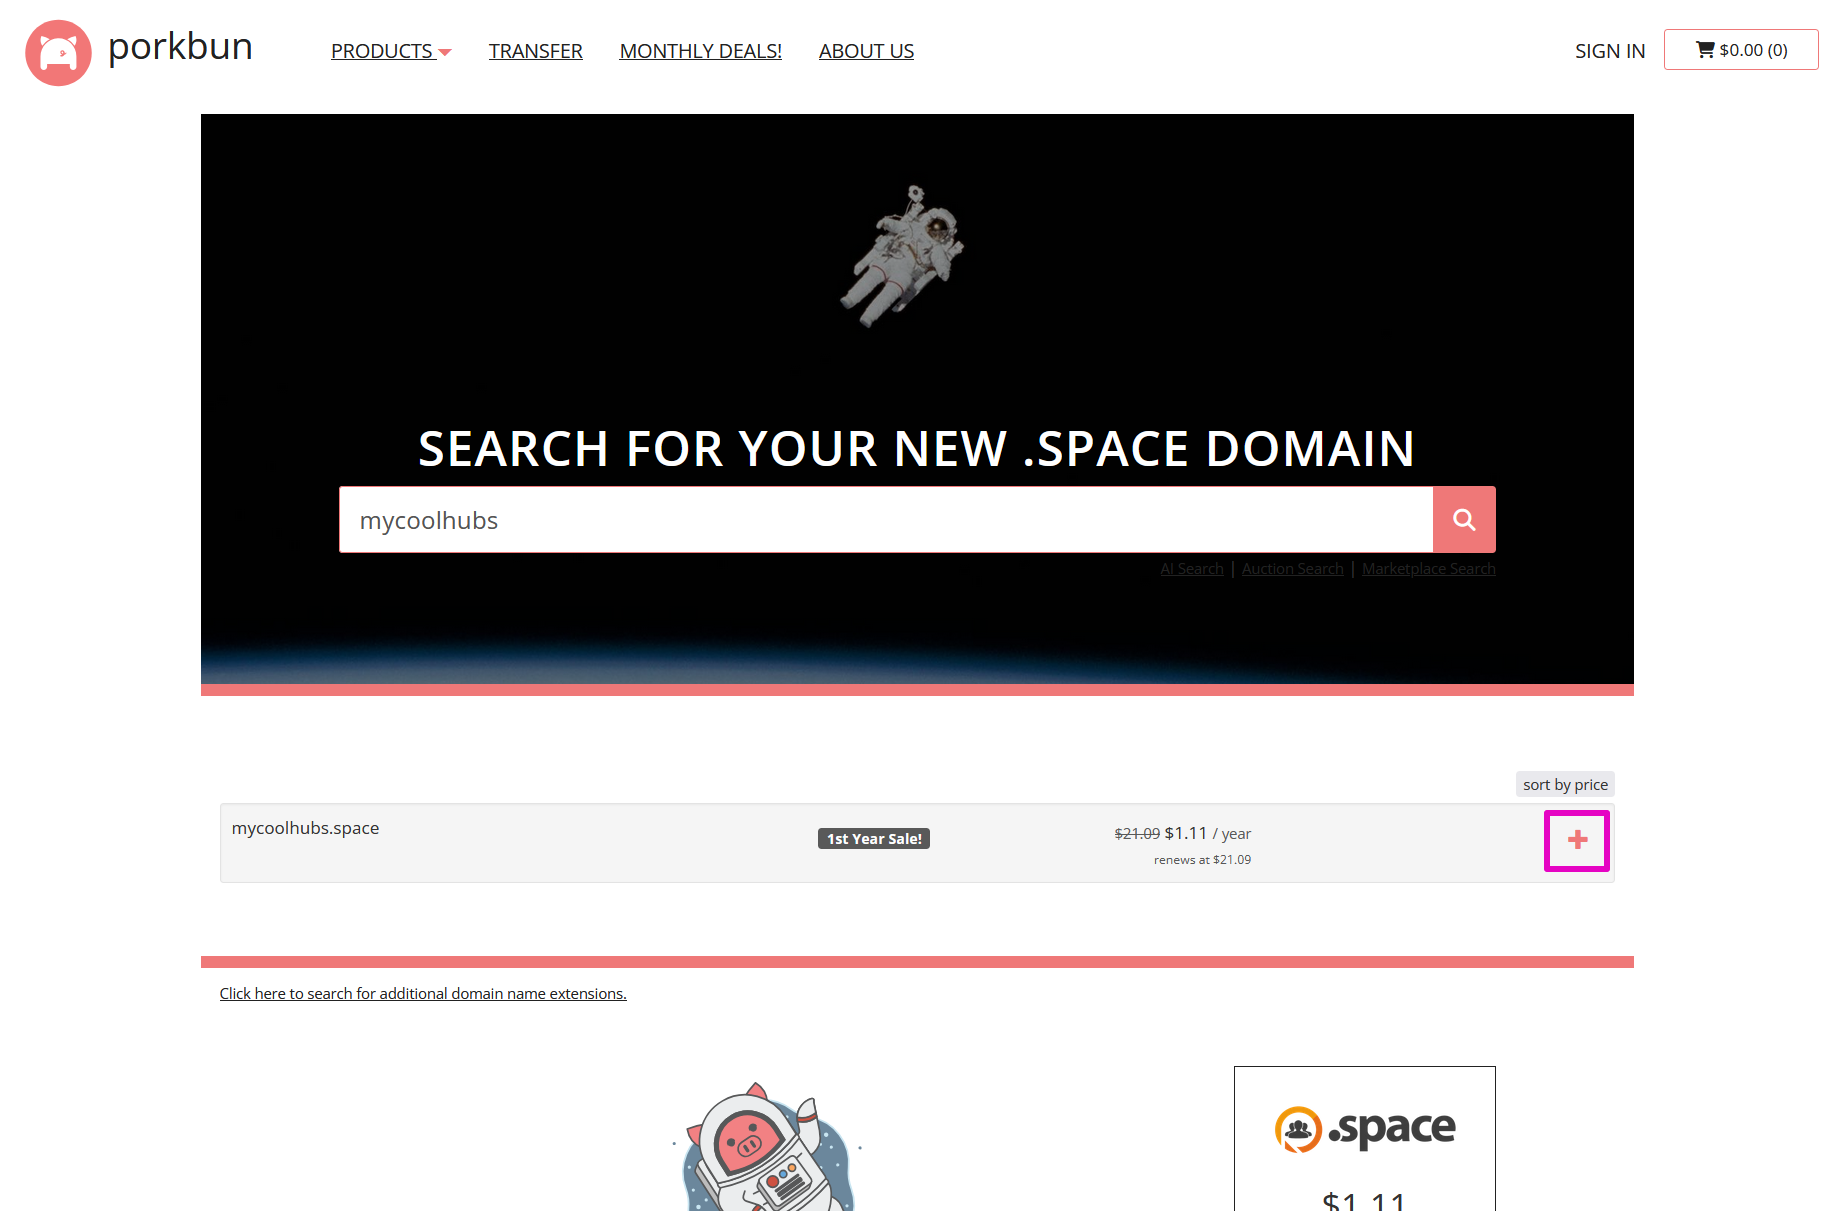
c. Search for a domain name if you already have a specific name in mind or you may shop by reviewing for different ending web domain extensions (the .com or .net or .xyz part of a web address) and their prices.

Select column headers “Registration”, “Renewal”, or “Transfer” to sort by lowest price in each column.

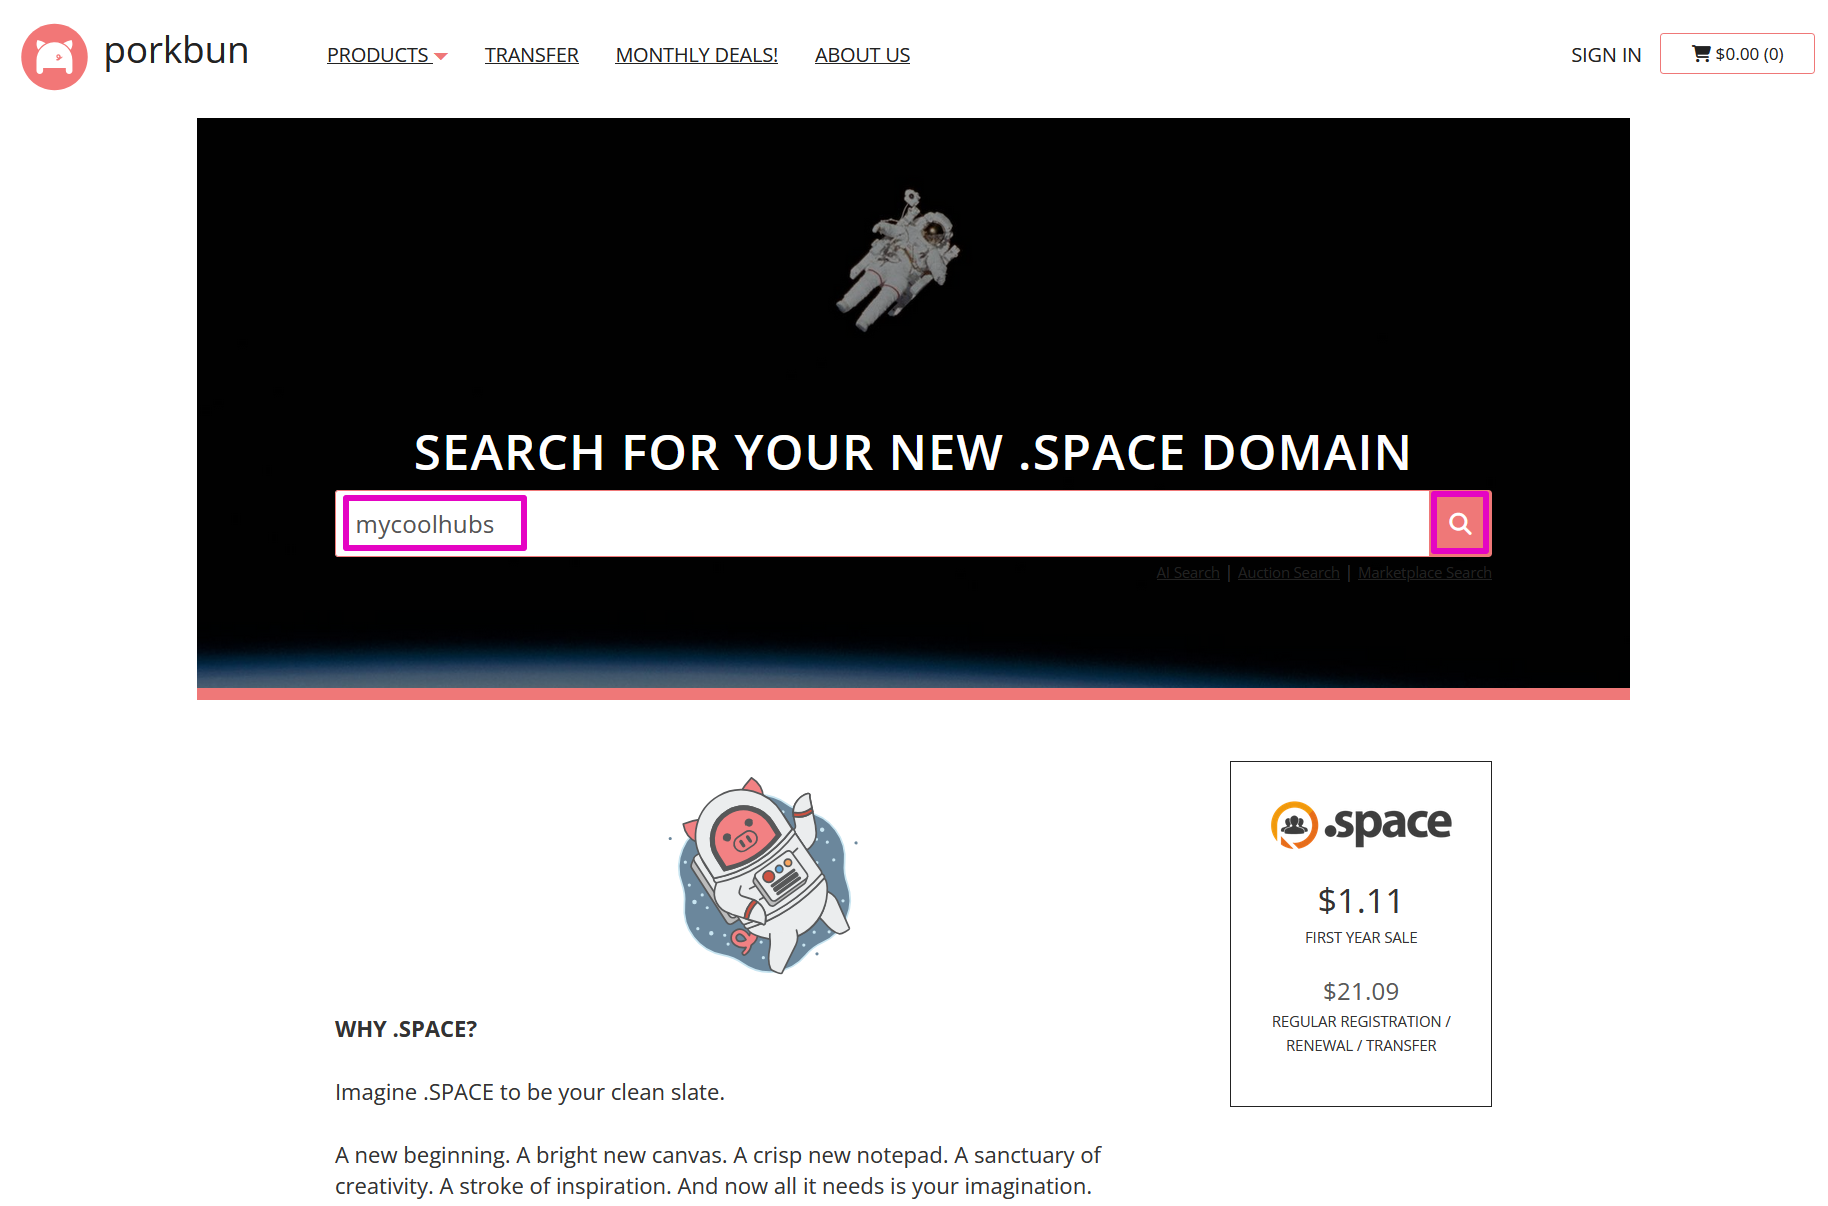
For example, let’s say you select the .space (dot space) extension because it is currently on a 1st Year Sale of US$1.11.
🤔 Advice: Pay special attention to the Renewal column, however, because that is what you will be charged every year after.
Next, search if your full domain name is available to buy. Let’s say you want “mycoolhubs.space”, enter mycoolhubs in the search box and select the magnifying glass (submit search).
Note from the future: Scaleway ONLY wants domains that meet these conditions, so follow them now: The domain can only contain alphanumeric characters, dots, and dashes.
d. When you have chosen your full web domain address, select the plus sign under sort by price to add it to your shopping cart.
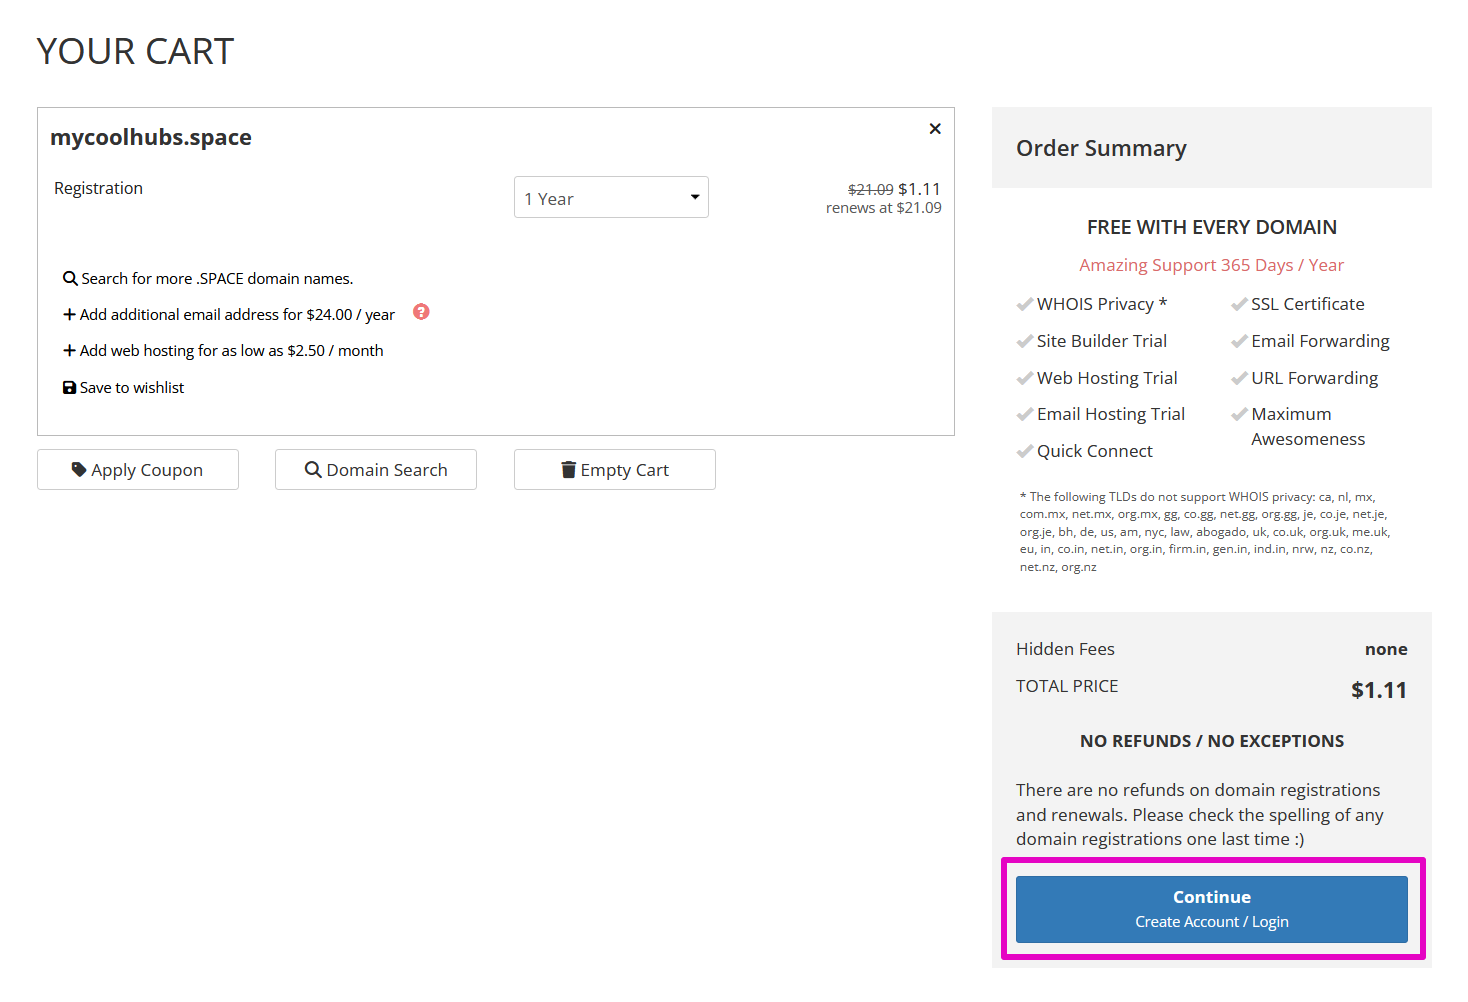
e. Select Checkout.

f. At Your Cart, select Continue Create account / Login.
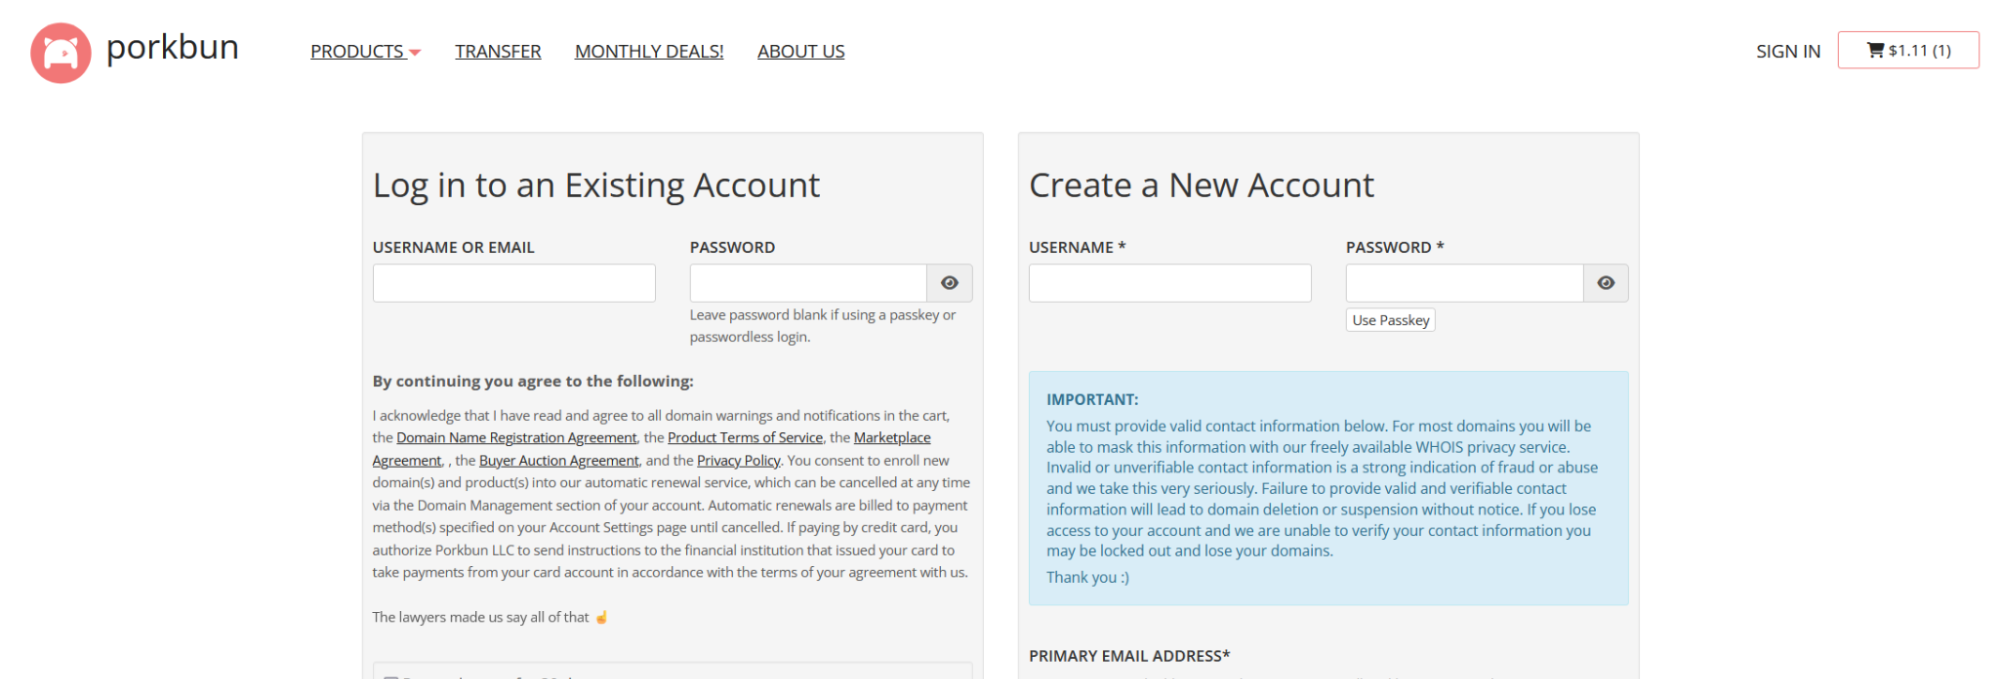
g. Under Create a New Account, type in your information to these required fields:
Username, Password, Primary email address, First or Given Name, Address, Country, City, Zip / Postal, Phone Code, Phone Number
Select the checkbox for You must agree to the following by checking the checkbox before continuing.
You may say yes or no to awesome emails.
Save your username and password somewhere.
Select Create Account.
h. Complete your purchase. Complete the email verification step. Enter your verification code into the pop-up and then select Submit.

🤔 Advice: Activate two factor authentication (2FA) for your account.
4. Create a A DigitalOcean Account
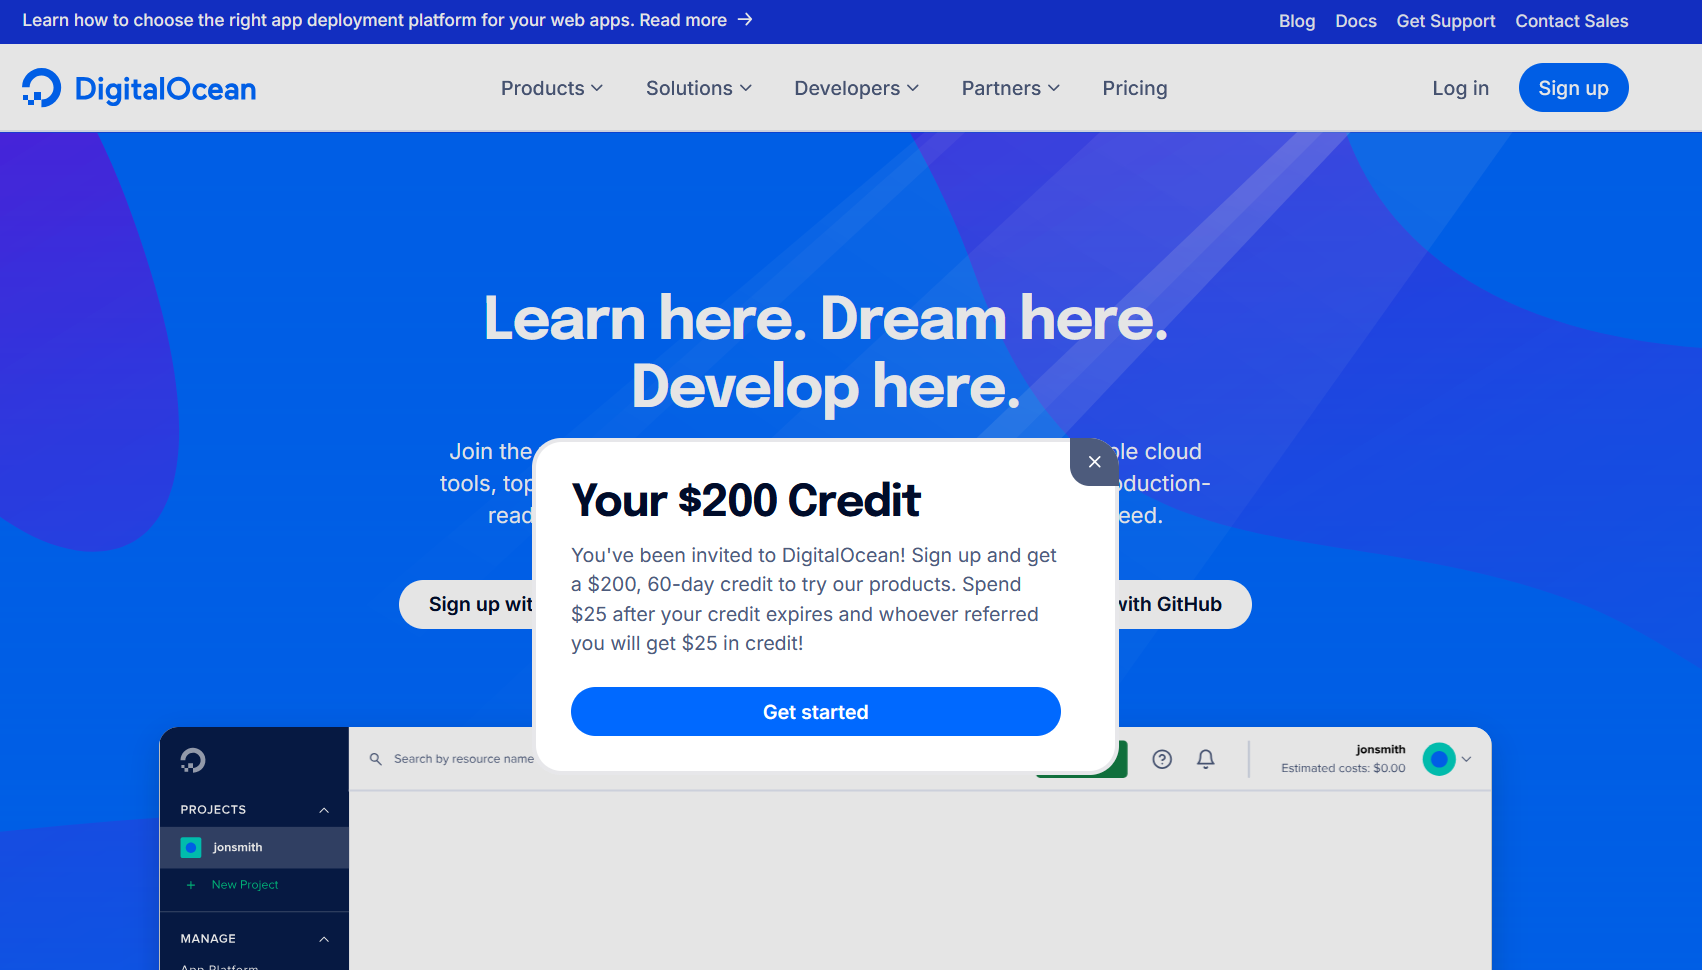
a. Go to DigitalOcean. Select Get started. DigitalOcean (DO) “only bills for the services you use” so there is no initial startup charge.
Currently DO is offering a US$200 credit for the first 60 days for new customers. Alternatively, you can get the US$200 credit AND Hubs community member Hrithik receives a small credit via his referral link. The referral is no extra cost to you. These instructions follow the referral link.
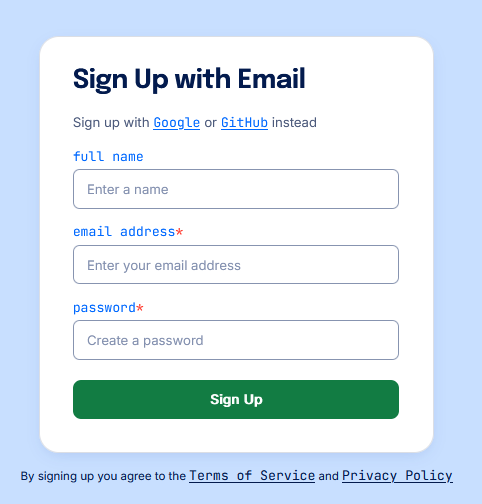
b. For Create your account, select Sign up with Google, Sign up with Github or Sign up with Email, your choice. These instructions will use Sign up with Email.

c. Enter in a required email address and password. Keep these passwords somewhere safe. Select Sign Up.
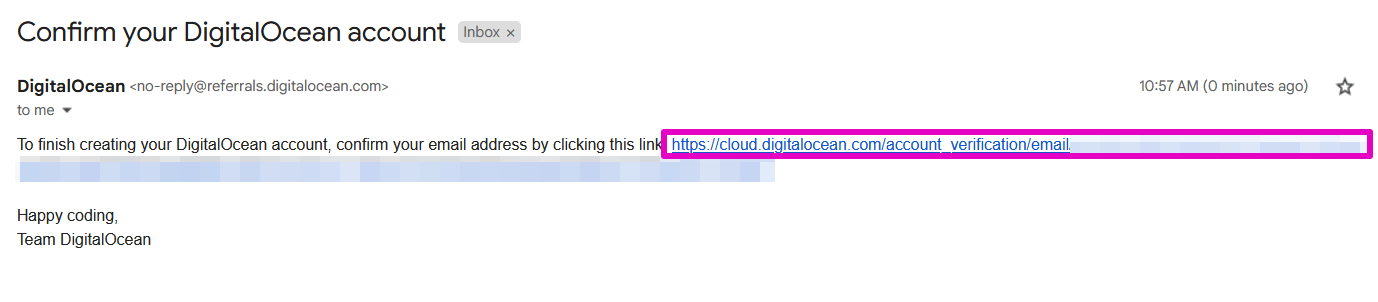
i. Notification to check your email for a confirmation link:
![Capture of DigitalOcean Confirm your email address notification. Text: We sent an email to [blurred email address]. Please confirm your email address by clicking the link we just sent to your inbox. Resend verification email blue button is at lower center of prompt box.](img/beginnersguide/image35.png)
d. Check your email and select the confirmation link that starts with cloud.digitalocean.com/account_verification. The link logs you into your DO account. You may close the other DO page now.
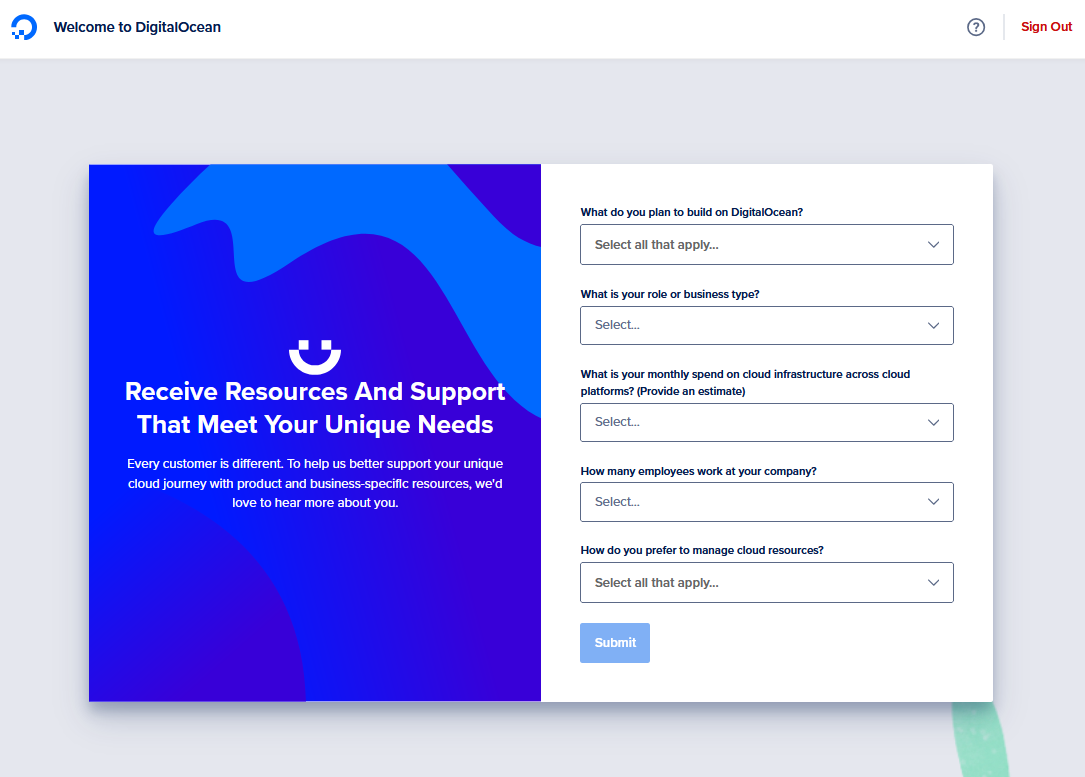
e. On this new page, you are asked some demographic questions that you must answer before selecting Submit:
i. What do you plan to build on DigitalOcean?
Choices are An API, Data analytics infrastructure, Web3 or decentralized application, A website or content site, AI and machine learning, Video or livestreaming platform.
🤔 Advice: We recommend Web3 or decentralized application
ii. What is your role or business type?
Choices are Digital agency / MSP, Freelancer or Consultant, Software company, E-commerce company, Hobbyist or Student, Other.
iii. What is your monthly spend on cloud infrastructure across cloud platforms? (provide an estimate)
Choices are $0-$50, $50-$500, $500-$1,000,$1,000-$5,000, $5,000-$10,000, $10,000-$100,000, More than $100,000.
iv. How many employees work at your company?
Choices are I work alone, 2-9, 10-99, 100-499, 500-999, 1000+
v. How do you prefer to manage cloud resources?
Choices are: Cloud console, CLI or API, SDK, Infrastructure as Code, I’m not sure.
🤔 Advice: We recommend I’m not sure.
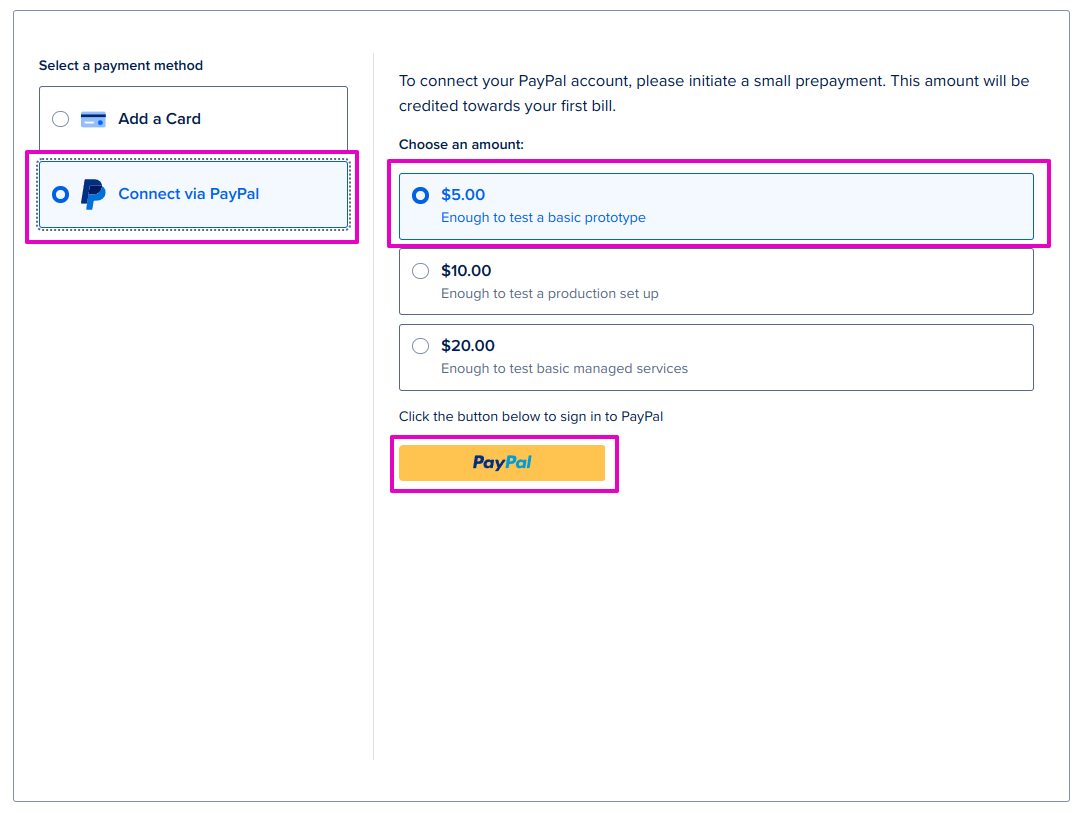
f. For Verifying your Payment Information, select either ‘Add a Card’ or ‘Connect via PayPal’.
g. If you choose Add a Card, enter your Card number, Cardholder name, Country, and Street address. Select Save and Sign Up.
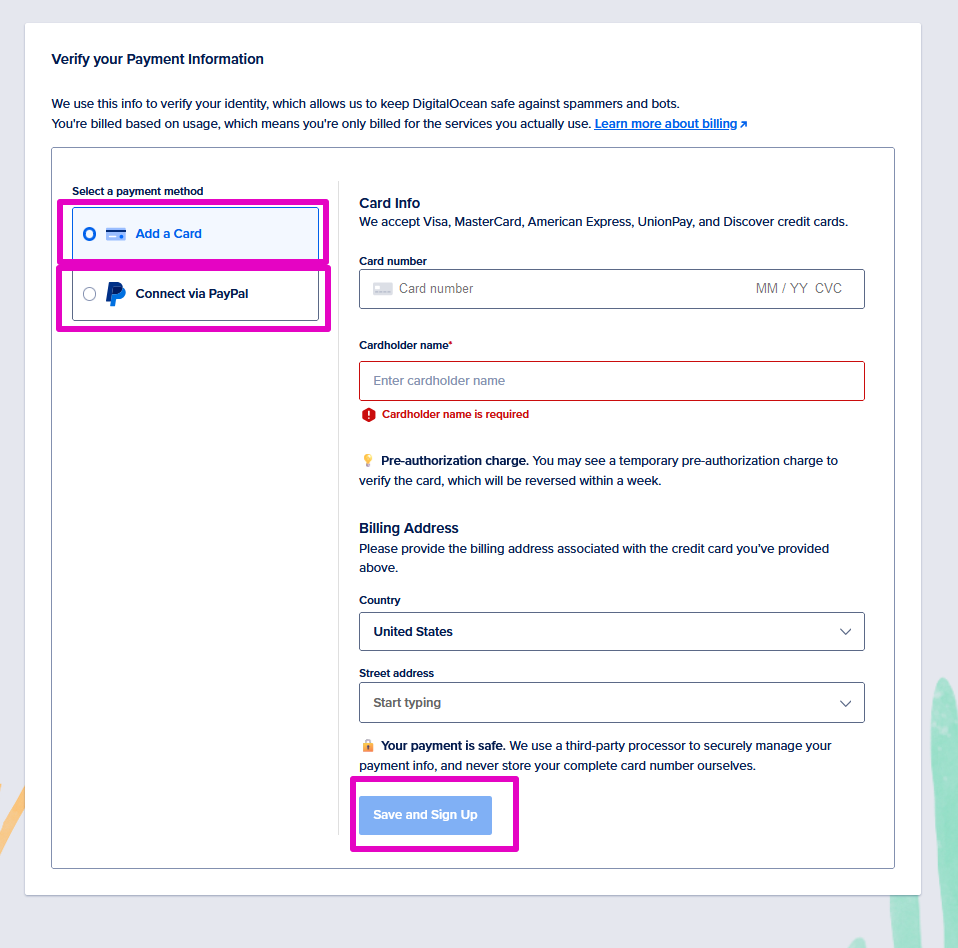
If you choose Connect via PayPal, for Choose an amount, select US$5.00, US$10.00, or US$20.00.
🤔 Advice: we recommend $5.00, and select PayPal.
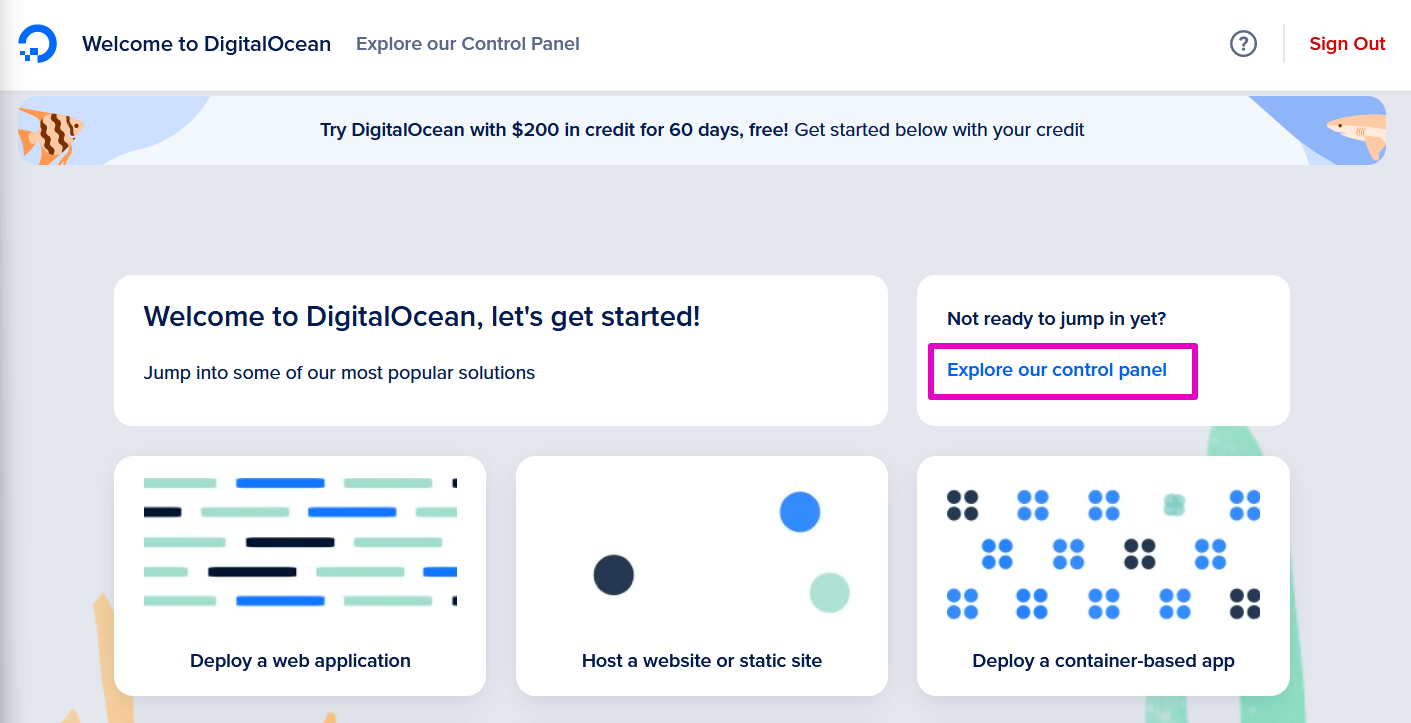
h. Once you have completed setting up your payment method, you are taken to a welcome page. Select Explore our control panel.
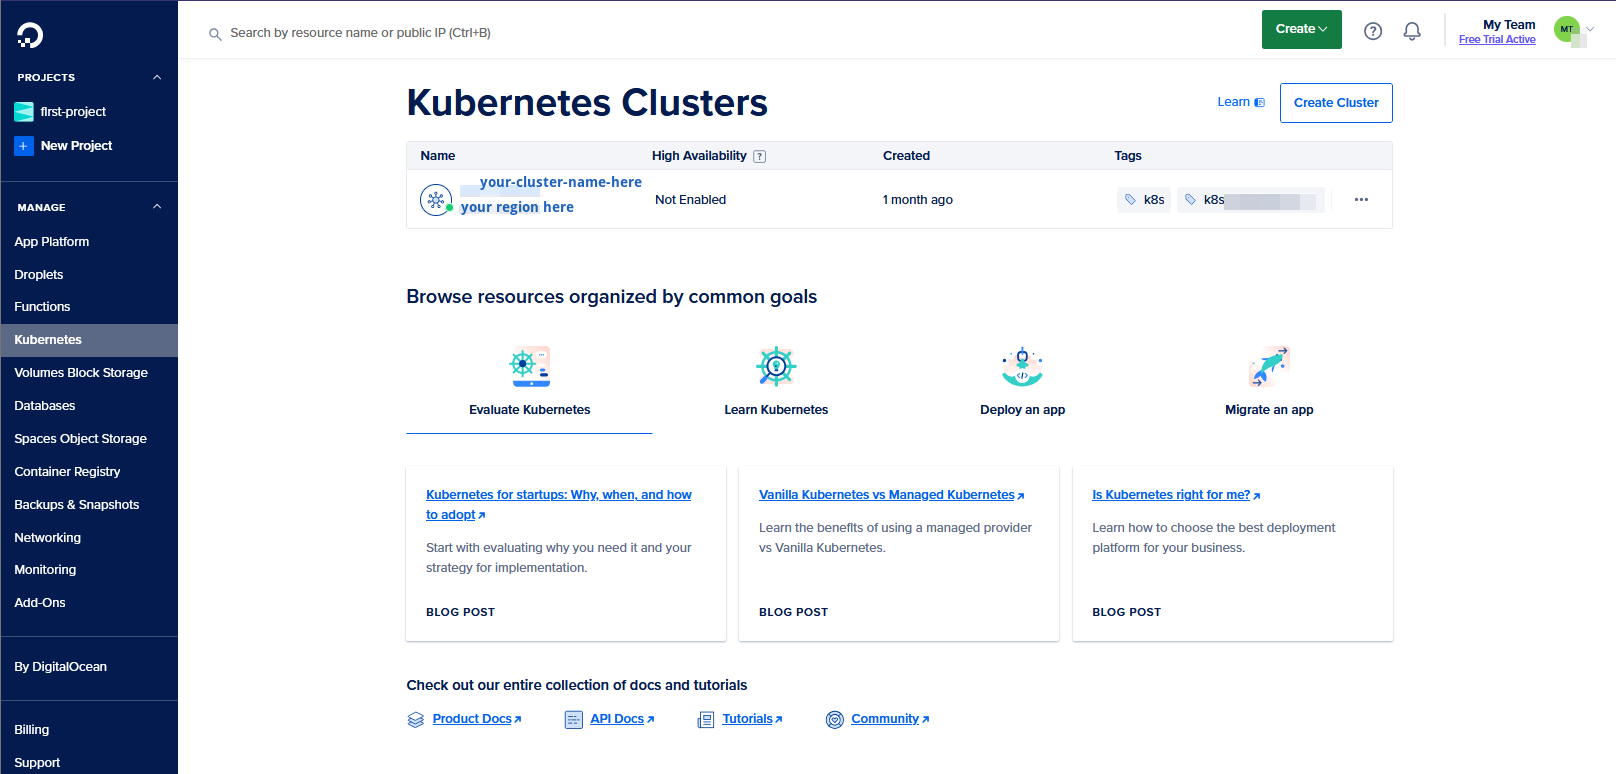
5. Create a Kubernetes cluster at DO
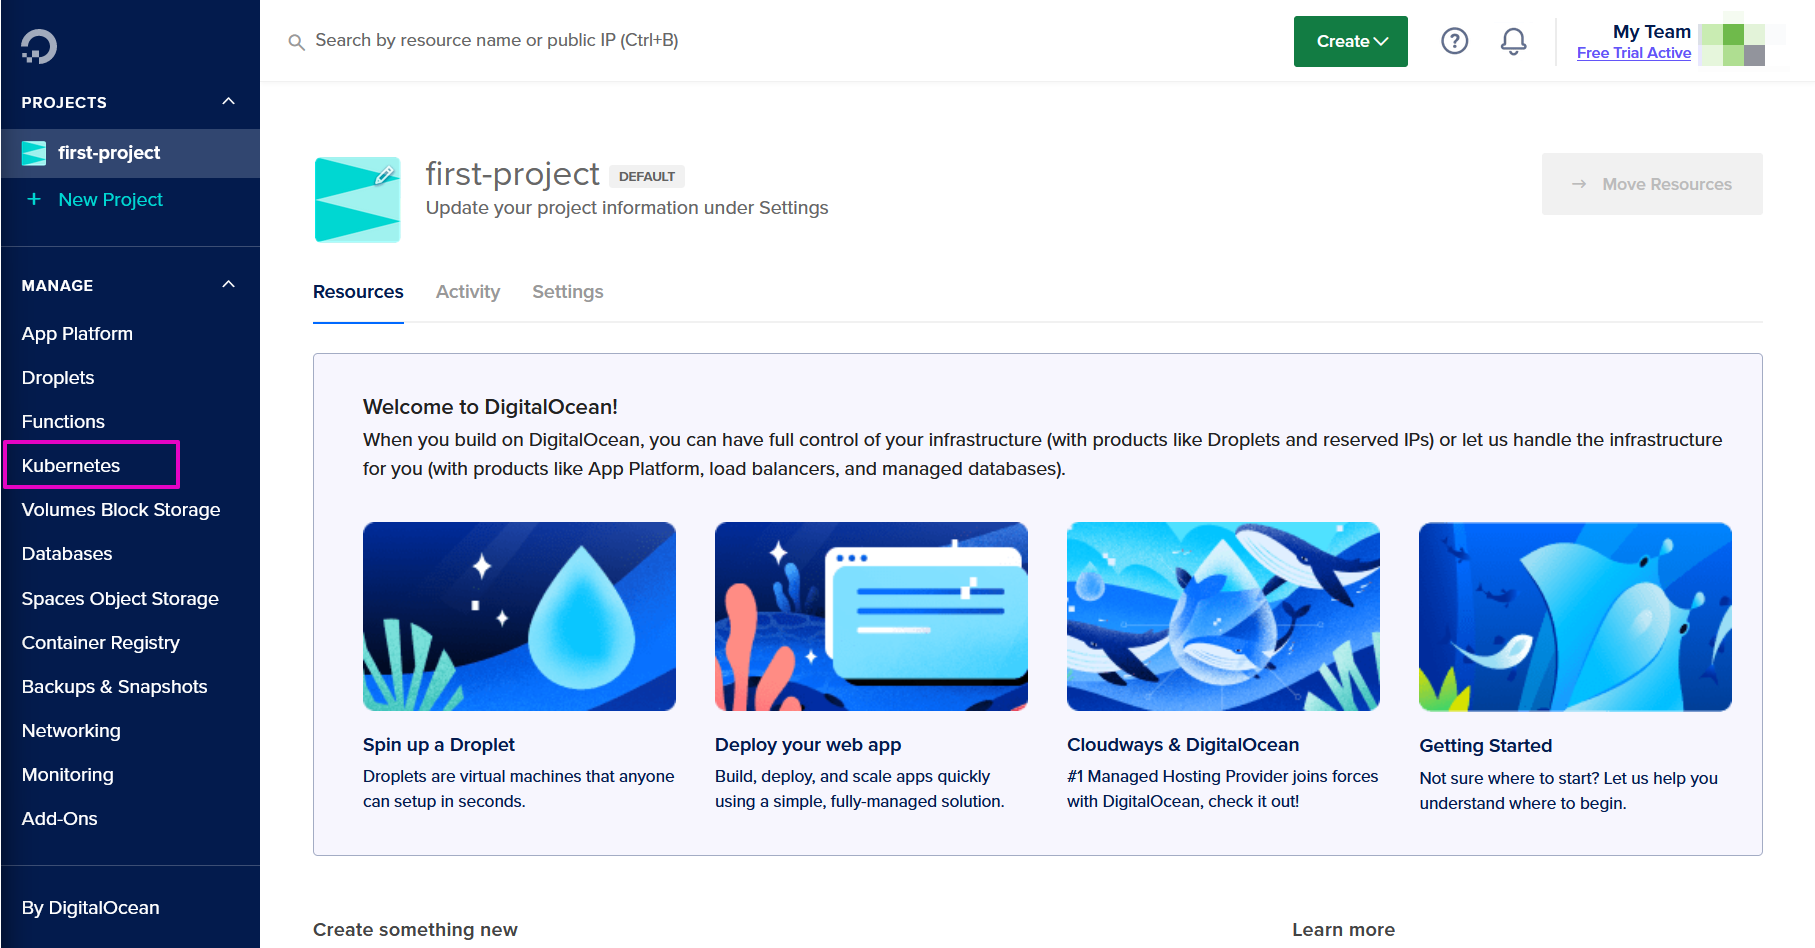
a. DO will create for you a default project called “first-project”. From the MANAGE menu, select Kubernetes.
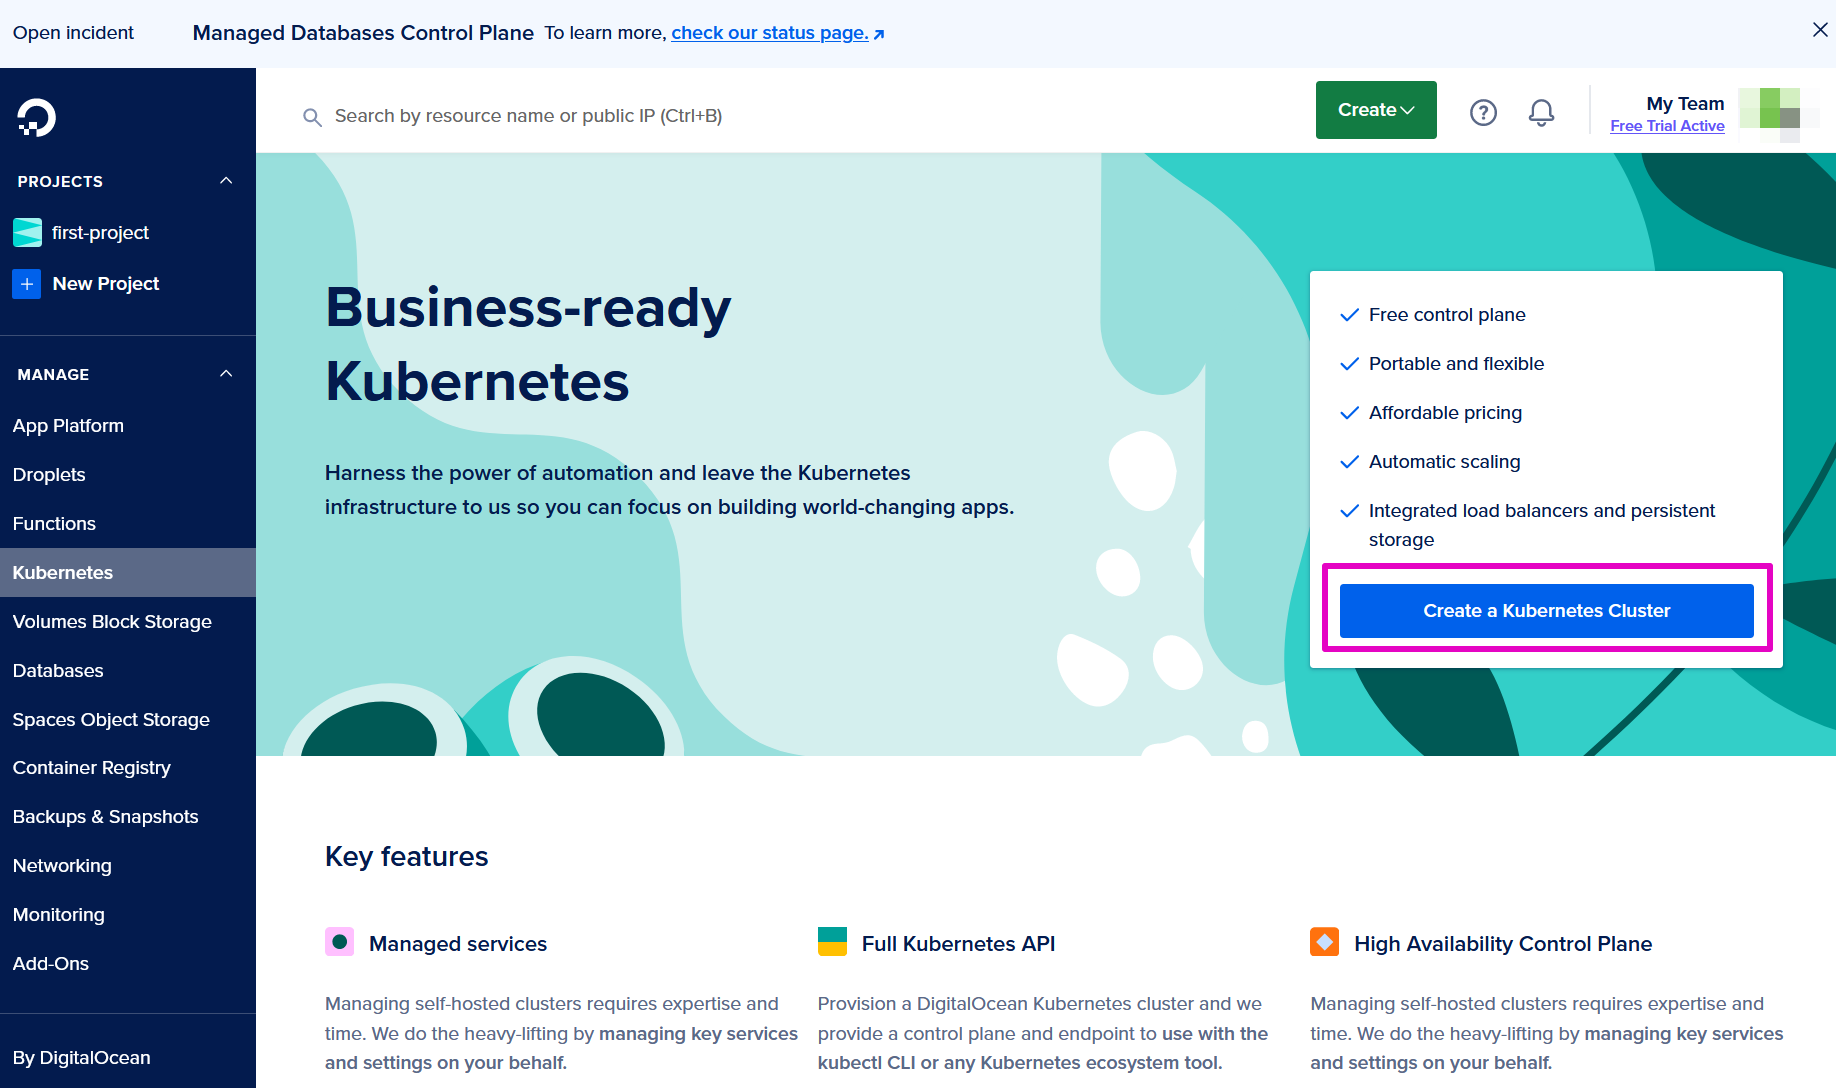
b. Select Create a Kubernetes Cluster.
c. For Create a Kubernetes cluster, Choose a data center region, select a region geographically closest to you. For ‘Select a version’- Keep whatever is recommended.
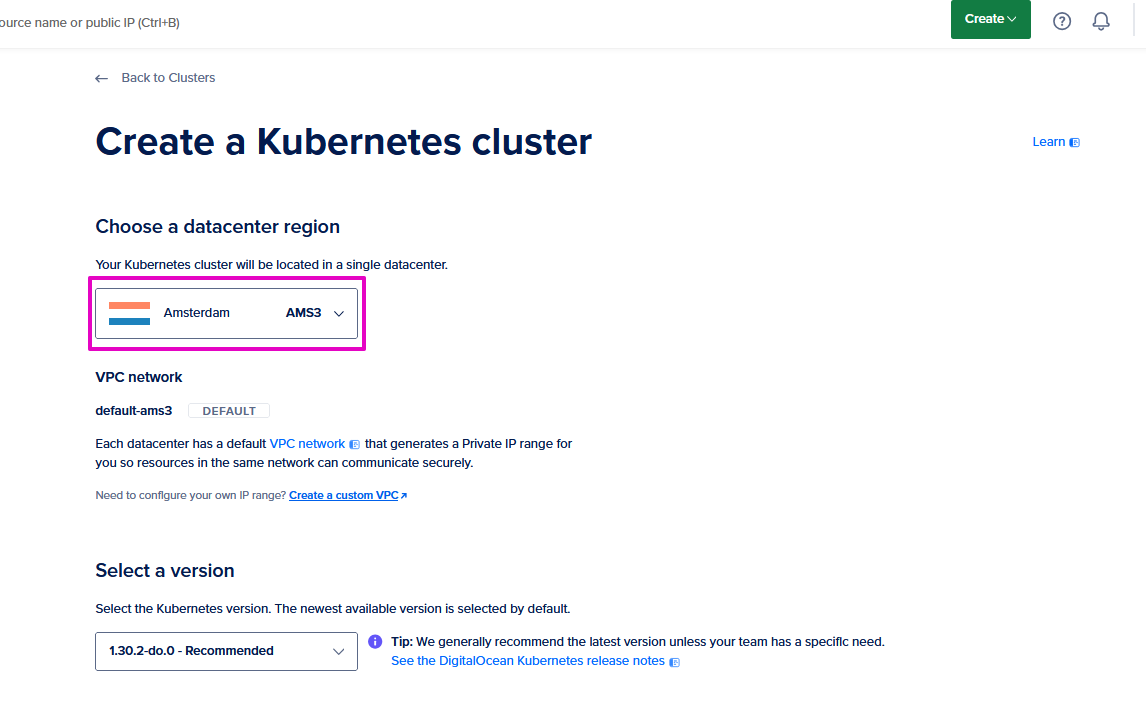
Choices are in North America, Europe, Asia, and Australia.

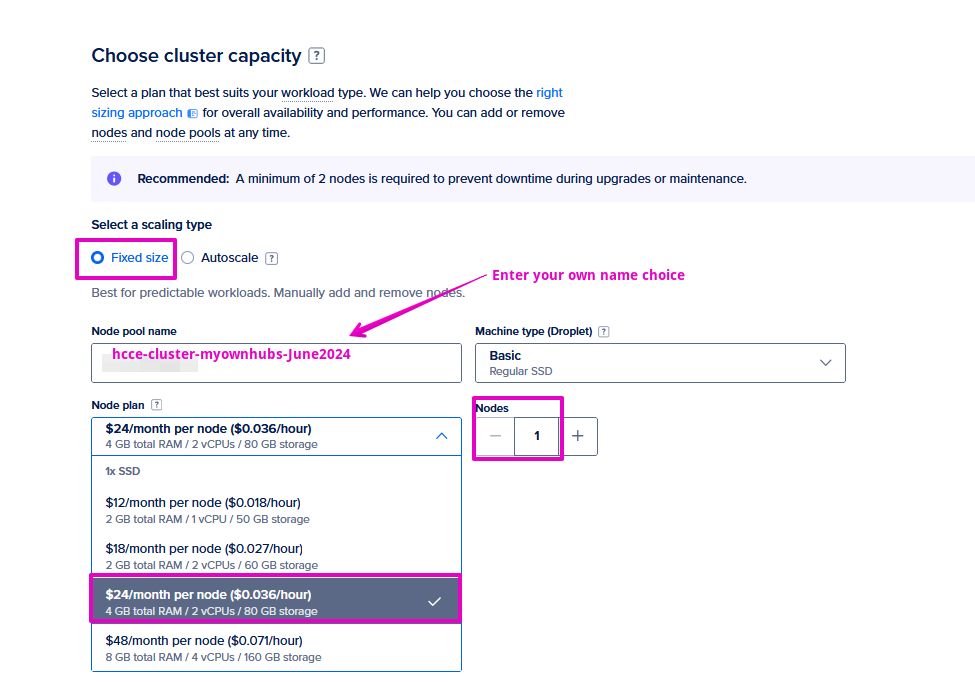
d. For Choose cluster capacity, Select a scaling type, select Fixed or Autoscale.
🤔 Advice: Fixed will help control your costs, but Autoscale will make sure that the servers are up if and when you need them. You decide: Fixed = cheaper but slightly less reliable, Autoscale = more expensive but more reliable. We are selecting Fixed in these instructions.
Note: You may ignore this warning: You have reached the 3 Droplet on your account. Request increase.
e. For Node pool name: Change the name to something that makes sense to you.
🤔 Advice: hcce-cluster-yoursetupreason-date
f. For Machine Type: Leave selected as Basic, Regular SSD
g. For Node plan: Select $24/month per node ($0.036/hour) of 4GB total RAM / 2 vCPUs / 80 GB storage (June 2024 specifications) Tip 💡Hubs Community Edition needs 3-3.5 GB RAM to run. Choosing 4 GB RAM gets you the minimum you need. If you run into too many problems, re-think this choice.
💡 Tip: DigitalOcean charges an extra $12/month for mandatory load balancing.
So a $24 choice here will be $24 + $12 a month for a total of $36 a month.
🤔 Advice: See our FAQ Can I select a lower price, smaller RAM/vCPU Node plan with DigitalOcean? for our further advice about selecting node and memory plans.
h. For Nodes: Select the negative sign to reduce this from 3 to 1.
🤔 Advice: One node is enough.
Note: This warning should have changed to: You are near the 3 Droplet limit on your account. Request increase. You can continue to ignore this warning.
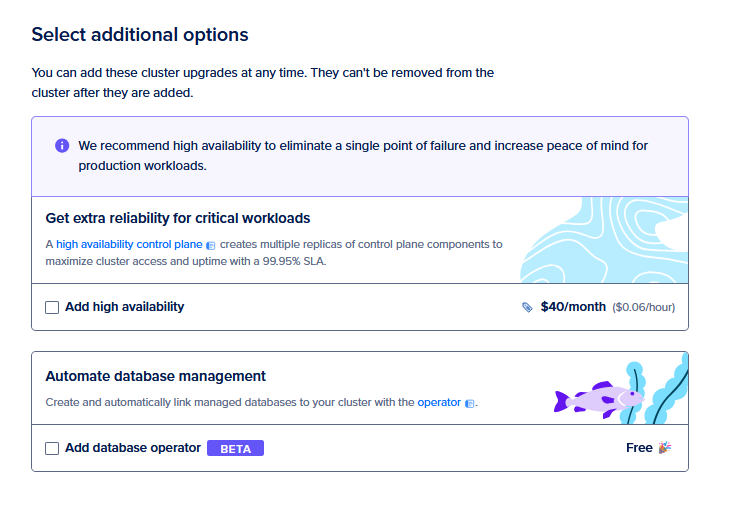
i. For Select Additional options - If you need high Availability you can select the checkbox for Add high availability.
🤔 Advice: Do not buy this (it is an extra $40/month!), but you do what’s right for you. If you need to automate your database management, select the checkbox for Add database operator. 🤔 Advice: You do not need this.
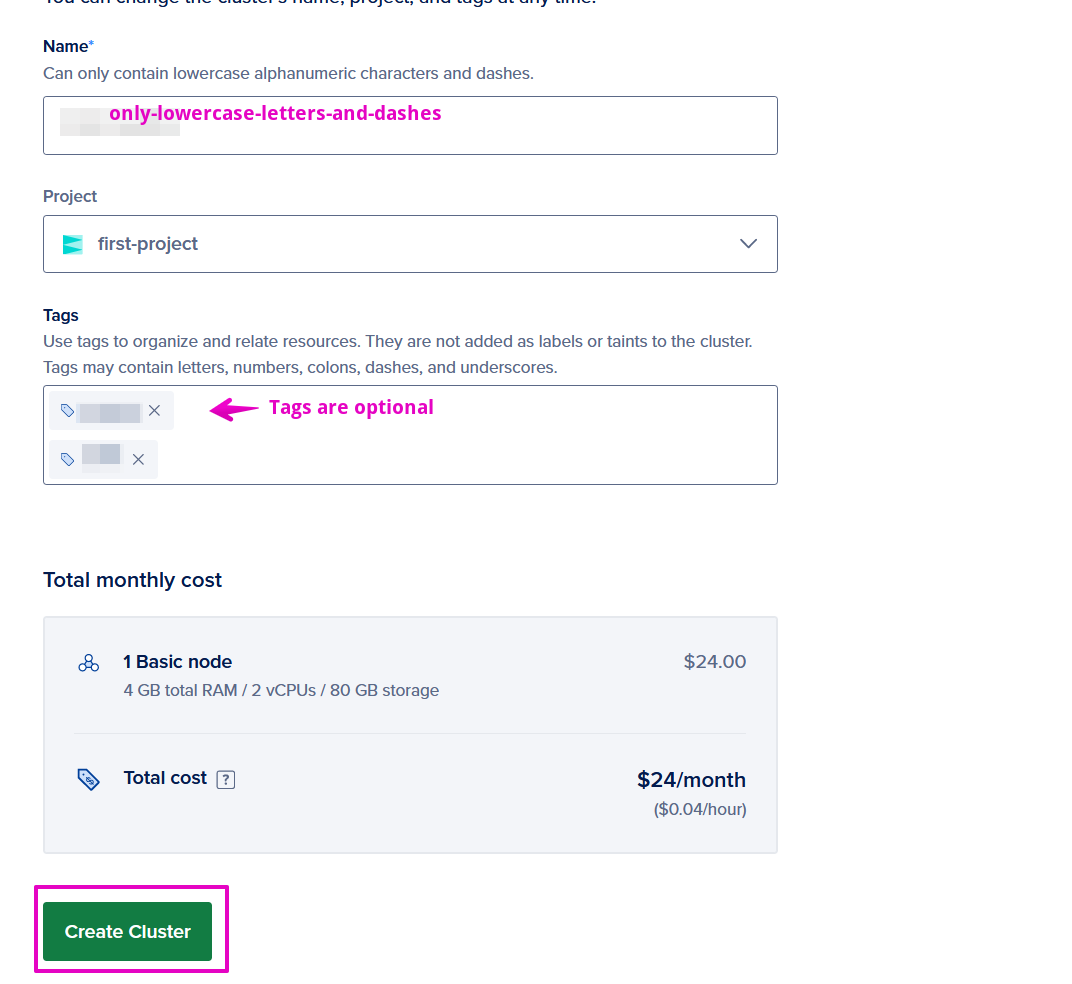
j. For Finalize, Name: Enter a cluster name. From DO, it “can only contain lowercase alphanumeric characters and dashes”.
💡 Tip: We picked “hcce-myfirstname”
k. Project: Leave this as first-project.
l. Tags: Tags are optional. Our advice is to add a minimum of one tag to help describe your project to yourself. You might use tags more if you have more than one cluster for, you know, later in life when you are a big deal.
m. Select Create Cluster.
In a few moments, your Kubernetes Cluster will be up and running. Hooray! Congratulations! You bought hosting services on the cloud.
6. Set up SMTP email service, verify domain, & get credential.
- Follow these instructions for Parts 1–4.
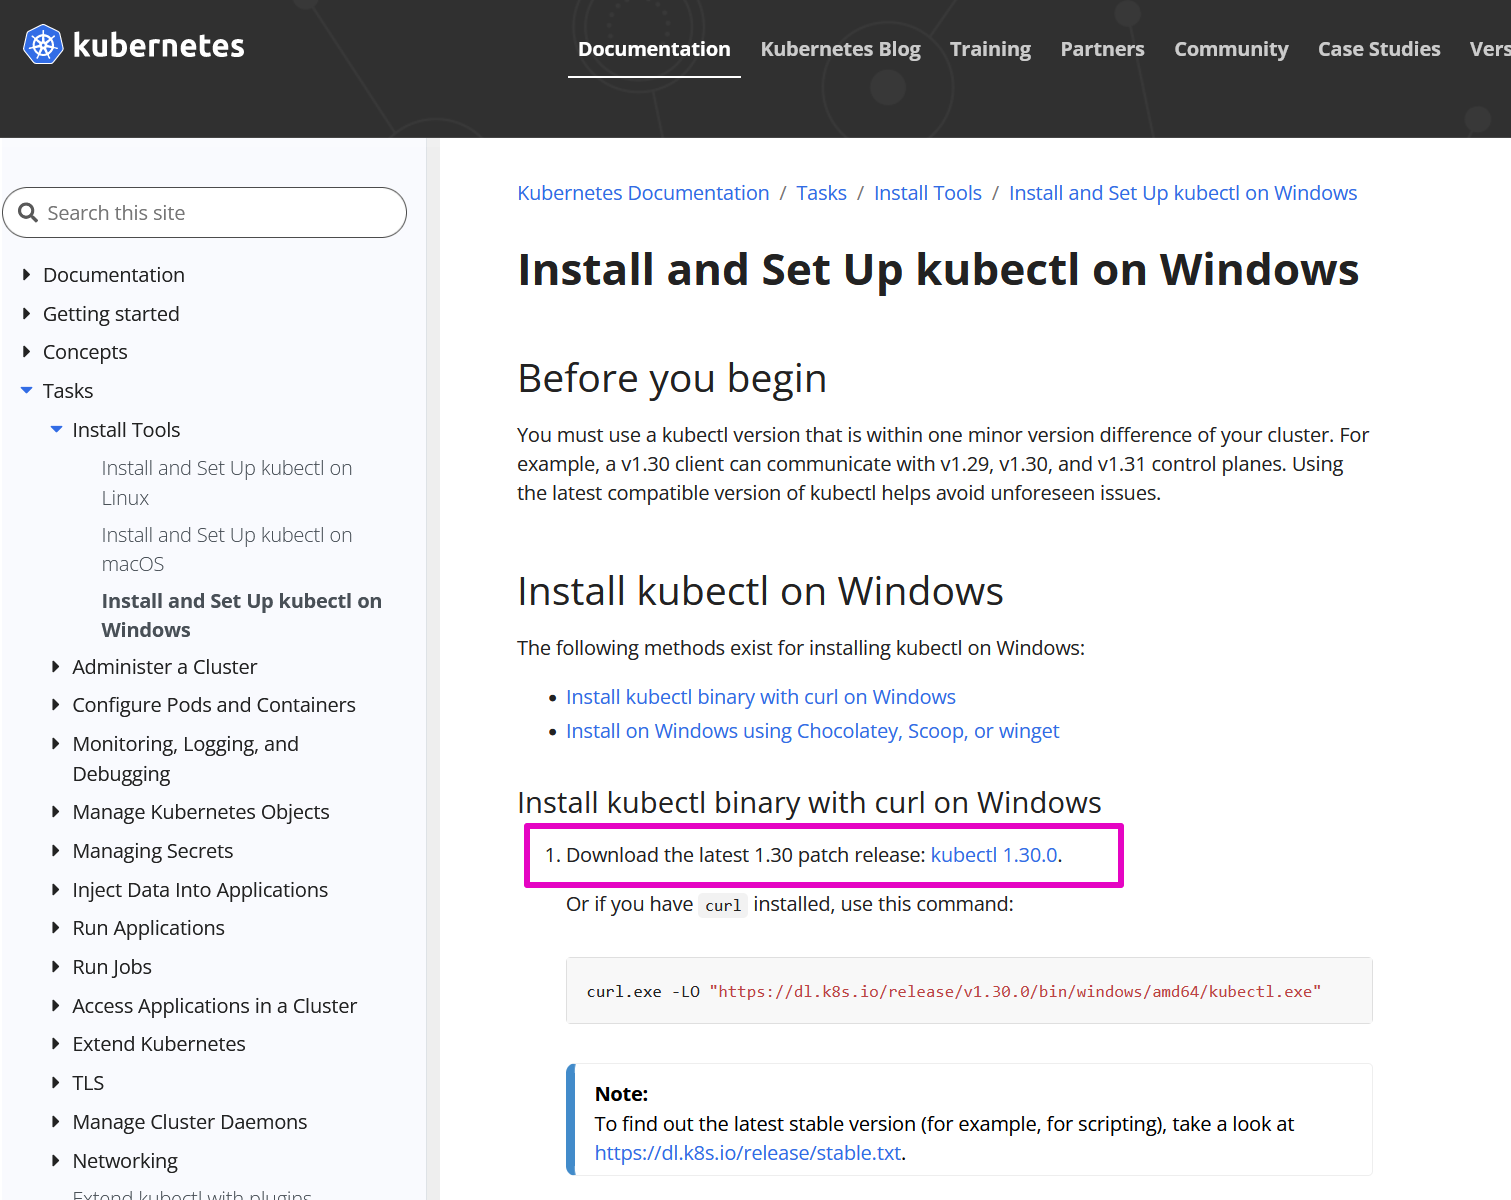
7. Download and install Kubectl
This software controls Kubernetes (k8s).
a. Go to Kubernetes.io for Windows.
b. Select the link at Download the latest 1.30 patch release: kubectl 1.30.0. This link is a .exe file so selecting it will activate it to download. Double-click or right-click and select Open to install.
c. Refer to our FAQs for advice on making sure that your kubectl version aligns with your kubernetes version at DO.
8. Download and Install Doctl
Doctl is the same idea as kubectl, it controls Digital Ocean via the command line interface.
Follow instructions 1 through 10 here.
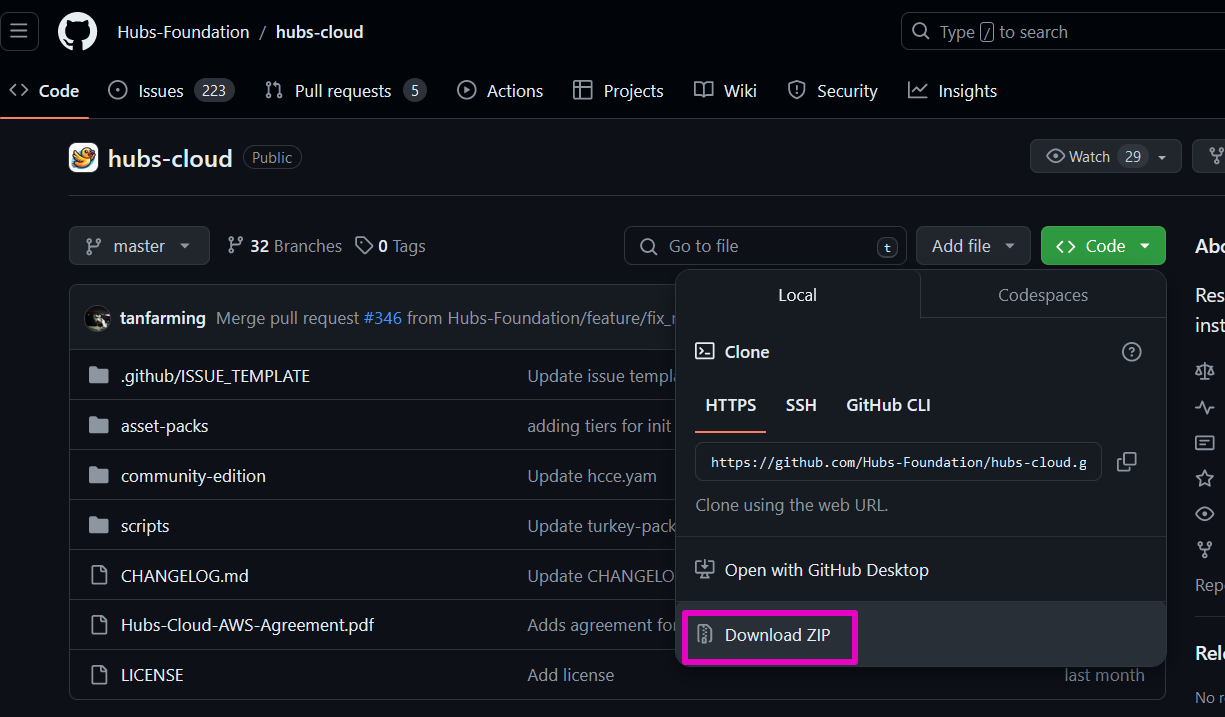
9. Download Hubs CE
a. Go to the Hubs Foundation Github repository for hubs-cloud.
💡 Tip: This link is for the “Hubs-Foundation / hubs-cloud (Public)” folder, also known as hubs-cloud-master. Do not be confused because this is called hubs-cloud. Community edition lives in a file structure within hubs-cloud because community edition was created from the hubs-cloud original (but now defunct) programming.
b. Select Code.

c. Select Download ZIP.

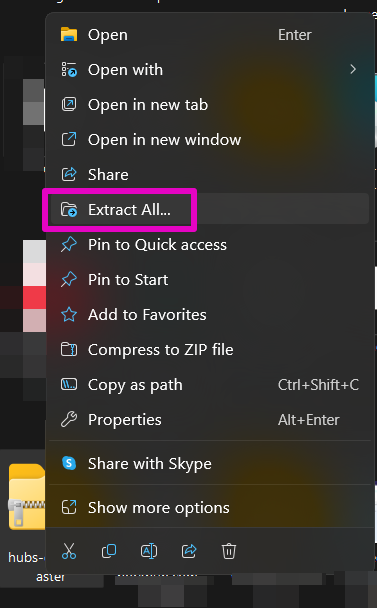
d. In your Download Folder, right-click on hubs-cloud-master and select Extract All…
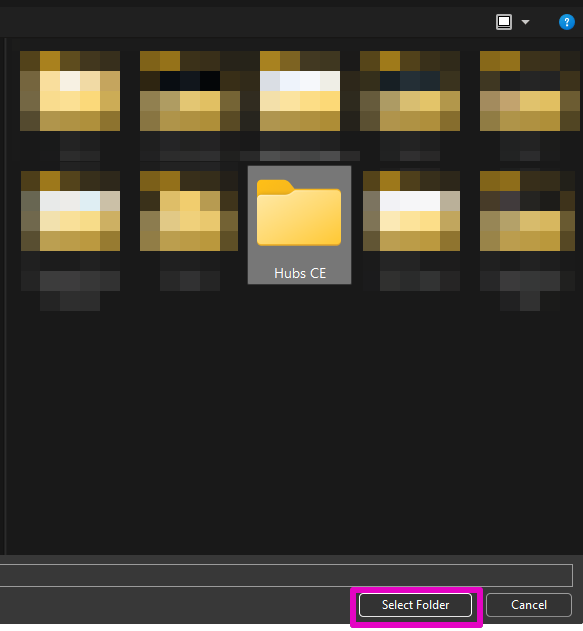
e. Select Browse.
f. Select Select Folder. Create a new folder on your computer called Hubs CE. Do not place this code inside of too many other folders. 🤔We recommend that you keep it near your Desktop.
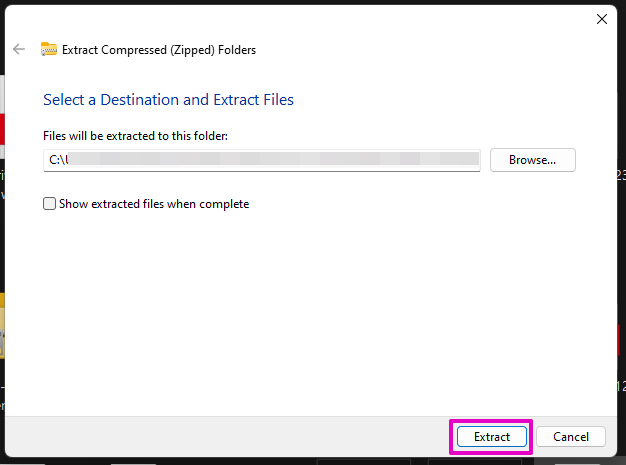
g. Select Extract.
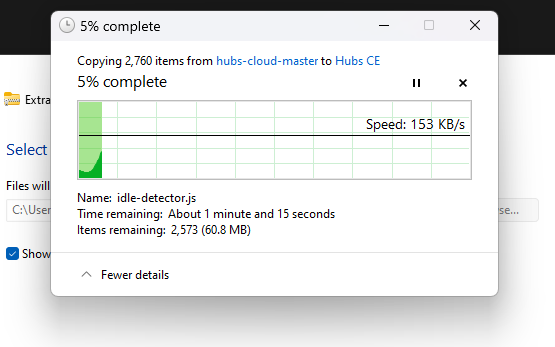
Tip 💡 After the extraction, there is one folder called hubs-cloud-master.

h. At ‘hubs-cloud-master’ folder that you downloaded, right-click on the ‘hubs-cloud-master’ folder. You might need to select ‘Show more options’ first then select ‘Open with Code’.

i. Visual Studio Code will open. Select ‘Yes, I trust the authors’.
💡 Tip: Ignore any other notifications from VS Code by closing the notification box.

Section 2 Connect DO
10. Generate DO API token
You need to get a ‘password’ in the form of an API Token from DO so that your modified Hubs code can be accepted by DO. You’ll insert that token into doctl so that DigitalOcean can understand it.
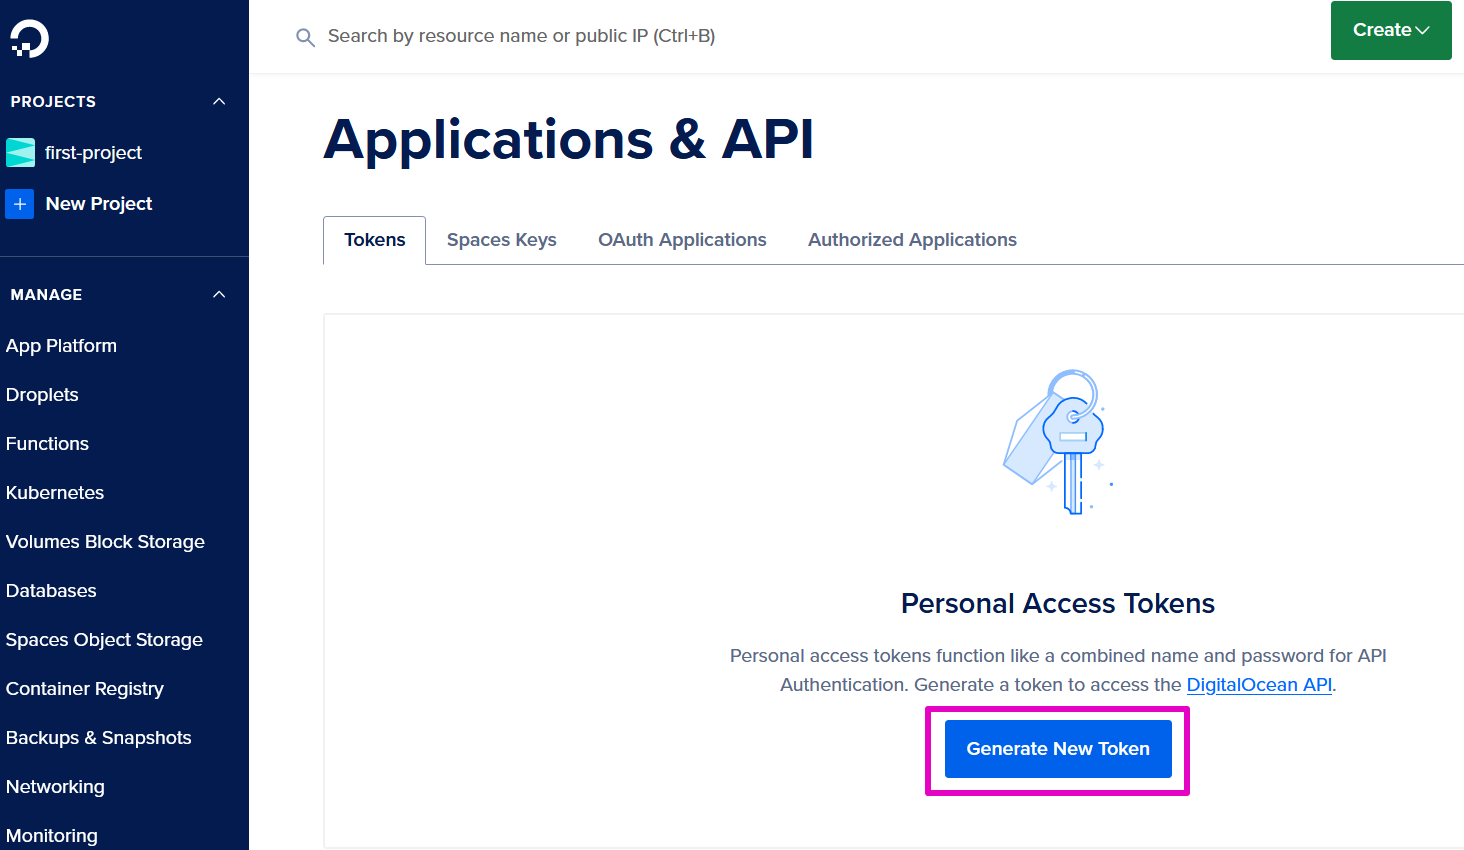
a. Go to DigitalOcean. From the same sidebar where MANAGE is, go to the 4th menu section that has Billing, Support, Settings, API. Select API.
💡 Tip: We found that you can API via your Tab button.

b. Select Generate New Token.
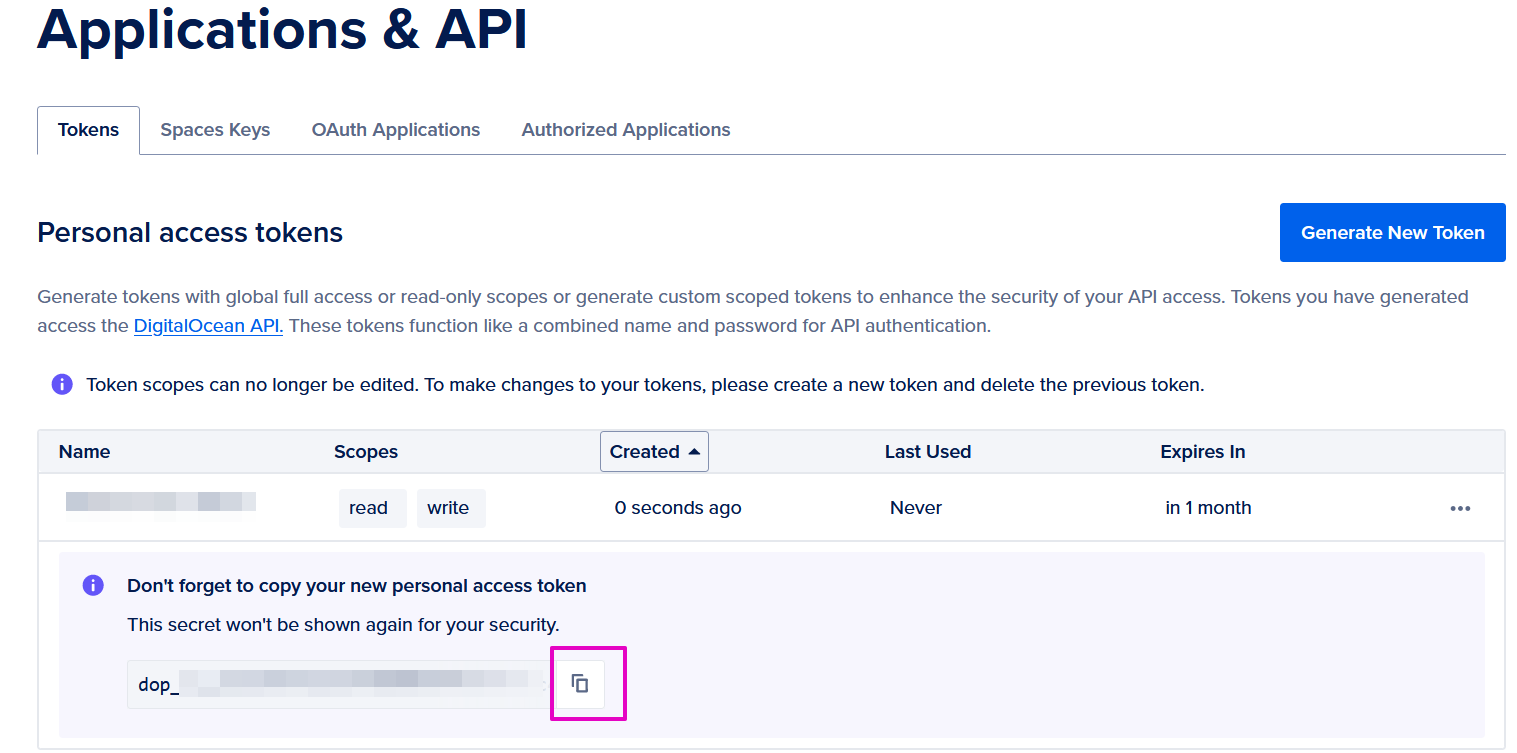
c. Token Name: This can be any text. The name will appear with dashes. For example: My-First-Token.
d. Expiration: Select no expire.
e. Scopes: Select Full Access.
f. Select Generate Token.


g. Copy and save your Token somewhere securely. If you ever change computers to control your Hubs, you’ll either need this Token or you’ll need to generate a new Token.
11. Authenticate doctl
a. Copy and paste or type the following text into the terminal window of VS Code, changing <NAME> to any generic name (e.g. MyHubsCE) and hit enter on your keyboard. No need to keep the less than or greater than symbols: < >
doctl auth init --context <NAME>
For example: doctl auth init --context MyHubsCE

b. The terminal will prompt > Enter your access token: Paste in the DO API token. Hit enter on your keyboard.
☑️ Check mark means success!

c. Then type or paste this line, putting the name you used from Step 13a above for <NAME>
doctl auth switch --context <NAME> *Make sure you type two dashes just before the text ‘context’
For example doctl auth switch --context MyHubsCE

d. Return to DO, go to your Kubernetes cluster. You’ve already done step 1 so now go to step 2 called ‘Connecting to Kubernetes’.
e. Copy the code presented in the Automated (recommended) tab and paste it into your Terminal window and hit enter on your keyboard.
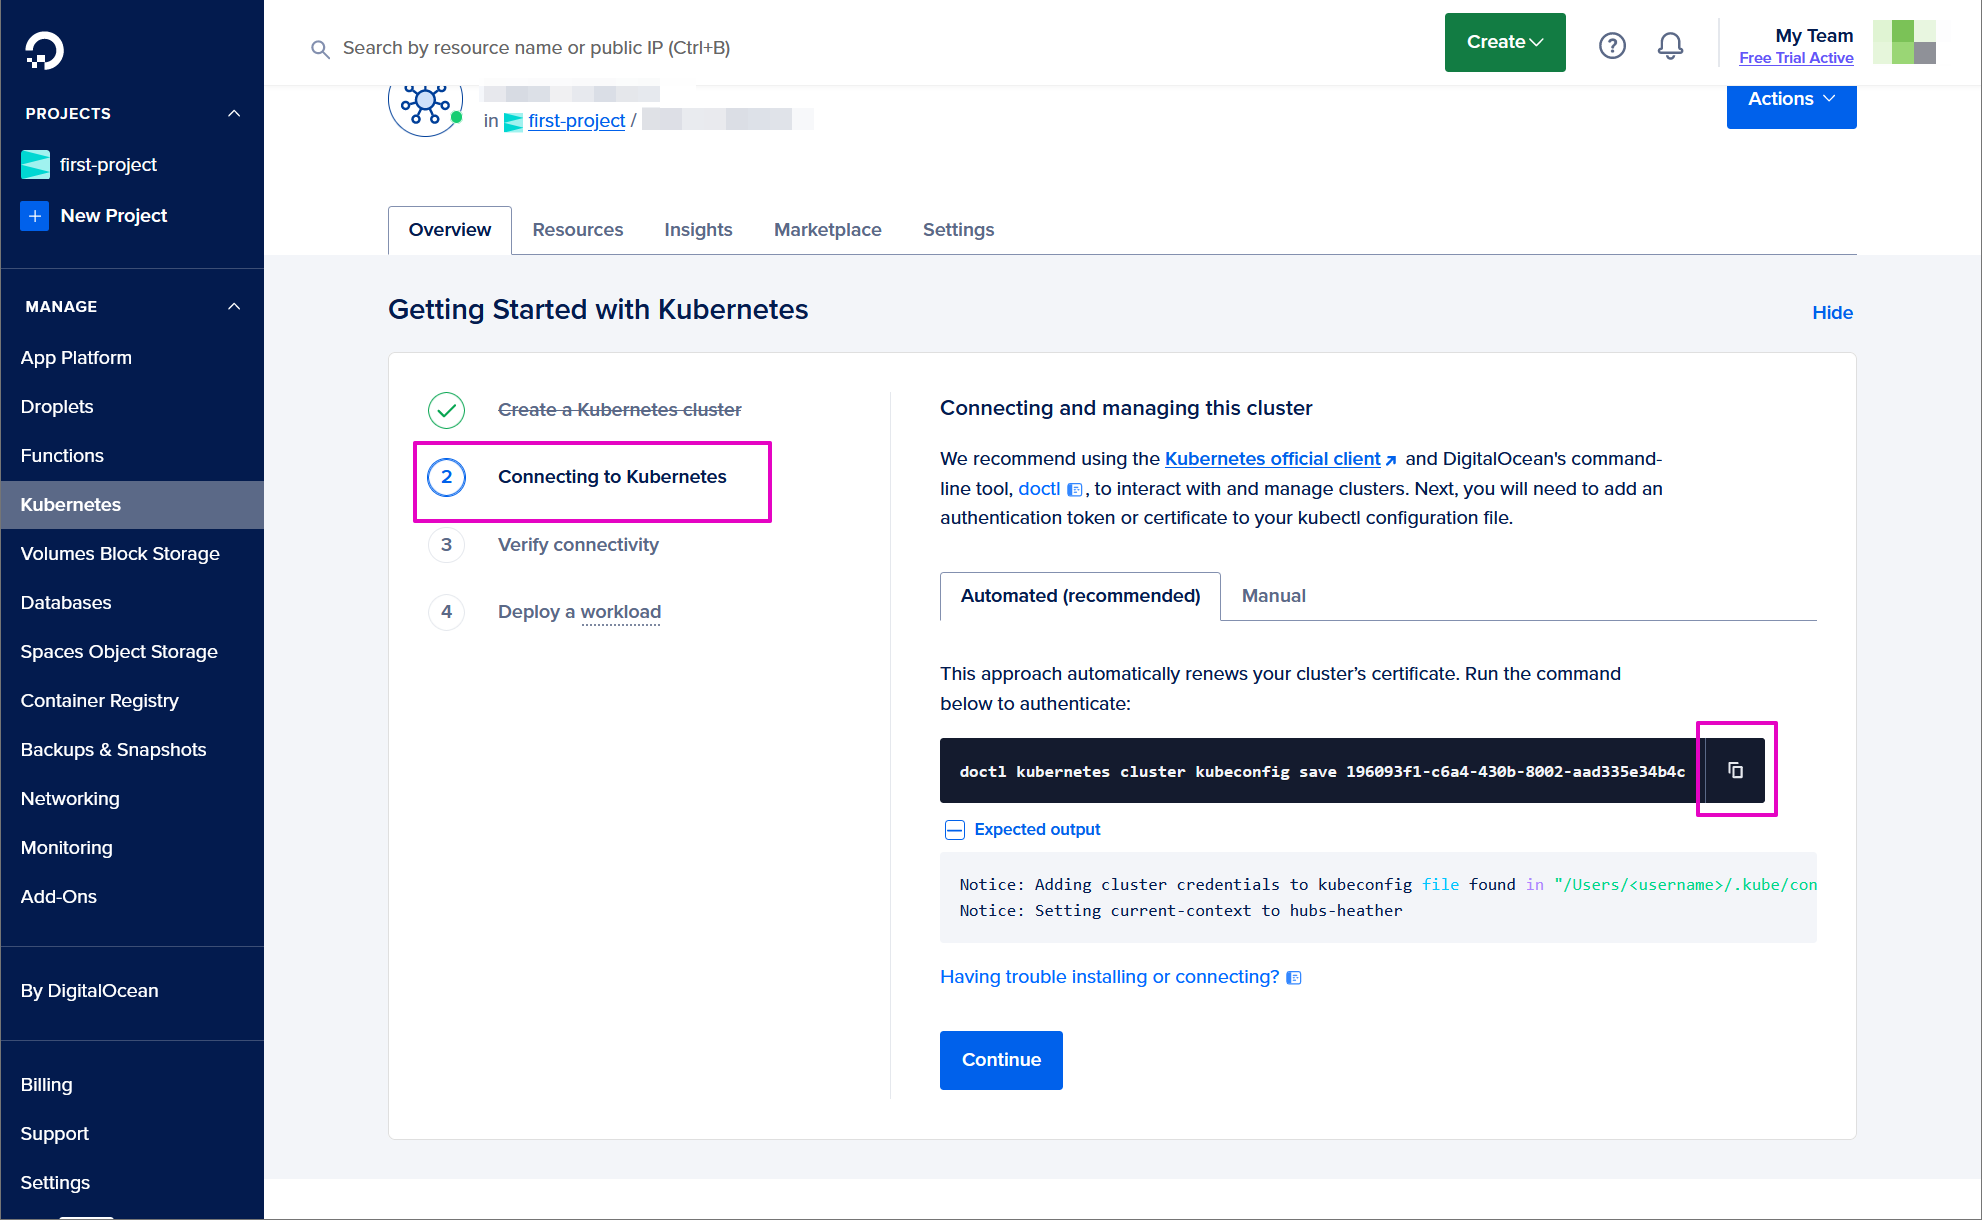
Results:

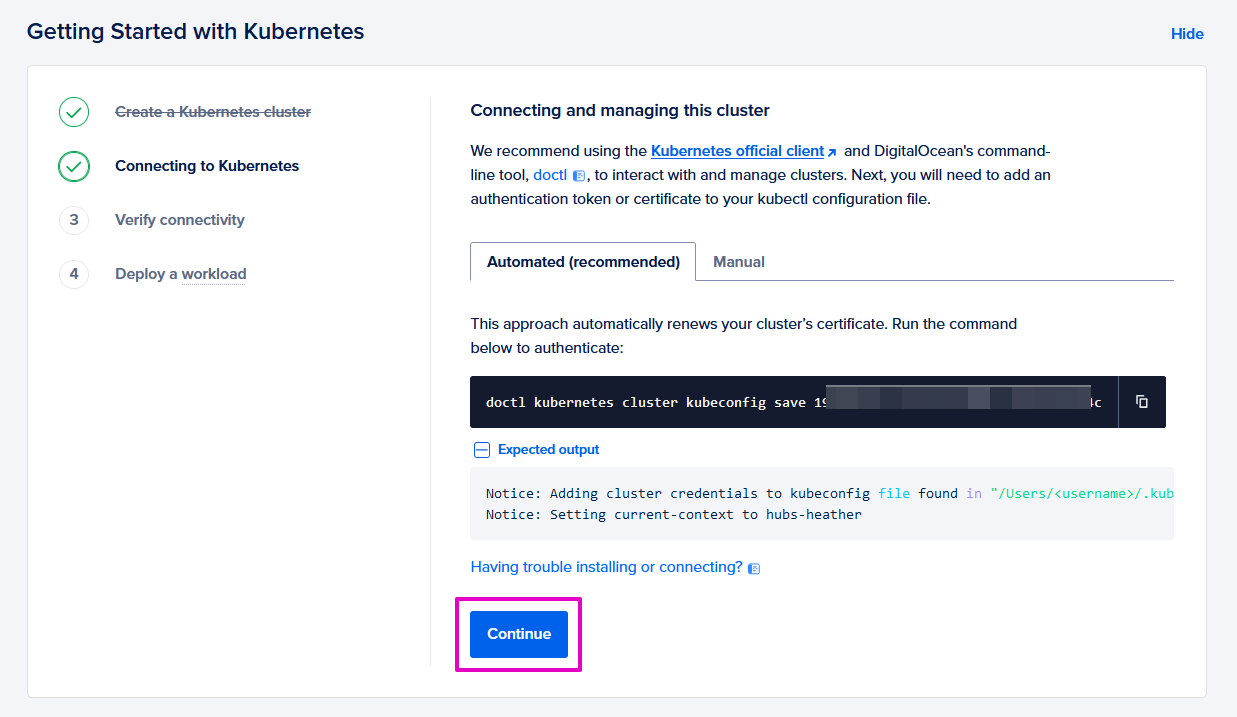
f. Select Continue.
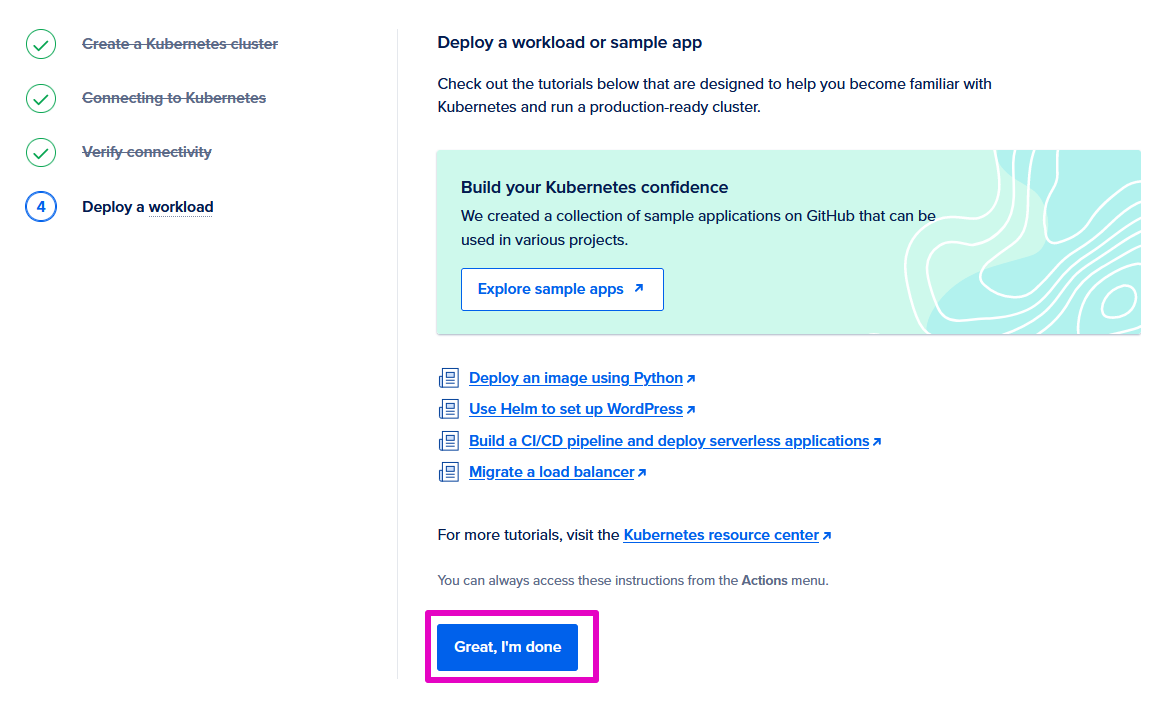
g. Skip DO’s Step 3 called Verify Connectivity, select Continue.
h. Skip DO’s Step 4 called Deploy a workload, select Great, I’m done.
Section 3 Upload your Hubs
12. Generate your config file
Here is where you are going to change your Hubs code so that all of the accounts and parts work under your authority (passwords, tokens, etc.).
a. In VS Code, at HUBS-CLOUD-MASTER, select community-edition.

b. Select input-values.yaml We will be working lines 1-21.
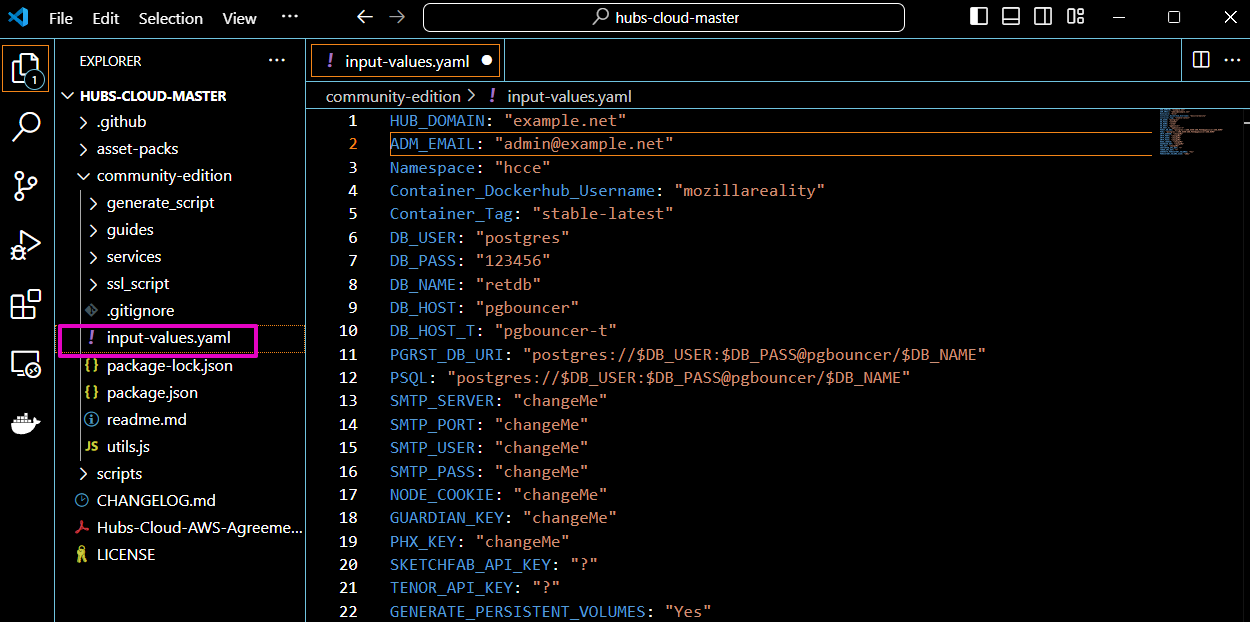
c. Enter these values as described below. Warning: Only change the lines that you are instructed to change. Do not change any line that you do not know what it does. In all cases, make sure your entry is between the quote marks (“) in VS Code with no extra spaces.
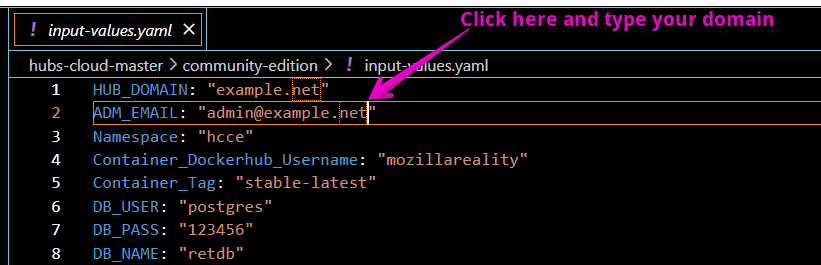
i. For HUB_DOMAIN: your domain purchased from Porkbun
ii. For ADM_EMAIL: Your real, private account.
🤔 Advice: This email account becomes the Admin of everything so choose the email you can reliably get into.
iii. For Namespace: ”hcce’” ⬅ Leave that
iv. For the SMTP_SERVER and the following SMTP lines, retrieve your Scaleway Host, Port, Username, and Secret Key entries that you saved from Step 6.
a. Server -> SMTP_SERVER: paste in the server you saved from Step 6 Set up SMTP email service, Part 4, Step 24a.
b. Port -> SMTP_PORT: enter 2587
c. Username -> SMTP_USER: paste in the Username you saved from Step 6, Set up SMTP email service Part 4, Step 24d.
d. Password -> SMTP_PASS: paste in the Secret Key you saved from Step 6 Set up SMTP email, Part 4, Step 37.
💡 Tip: Make sure you are using your Scaleway Username and Secret Key, not your Access Key ID.
d. For SKETCHFAB_API_KEY: ”?”
Get your API from your Sketchfab account. Wait, doesn’t this link your Sketchfab account to any use in your Hub? No, this API key allows access to Sketchfab, it doesn’t connect with any value to your personal Sketchfab account. Why are you doing this?
🤔 Advice: Sketchfab linkage is one of the most fun aspects of Hubs. You and your users will enjoy this feature.
i. Log into Sketchfab. Select your profile icon in the upper right corner. Select ‘Settings’.
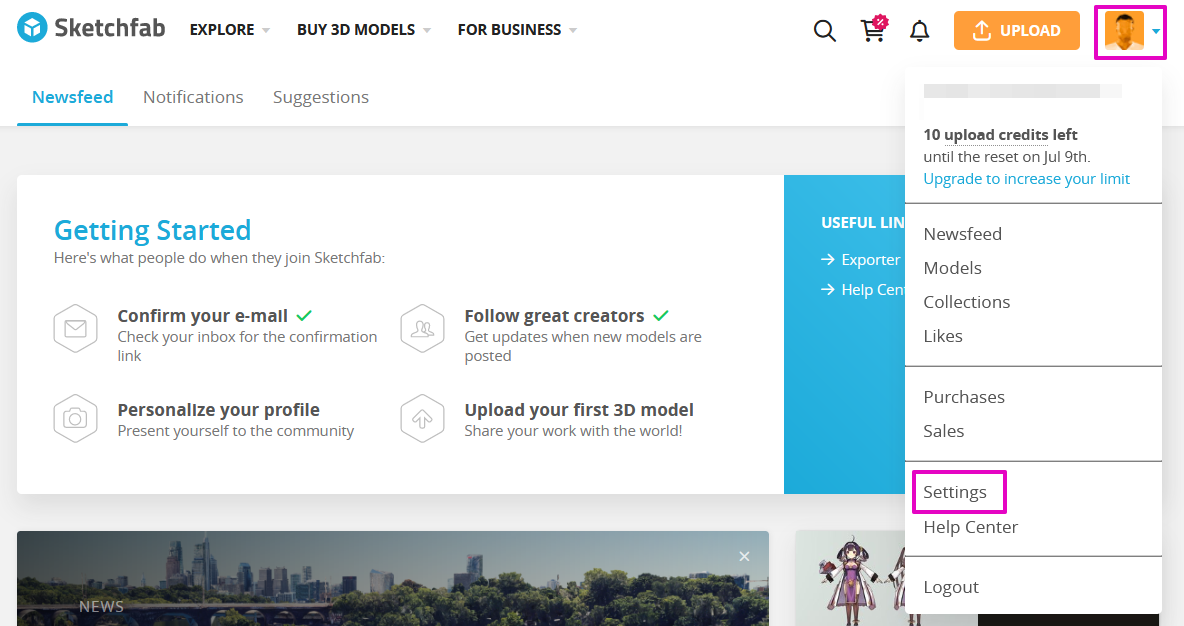
ii. Select Password & API. Copy the Token and paste it between the quotation marks, replacing the question mark.

e. Change NODE_COOKIE, GUARDIAN_KEY, & PHX_KEY to unique random values, using a password generator if you have one handy.
f. For now, leave all of the other fields unchanged. Here is an example, filled in:
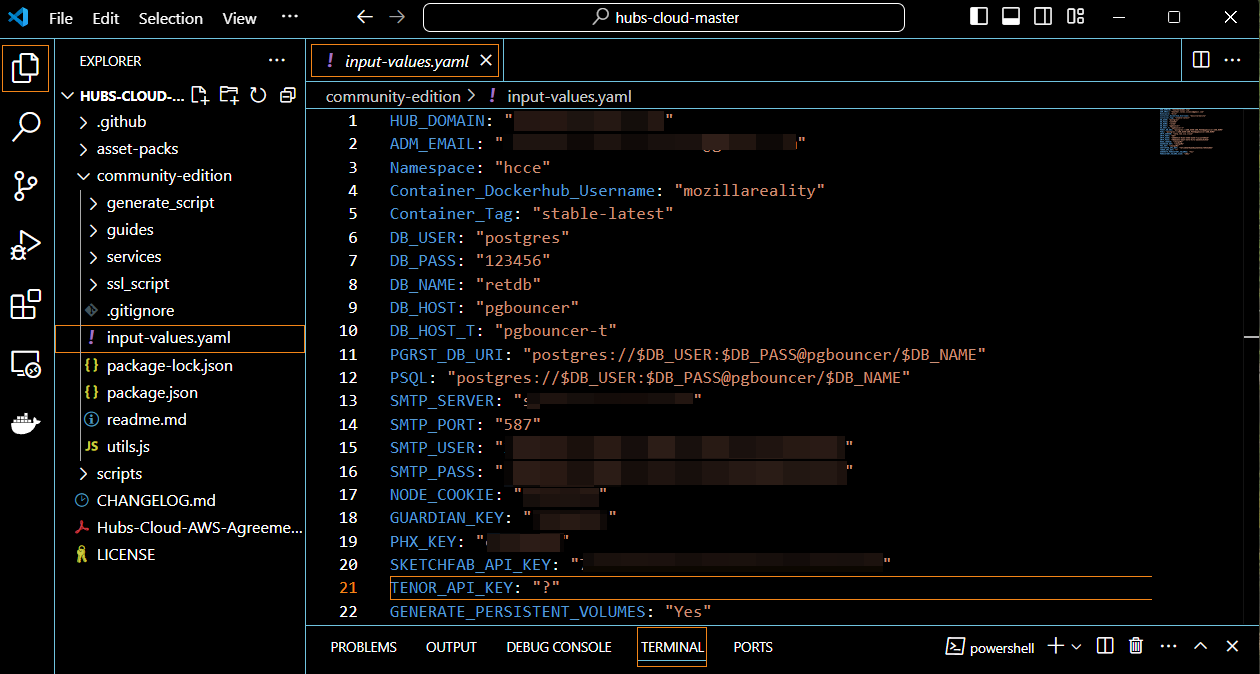
g. In VS Code, select File, Save. This will keep all of the changes you just made.

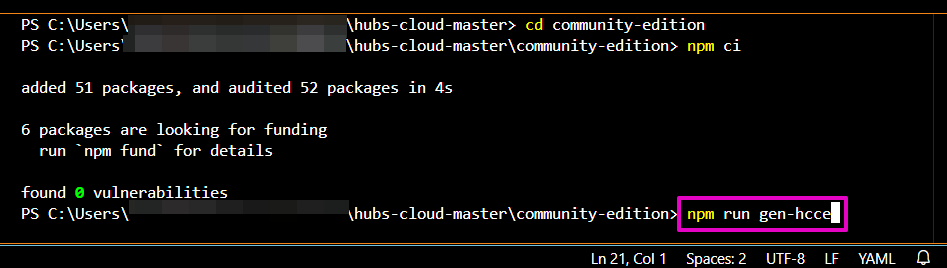
h. To be sure you are in your community-edition directory, copy and paste this into the terminal and hit enter:
cd community-edition

i. To install all of the dependencies for the generation commands we will run, copy and paste the following text and hit enter on your keyboard (you will only need to do this once, the first time):
npm ci

j. To generate your Kubernetes config file for DO, copy and paste the following text and hit enter on your keyboard:
npm run gen-hcce
13. Using Kubectl to deploy to DigitalOcean
Now it is time to upload your custom hcce.yaml file to DigitalOcean.
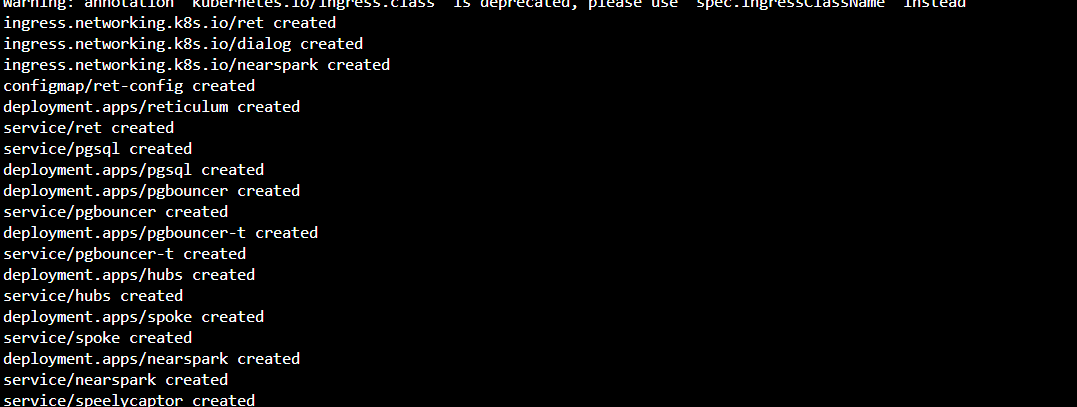
a. Now we need to apply your changes to Kubernetes on DO. Copy and paste this into the terminal and hit enter on your keyboard:
kubectl apply -f hcce.yaml
It will take a few seconds. Ongoing results look like this:
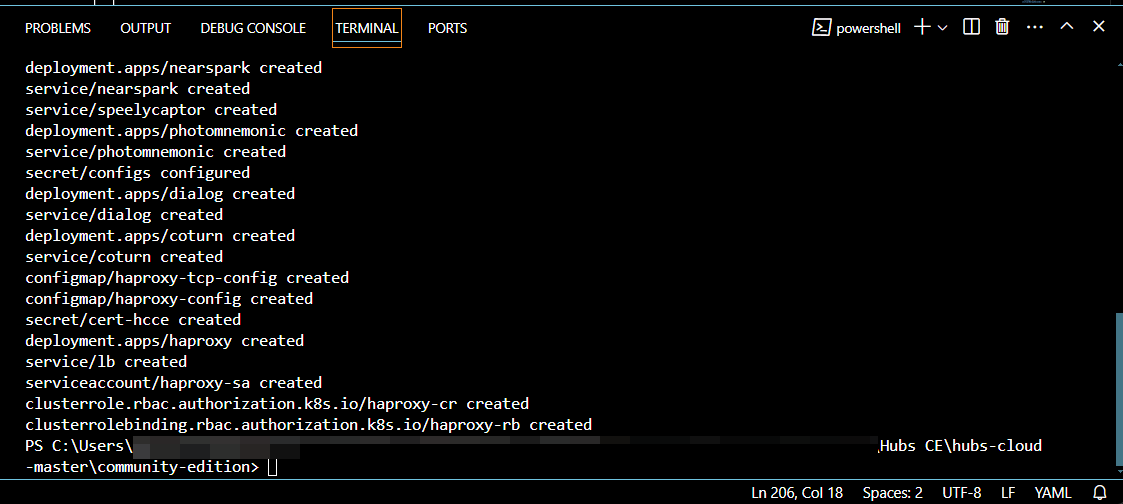
Final result looks like this:
b. Copy and paste this into the terminal and hit enter on your keyboard:
kubectl get deployment -n hcce
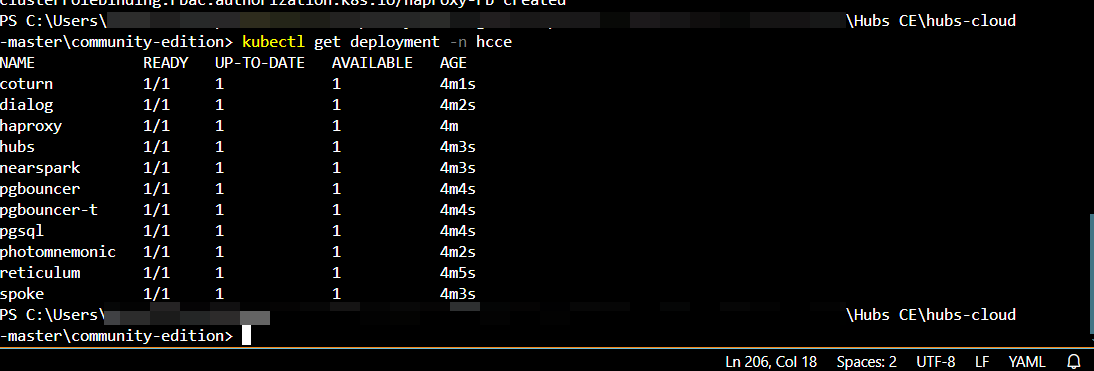
💡 Tip: It will take time for everything to be up and running, typically around 70-90 seconds.
Ensure that everything shows the value of 1 for READY and UP-TO-DATE.
- If you do have all 1s, go to step f.
- In case you do NOT have all 1s, follow steps c, d, and e below.
c. If you do NOT have all 1s, delete the deployment by copying and pasting this into the terminal and hit enter on your keyboard.
kubectl delete deployment --all --namespace=hcce
d. Redeploy by copying and pasting this into the terminal and hit enter on your keyboard. (This is a repeat of Step 14a: you have deleted your prior data and you are re-applying or re-uploading it again.)
kubectl apply -f hcce.yaml
e. Copy and paste this into the terminal and hit enter on your keyboard. (This is a repeat of Step 14b: You are re-checking that all of the Hubs pieces are ready to go)
kubectl get deployment -n hcce
It will take time for everything to be up and running, typically around 70-90 seconds.
Ensure that everything shows the value of 1 for READY and UP-TO-DATE.
💡 Tip: Further errors? See our FAQs or ask for help in Discord.
f. After your Kubernetes server is up, it will take a few more minutes for DO to set up your load balancer. (In our testing, it was quick; we continued with these steps.) Then, you need to point your domains to the IP address of the load balancer.
Copy and paste this into the terminal and hit enter:
kubectl -n hcce get svc lb
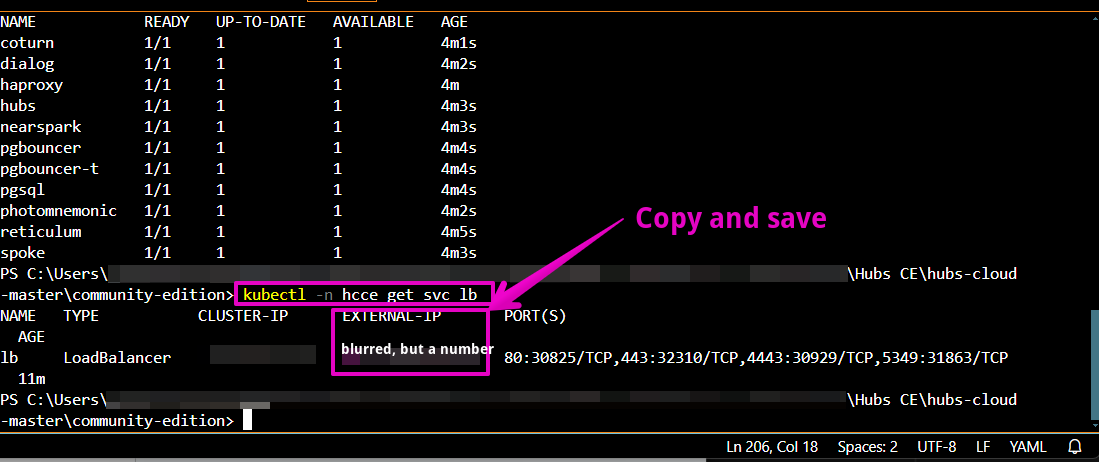
g. For EXTERNAL-IP, copy and save the number string in the Terminal window
h. ☑️ Extra instructions to check that your SMTP email is working.
🤔 Advice: Never share your config file with anyone.
Congratulations!! If you have got your external IP, you have your Hubs running on a DigitalOcean Kubernetes cluster. Next, we will work on accessing it!
14. Add new A records
This step will be very similar to Step 6, Part 3. You will add 4 more new A records. You will copy from your terminal and paste into Porkbun.
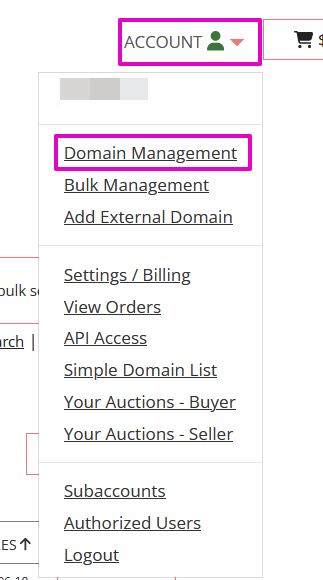
a. Log in to Porkbun.
b. Select Account, select Domain Management.
c. Select Details, select DNS Records.

d. Back in Step 6, we asked you to delete any records with the text pixie in them that appear by default. If you didn’t do that OR the pixie records have re-appeared, delete any existing A records that you didn’t create. You will create additional new A records in this step.

e. You are adding 4 new ‘A records’ using that EXTERNAL-IP that you saved; one each for these 4 types
- @
- assets
- cors
- stream
f. For Type: Select A - Address record
g. For Host: enter one of each of the A record types: @, assets, cors, or stream
- Note: in our testing, we found that Porkbun deletes the “@” as Host after we clicked Add. Do not be dismayed. We think it’s fine.
h. Answer: paste the external IP that you saved from Step 13, g.
i. Notes: Optional
j. Select Add.
- Example of cors:

- Results:

k. Check that your SSL certificates are missing. At this point, they should be. Go to your Hubs domain address (the full website address you purchased in Step 4). You should receive a warning that says something like Warning: Potential Security Risk Ahead. This is normal.
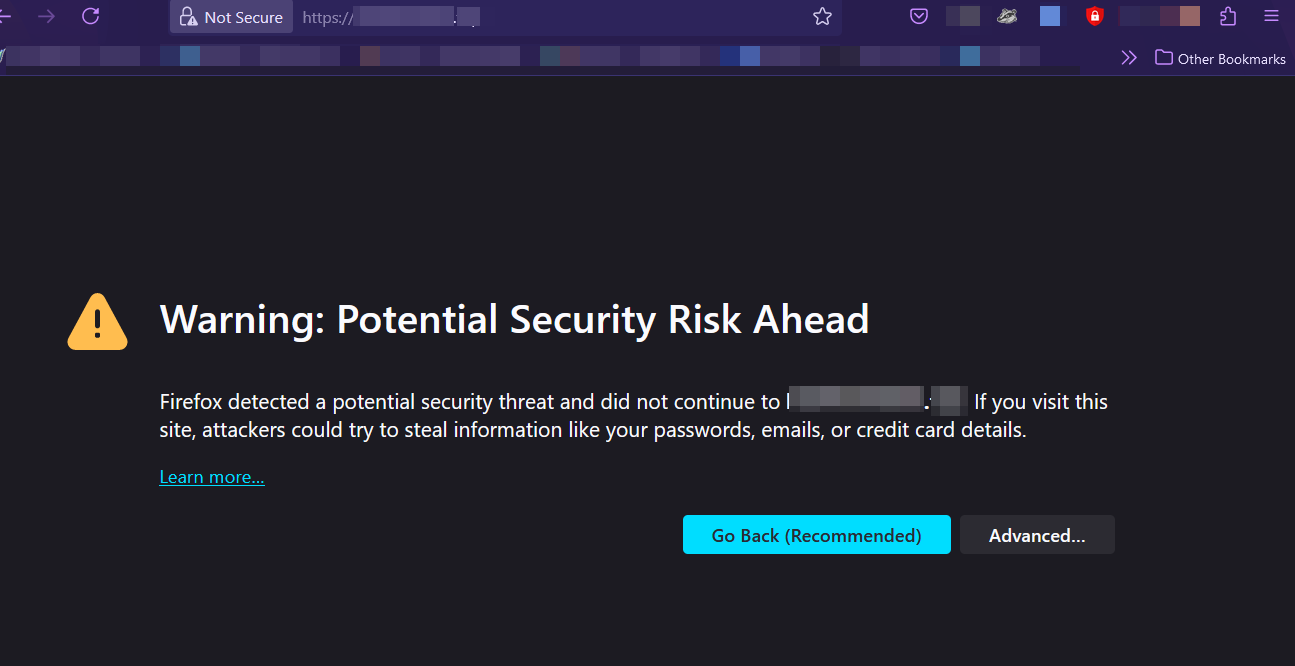
l. If you go ahead to the site by selecting Advanced… (in this Firefox example), the word admin will be in the address bar and the screen will be blank (or white)
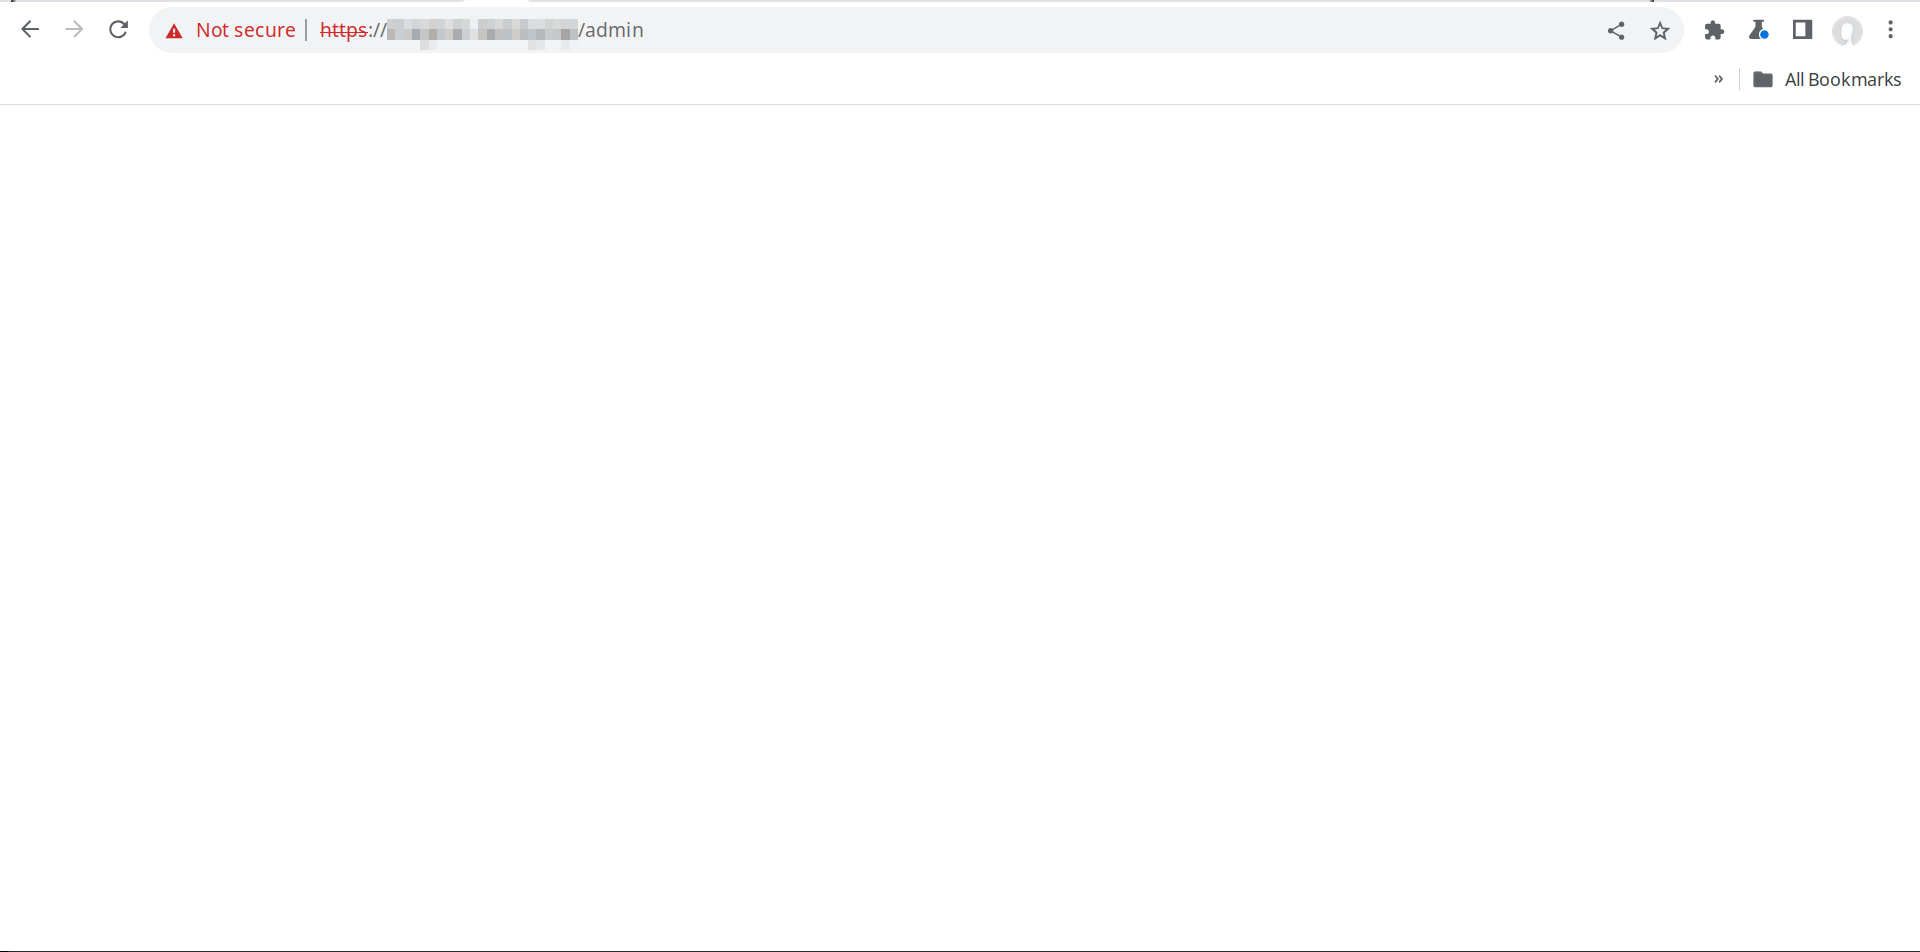
In the next Step, you’ll generate the proper security certificates.
15. Generate certificates
These steps add SSL certificates to your domain so that your admin log-in adds security certificates to the domain and thus everyone else will not receive security warnings.
🤔 Note: Your SSL certificates expire every 90 days. Don’t worry. We’ve got instructions for you when that happens.
a. Return to VS Code.
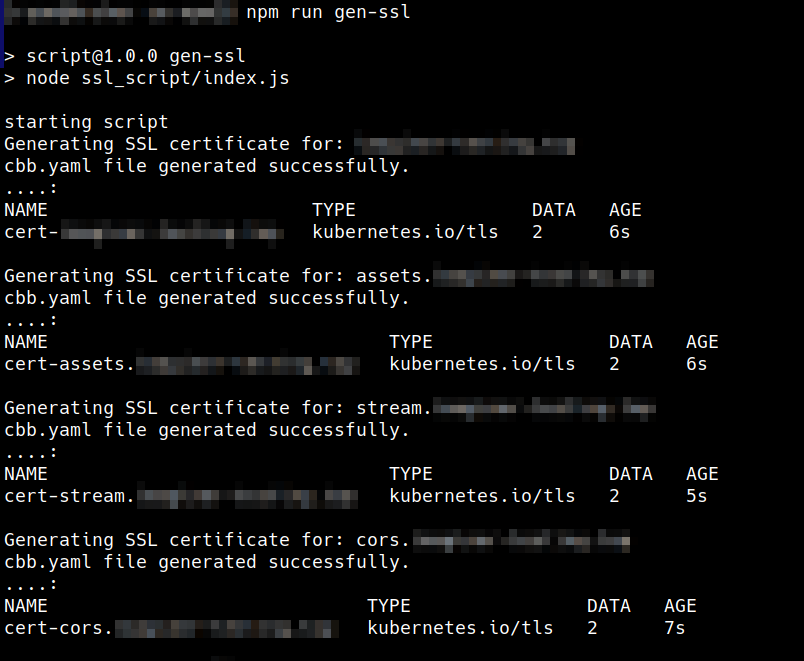
b. Copy and paste this into the terminal and hit enter on your keyboard:
npm run gen-ssl
💡 Tip: It will take time for everything to be up and running, it might take ~5 minutes. Dots may appear, this is normal. This capture below shows the end of the generating certificates process.
c. In VS Code, select hcce.yaml

d. Select Control + F on your keyboard and search for this text: default-ssl-certificate.
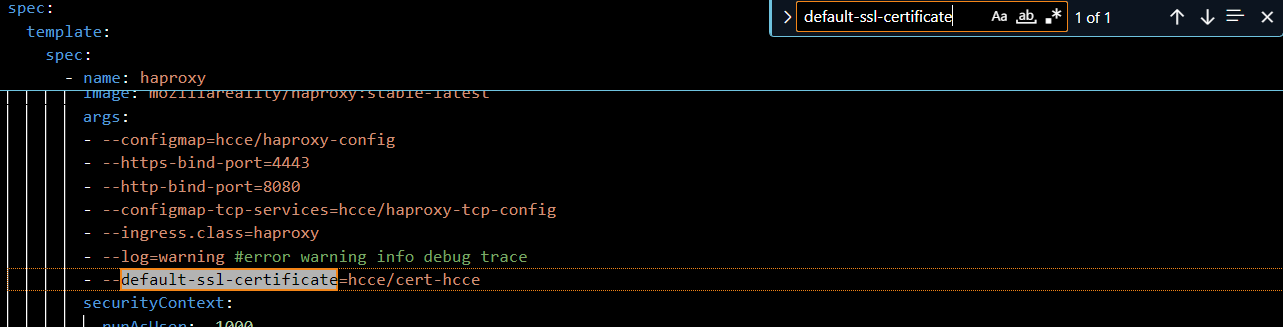
e. Enter a # (number sign) at the beginning of the text line, to the left of the dashes. It will be correct if the line changes color; this means the line has been disabled.

f. Select File, Save. This will keep all of the changes you just made.
g. Now we need to apply your changes to Kubernetes on DO. Copy and paste this into the terminal and hit enter on your keyboard (this is similar to Step 13, d.)
kubectl apply -f hcce.yaml
h. After it's complete, your instance is running successfully. Go to your Hubs domain address (the full website address you purchased in Step 4). You should not see the Warning that you saw in Step 14, k. Enter your admin email. Select Next.
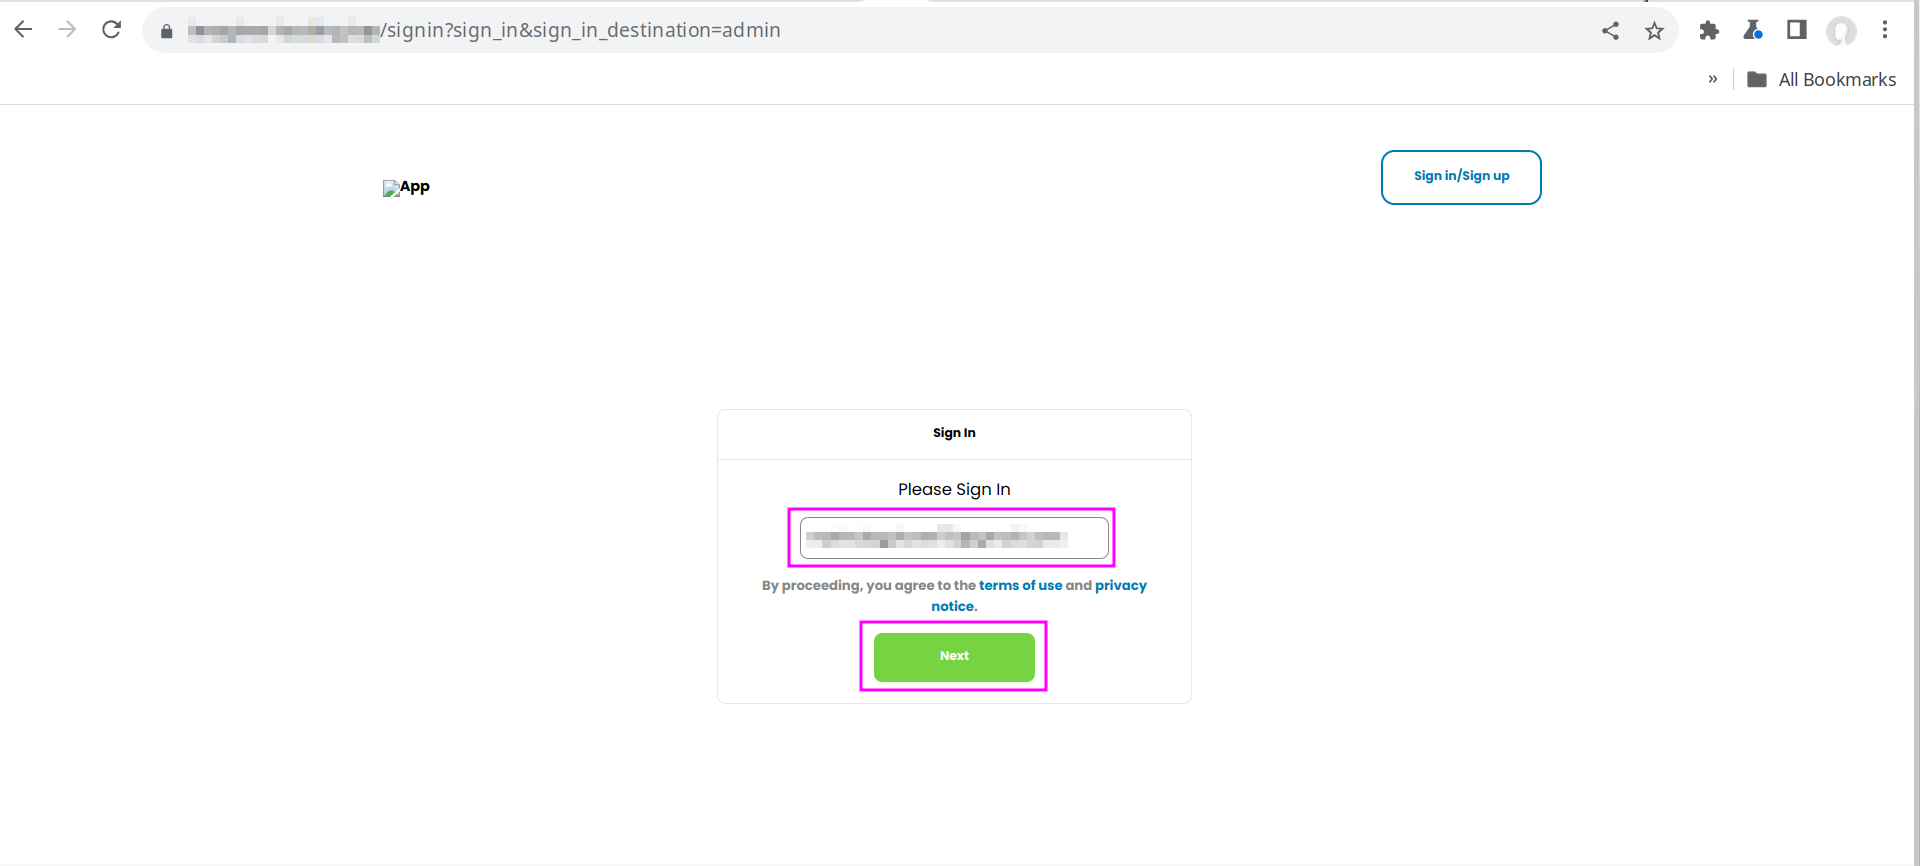
i. Check your email inbox. You should receive the magic link email. Select the magic link. Go back to your Hubs domain address. It should look like this:
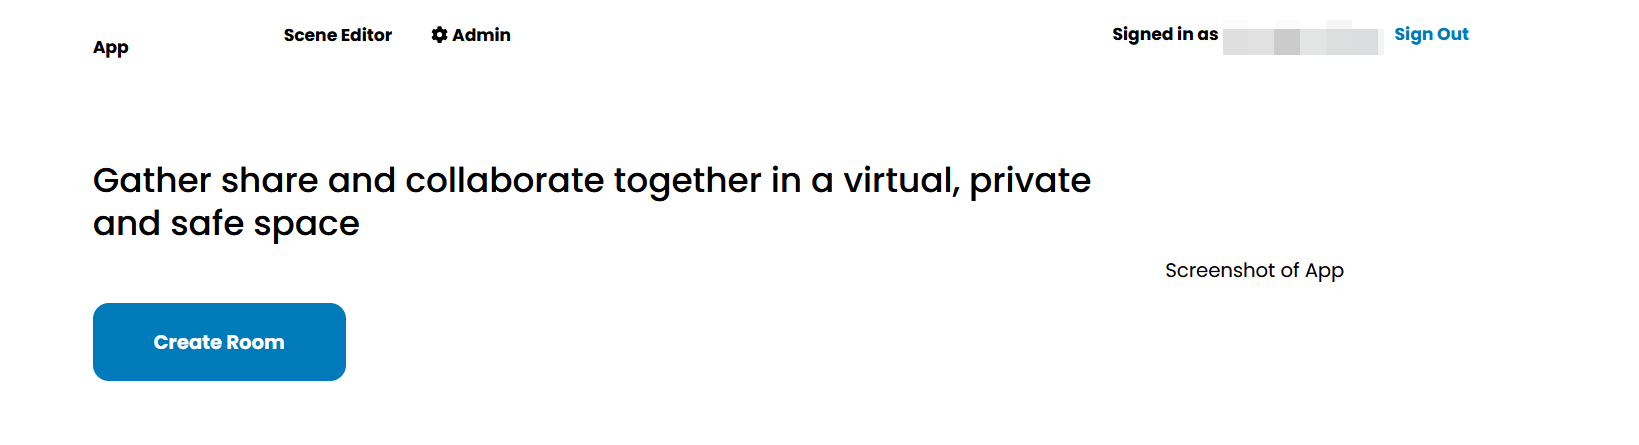
j. You should be able to now test your Hubs. Select Create Room. At this point your room may just be a dark horizon but it works!

Section 4 Kick the tires and light the fires
16. Create Firewall
Now you have to whitelist a few ports so that the voice chat and screen share/video share work properly.
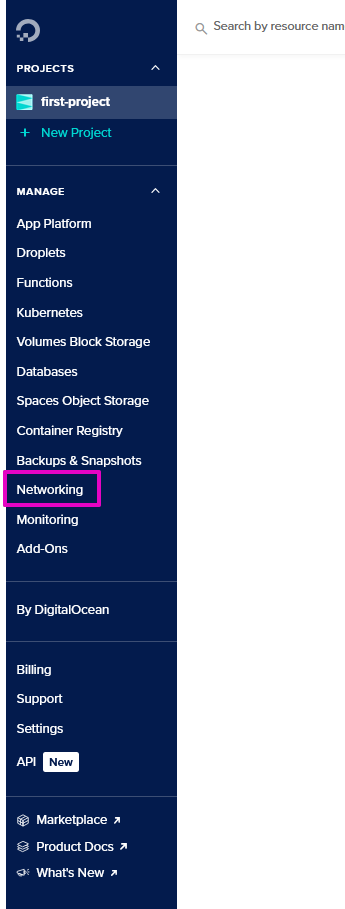
a. At DigitalOcean, select Networking.
b. At Networking, select the Firewalls tab.
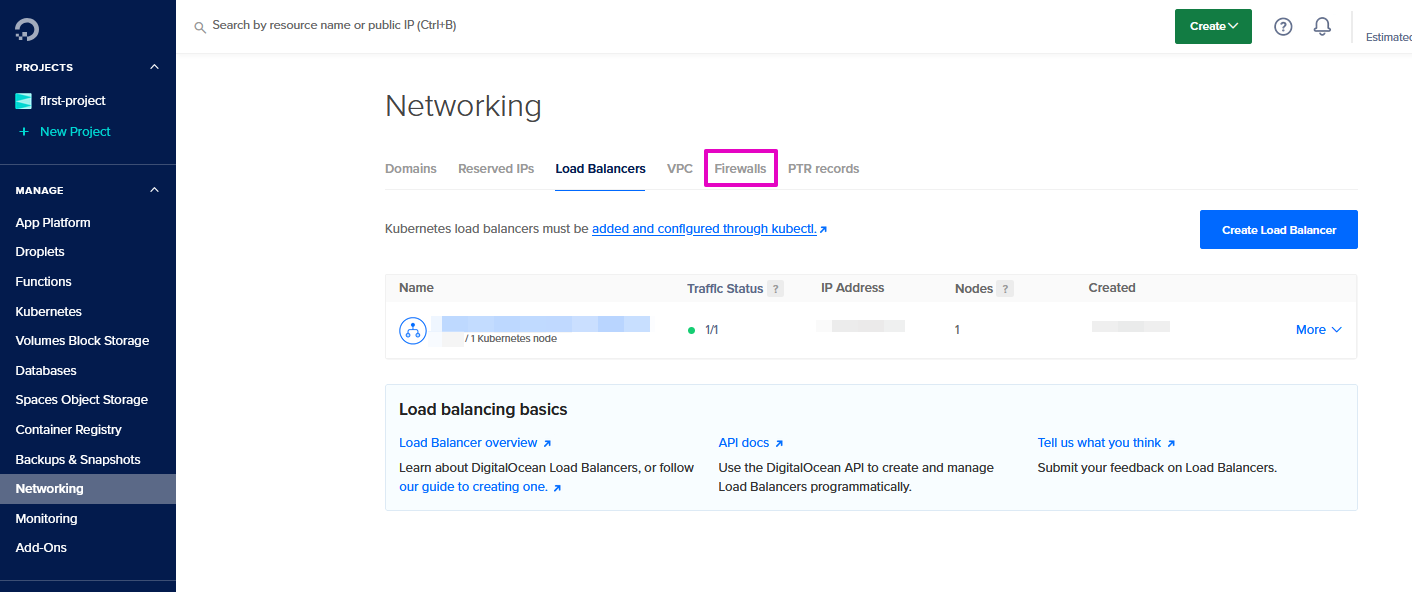 c. Do not be concerned if you see a Firewall already there. That is the default created by DO. Select Create Firewall.

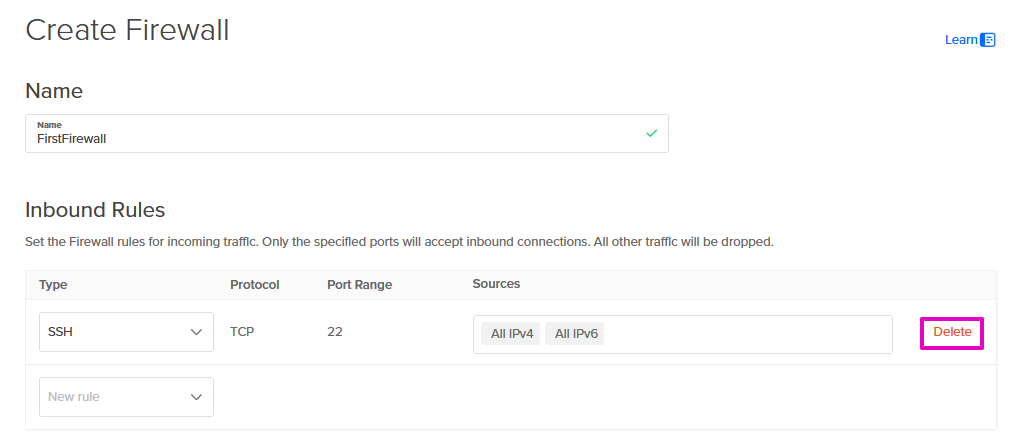
d. At Create Firewall, Name, enter a firewall name (no dashes allowed in the name).
🤔 Advice: We used FirstFirewall.

e. For Inbound Rules, delete the SSH rule that comes predefined by selecting Delete.
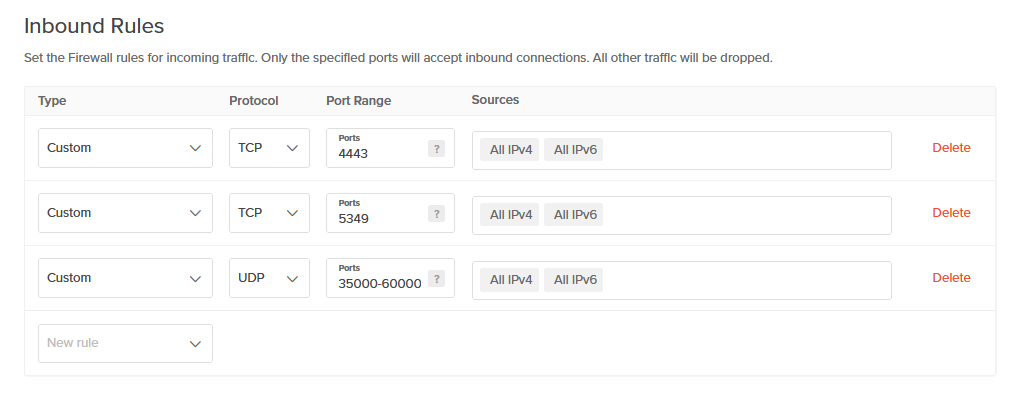
f. Create three (3) new Inbound Rules. These will whitelist these ports for Hubs to use them.
i. First rule
- For Type, select Custom.
- For Protocol: select TCP
- For Port Range: enter 4443
- For Sources: leave as default (All IPv4 and AllIPv6)
- Select New rule to start the next entry.
ii. Second rule
- For Type, select Custom.
- For Protocol: select TCP
- For Port Range: enter 5349
- For Sources: leave as default (All IPv4 and AllIPv6)
- Select New rule to start the next entry.
iii. Third rule
- For Type, select Custom.
- For Protocol: select UDP
- For Port Range: enter 35000-60000
- For Sources: leave as default (All IPv4 and AllIPv6)
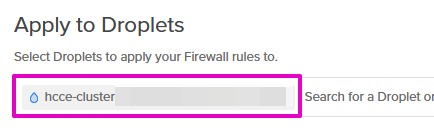
g. At Apply to Droplets, type in the name you entered at Step 5,e. Hint: it probably starts with hcce.
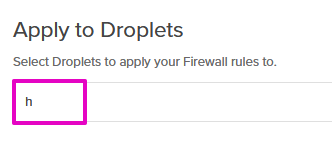
🤔 Advice: we typed h and waited. Your one droplet should appear in the drop down box.
Note: If you have added tags to your cluster, just use that one tag. It's enough for all the nodes and node groups.
h. Select Create Firewall. There will be a notification that the ‘Firewall created successfully’.
i. You may log out of Scaleway, Porkbun, and DigitalOcean. You may close VS Code.
Your Hubs is up!
- Go to your domain and log in.
- Visit What's next? for tips on room settings, importing scenes, and backups.
Got questions?
Sources
- Hrithik Tiwari’s original DigitalOcean instructions.
- [Video] DigitalOcean Quick Start with Hrithik Tiwari - Community Edition Setup Session - April 3, 2024
- Using Sendgrid for SMTP
- [Video] Doctl for Windows installation video
- [Video] Visual Studio code tutorial
- [Video] Config file tutorial from Stan
- Installing WSL in Windows - didn’t use WSL after all
- Username and password advice for Linux - didn’t use after all
- Using SendGrid for SMTP - Tutorial from Fabien
- Brevo How to Authenticate your domain
- Setting up AWS SES
- Community Edition Case Study: Quick Start on Google Cloud with AWS Services