Set up SMTP email service
Hubs software needs to send out emails with magic links to verify that your visitors are real people and *not* sentient AI bots here to destroy humanity. 🤖
If there are emails that need to be sent, there needs to be a controlling entity that does the work of sending the emails around. You will control that email service.
💡Tip: Do not be confused that there are 2 types of email when setting up Hubs.
- Your admin email is the main email account you have been using to set up accounts. It will control your Hubs. To help you, we have tried to refer to your controlling email as your admin email. Your admin email could be hosted nearly anywhere (work email, home email, etc.). We used gmail in our testing.
- This set of instructions (Set up SMTP email service) is about setting up the magic link emails. These are the automatic emails sent via SMTP services when a user tries to log into Hubs.
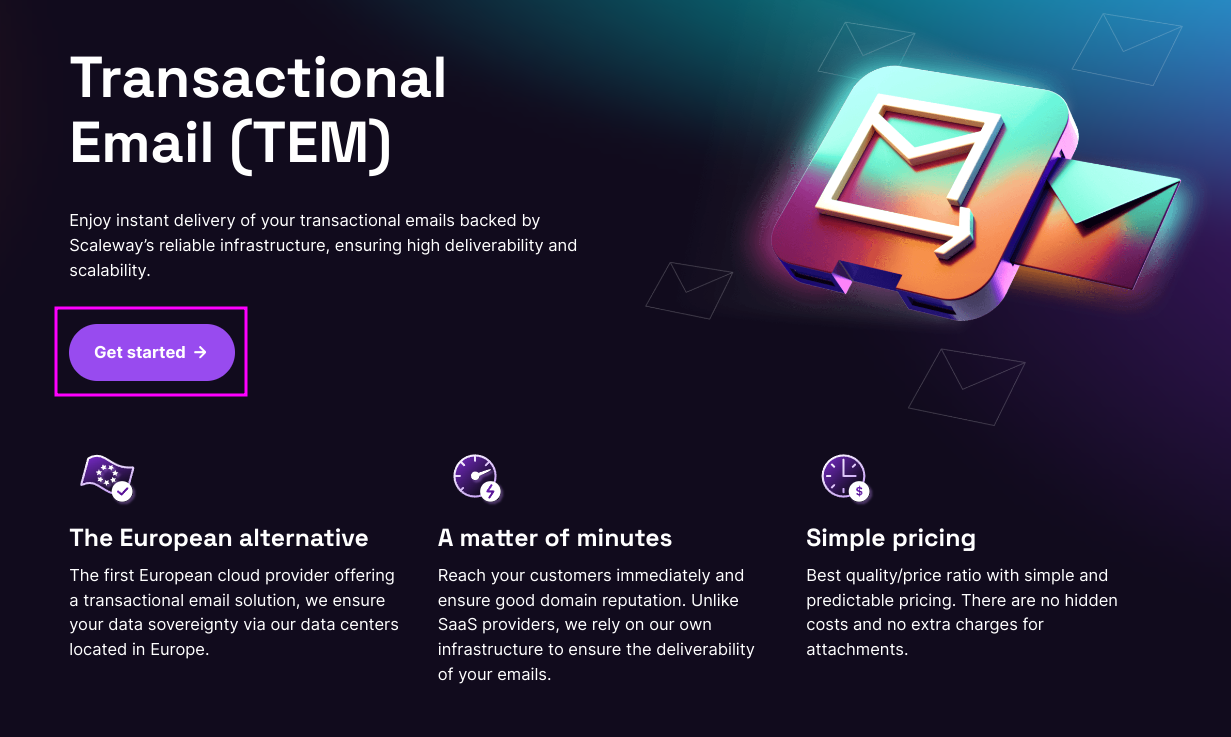
You can pick any email service that provides SMTP. These instructions will use Scaleway.
Scaleway offers a free service for 300 emails maximum per month. (See our FAQs if you need more than 300 emails per month.) We find this reasonable. Additionally, Scaleway is based in France, has a satisfactory Privacy Policy, and has an environmentally-friendly approach.)
Part 1 Set up an account at Scaleway
1. Go to Scaleway. Select Sign up
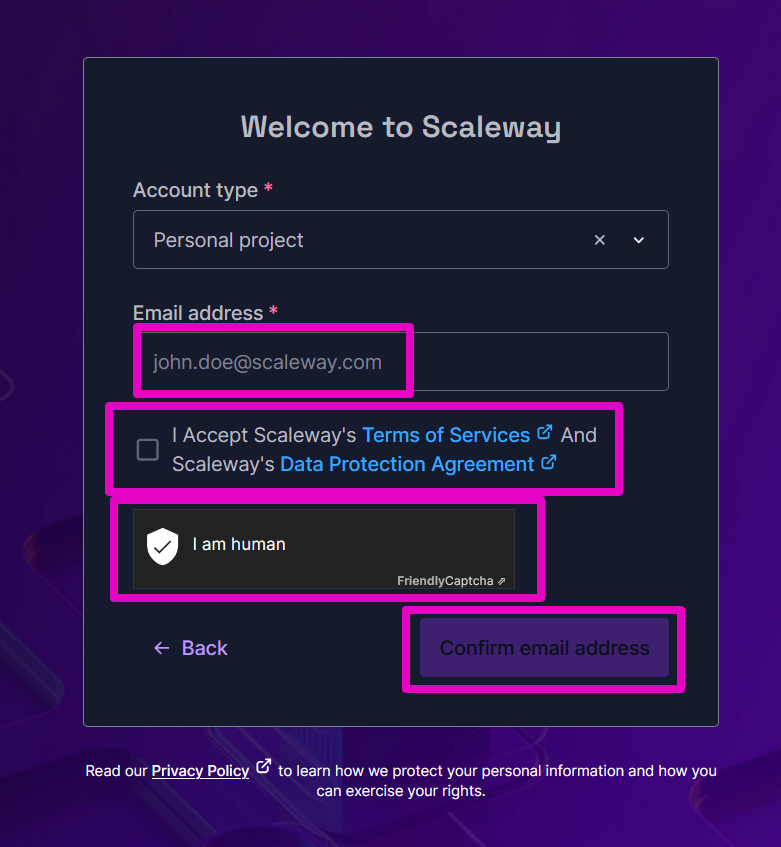
2. At Account type, we recommend Personal project.
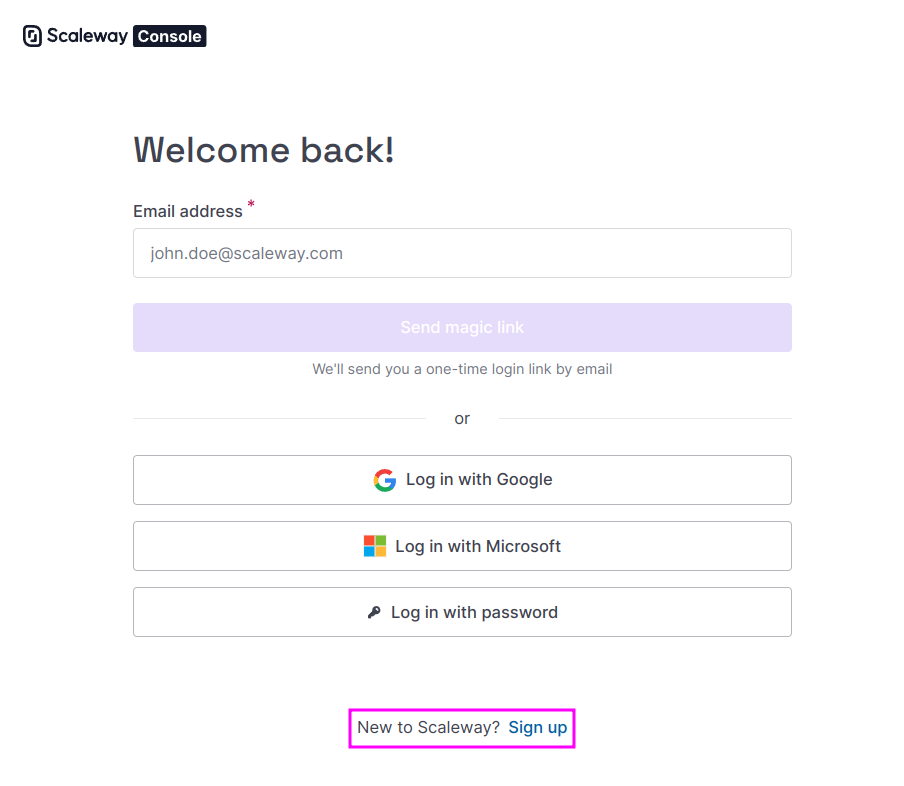
3. Select Sign up with your email.
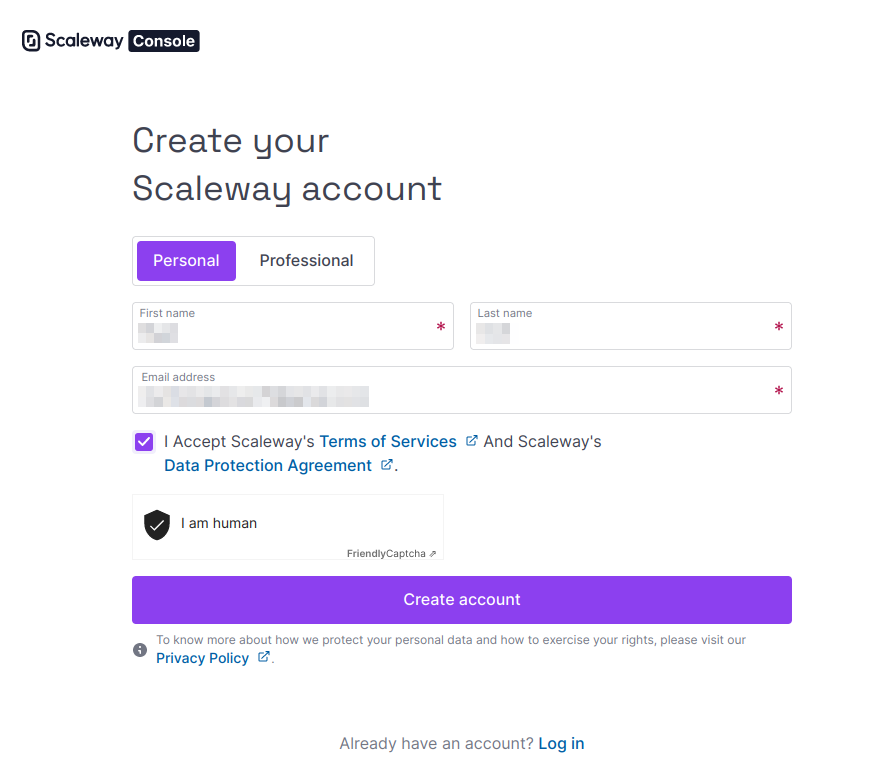
4. Enter your email address. Select I accept Scaleway’s Terms of Services and Scaleway’s Data Protection Agreement. Select Confirm email address.
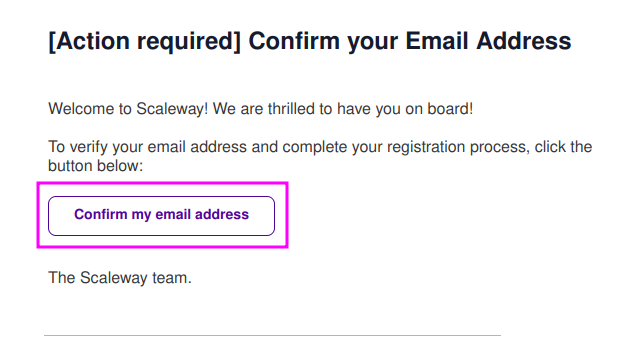
5. Check your email. Within the confirmation email, select Confirm my email address.
Scaleway account registration email:
6. You may close the previous window at Scaleway. In the window that opened from the email confirmation link, you are taken to Personal details, Set up your account. Enter First name, Last name. Select Create account.
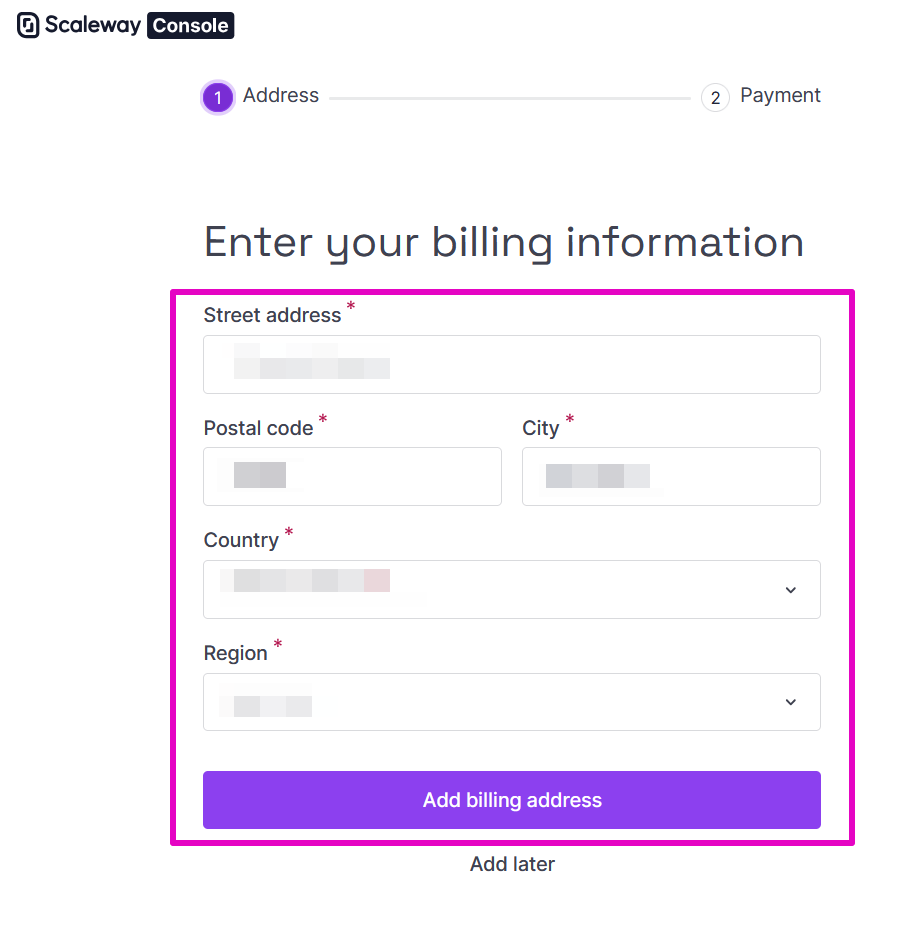
7. At Billing address, enter your billing address, enter your street address, postal code, city. Select your Country, and then select your Region from the drop down menus. and select Add billing address.
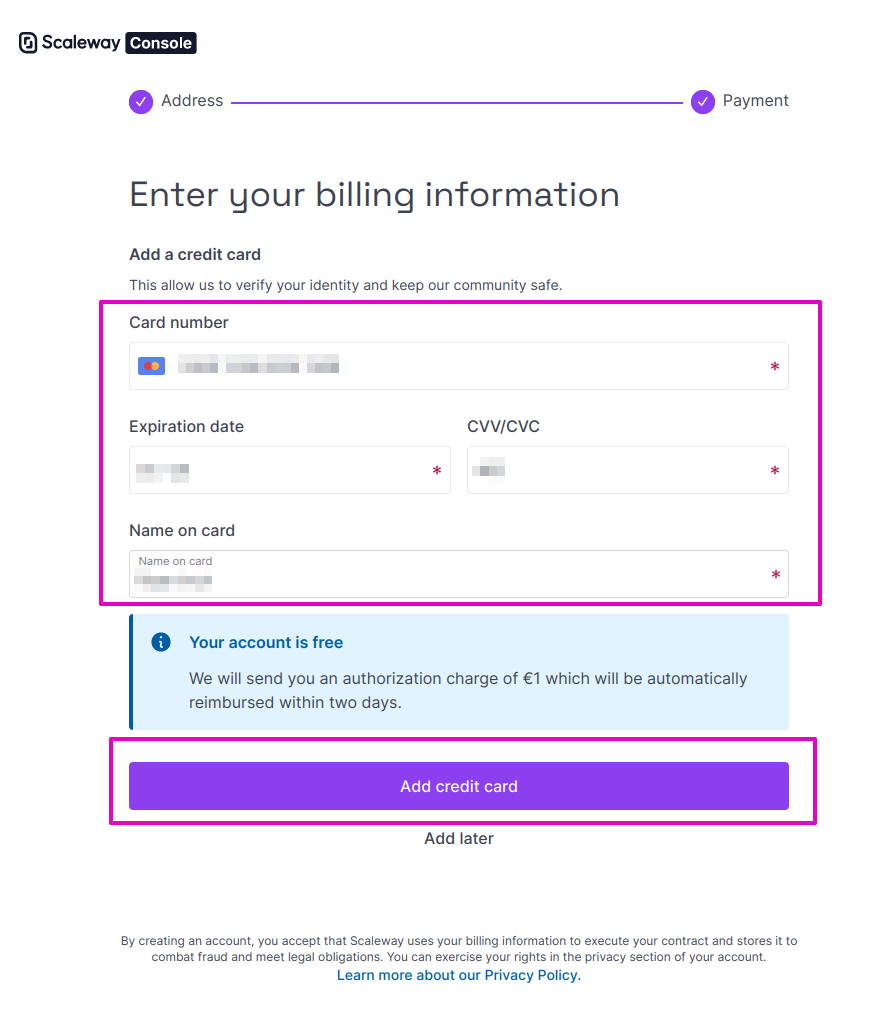
8. To use SMTP services from Scaleway, you must validate a payment method. Scaleway only has a pay by credit card option. For Add your payment method, enter your credit card number, expiration date, CVV or CVC, Name on card, and select Add payment method.
There will be a notification that your account is free, however, Scaleway will charge you a one (1) euro charge that you will need to use to verify the billing connection between Scaleway and your payment source.
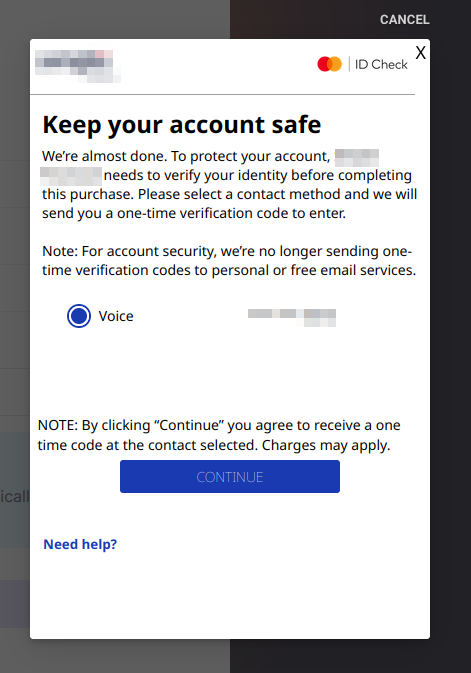
This is an example Mastercard credit card confirmation screen.

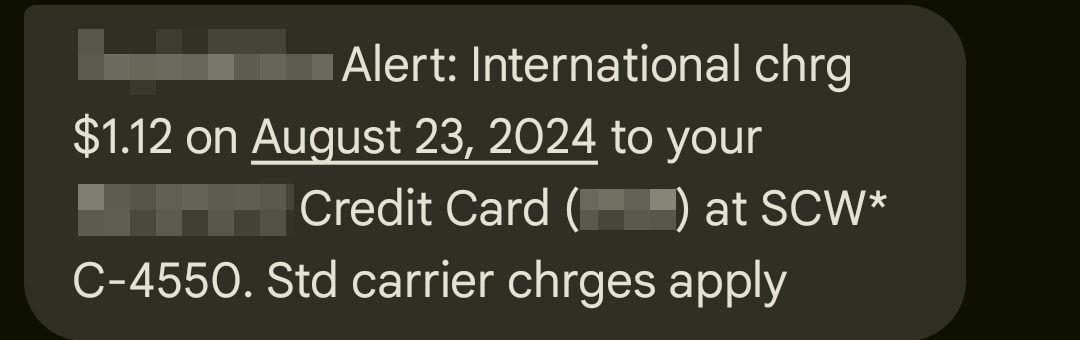
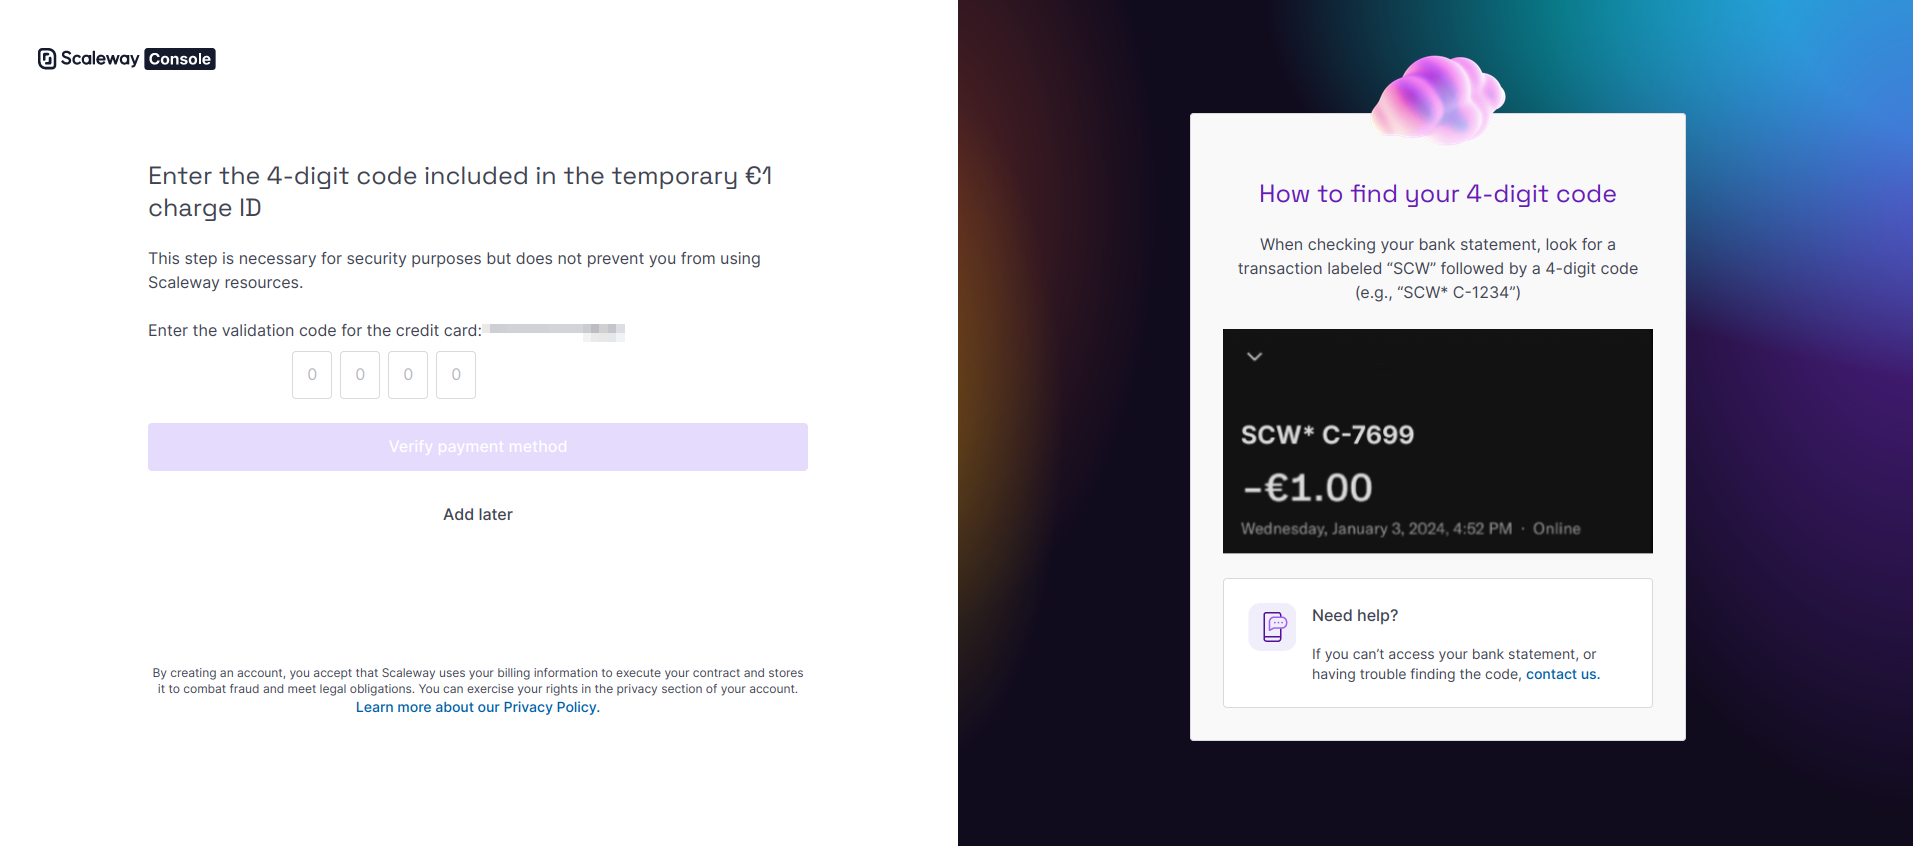
Note: Scaleway requests Enter the 4-digit code included in the temporary one euro charge ID. It will be similar to this format: SCW* C-7699. This can be a problematic step. It can show up immediately in a text alert or a pending charge at the credit card account site. If the 4-digit code does not show on your transaction, you may need to contact your bank or credit card company. The four digit code in this example below was 4550.
Text:
Pending charge at credit card site:
At Scaleway Console, after entering the 4-digit code, select Verify payment method.
9. At Create your first Project, enter a Project name and Project description. Select Continue.
🤔 Advice: We used HubsCEProject and magic link emails for your HubsCE instance.
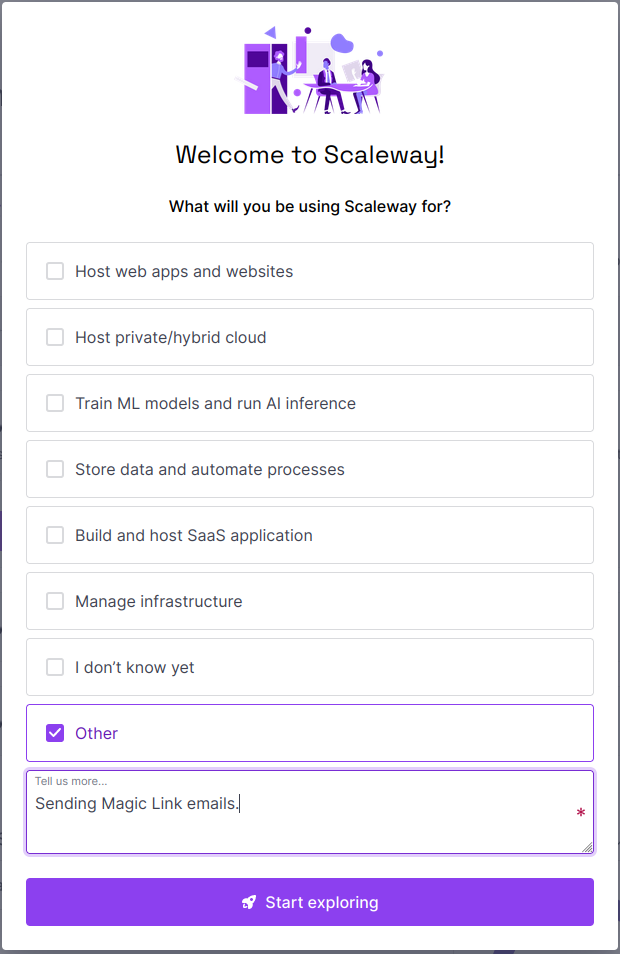
10. At Project use case, Configure your project dashboard, select Other or I don’t know. Select Start working.
🤔 Advice: if you have not entered the credit card information in Part 1, Step 8, Scaleway will not allow you to proceed to use their services (buttons will be grayed out or not available).
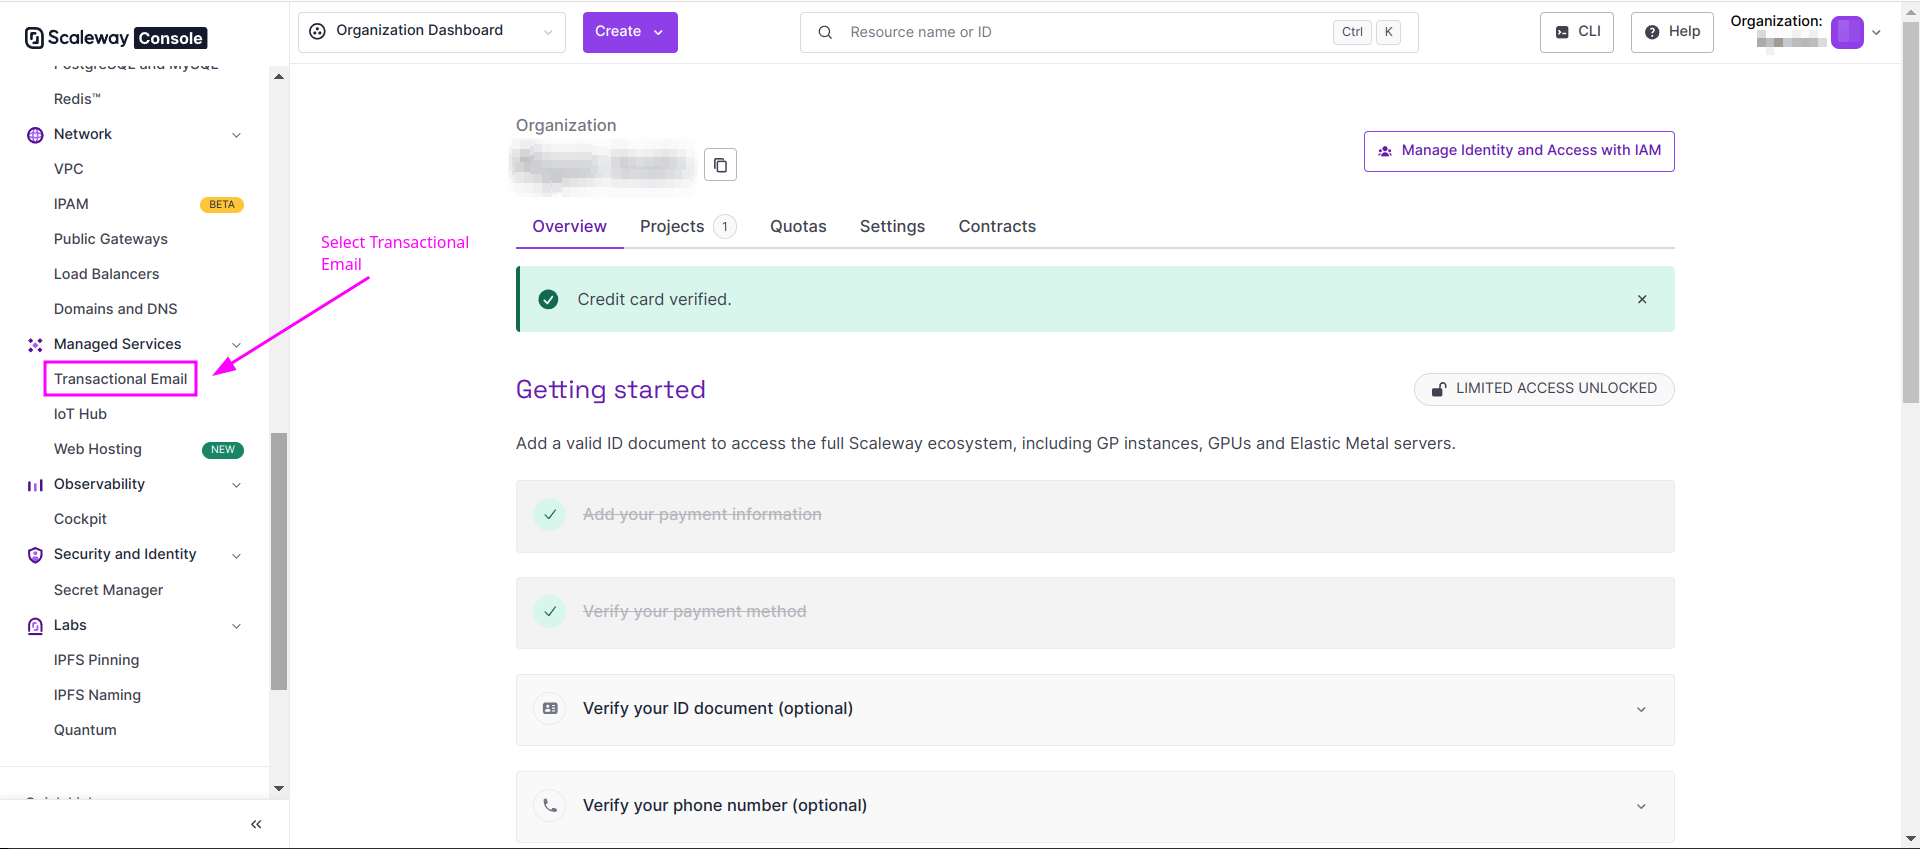
This is what the Scaleway Console page could look like:

Part 2 Connect Scaleway to Porkbun
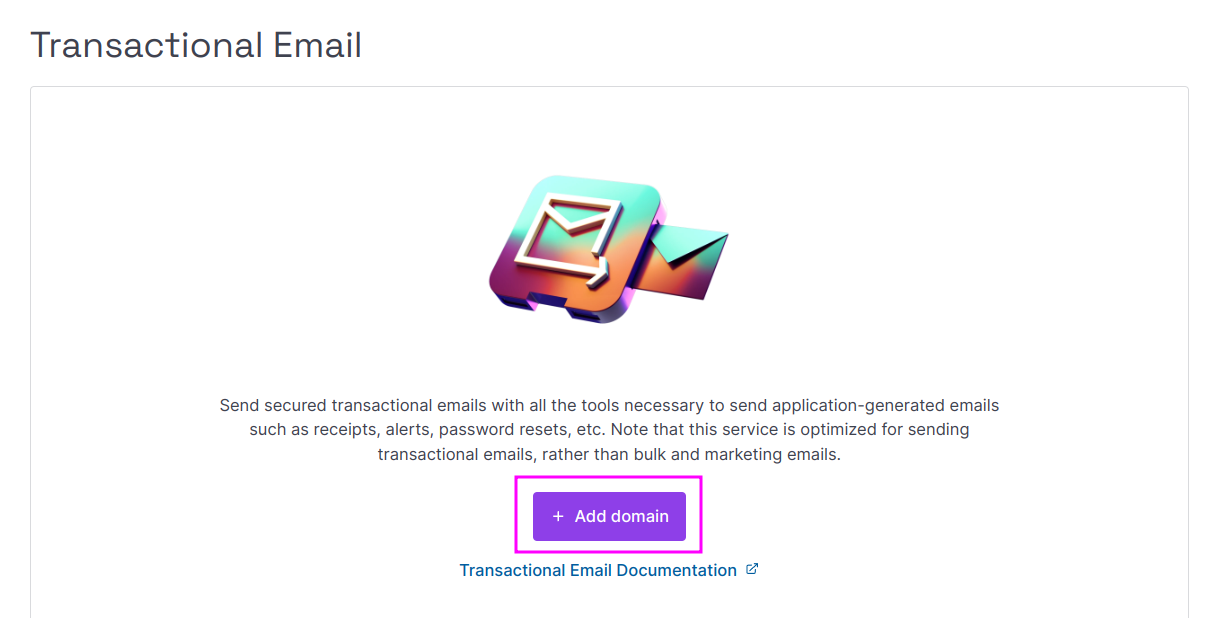
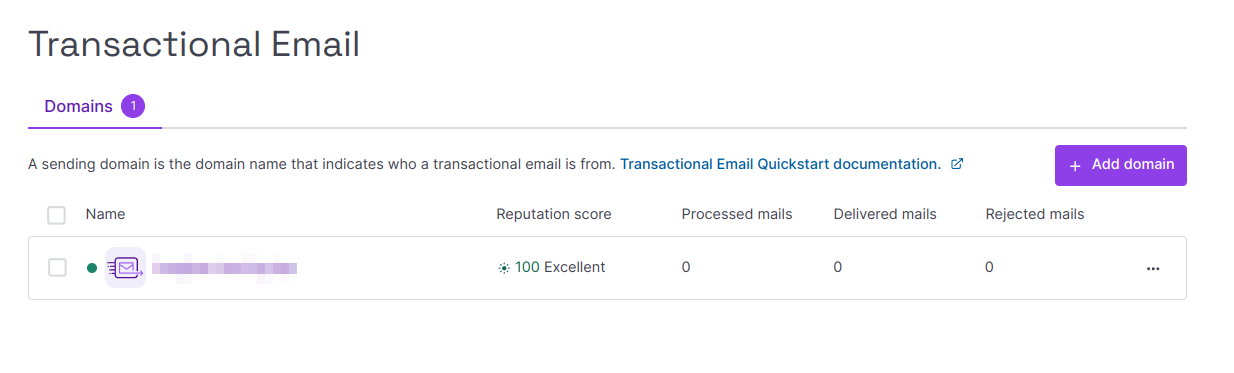
11. At the Scaleway Console, in the Products menu (sidebar), select Domains & Web Hosting, then select Transactional Emails.
12. For Domains, select Add domain.
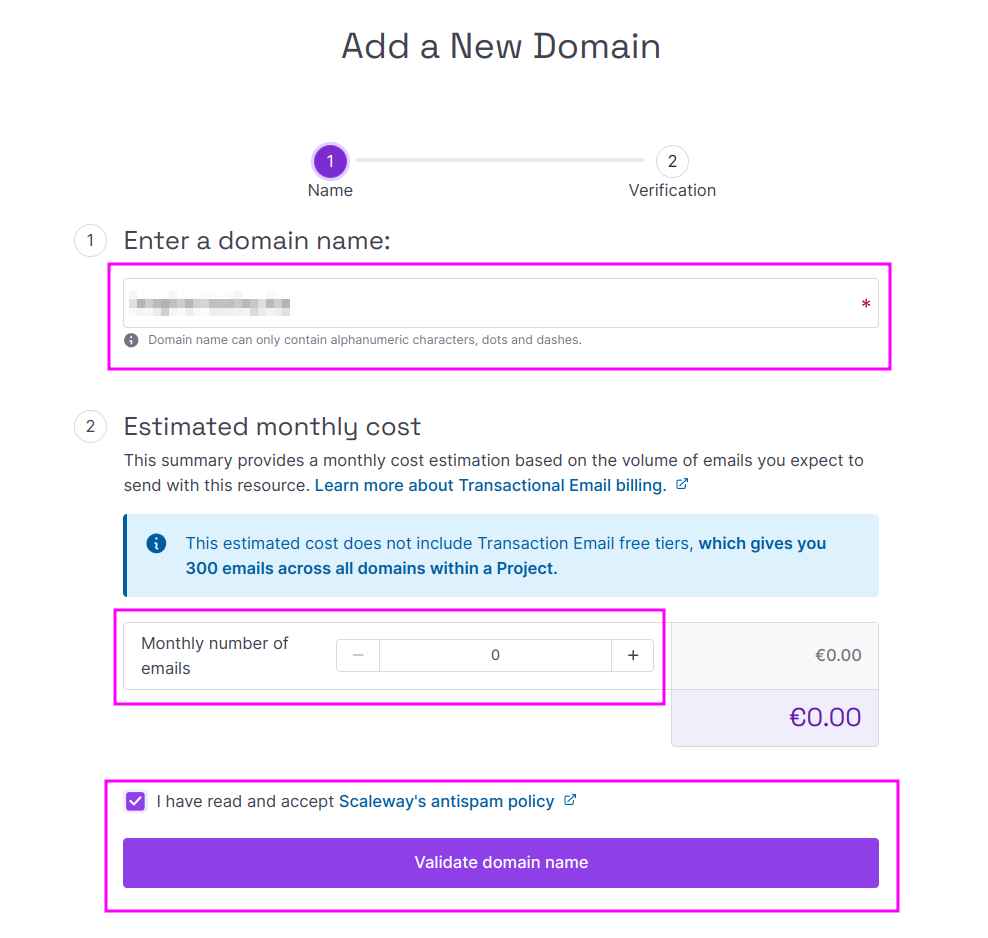
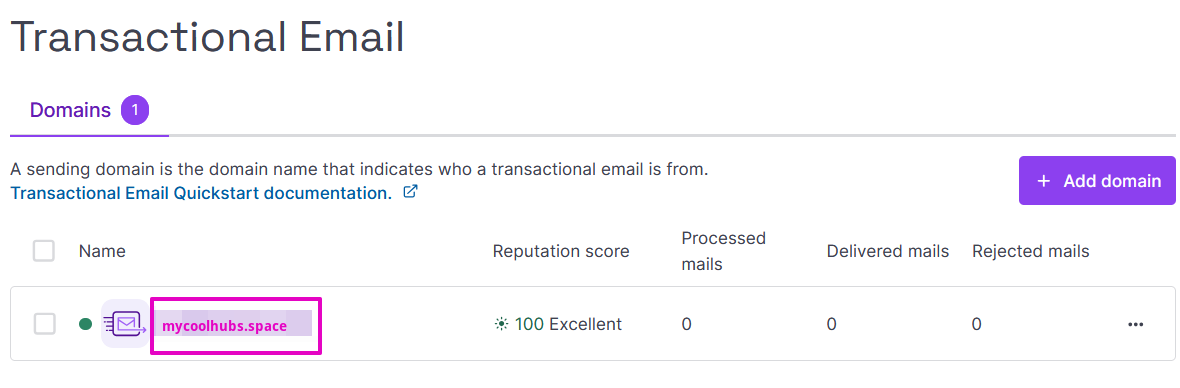
13. At Add a new email domain:
a. Add your domain, for Add a domain external to Scaleway, enter your porkbun domain. For example: mycoolhubs.space
💡Tip: The domain can only contain alphanumeric characters, dots, and dashes.
b. For Estimated monthly cost, this would be your estimated number of emails beyond 300 transactional emails.
💡Tip: You can enter zero here OR whatever you think you’ll need beyond 300 emails. In our example, we entered 5.
c. Select Validate domain name.
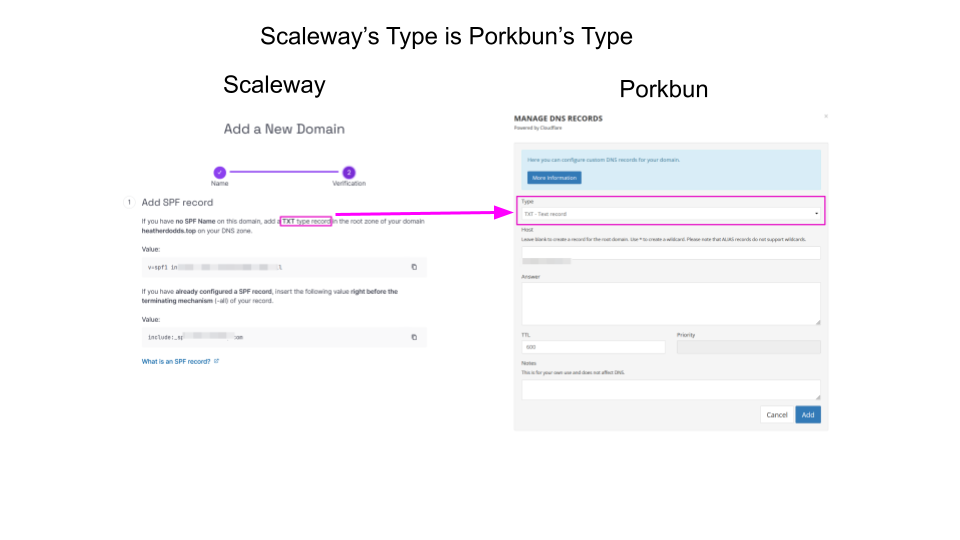
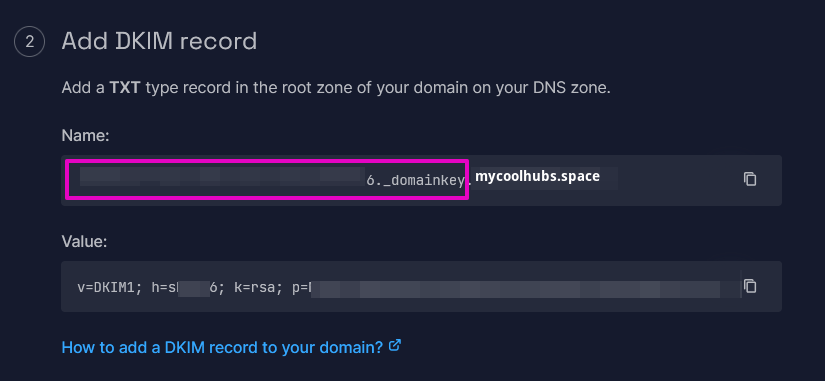
14. At Verification, Choose your configuration mode, Configure your DNS records manually may be default selected. That is OK.
💡Tip: Scaleway says “The verification of your domain might take 48 hours.” We found that it was quick.
Lower on this same page, Scaleway shows the Add SPF record, Add DKIM record, Add MX record, and the Add DMARC record information. You will use these values at Porkbun.
Part 3 Domain verification and adding A Records
Now you will add in the SPF, DKIM, MX, and DMARC records from Scaleway to Porkbun DNS records.
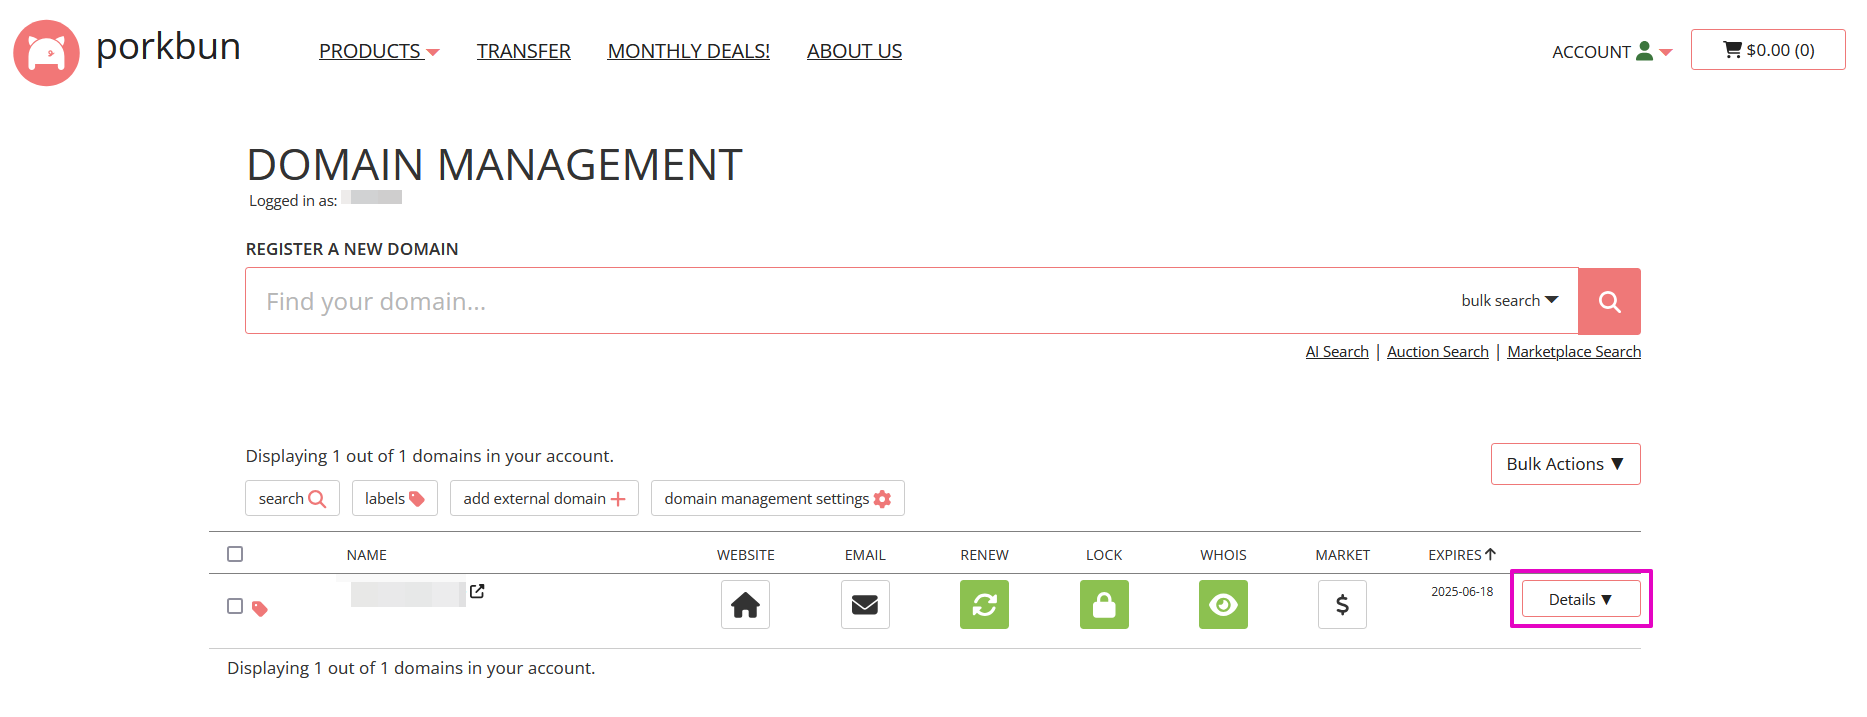
15. Log into Porkbun.com, if you are not already logged in. Under ACCOUNT, select Domain Management.
16. For your domain, select Details.
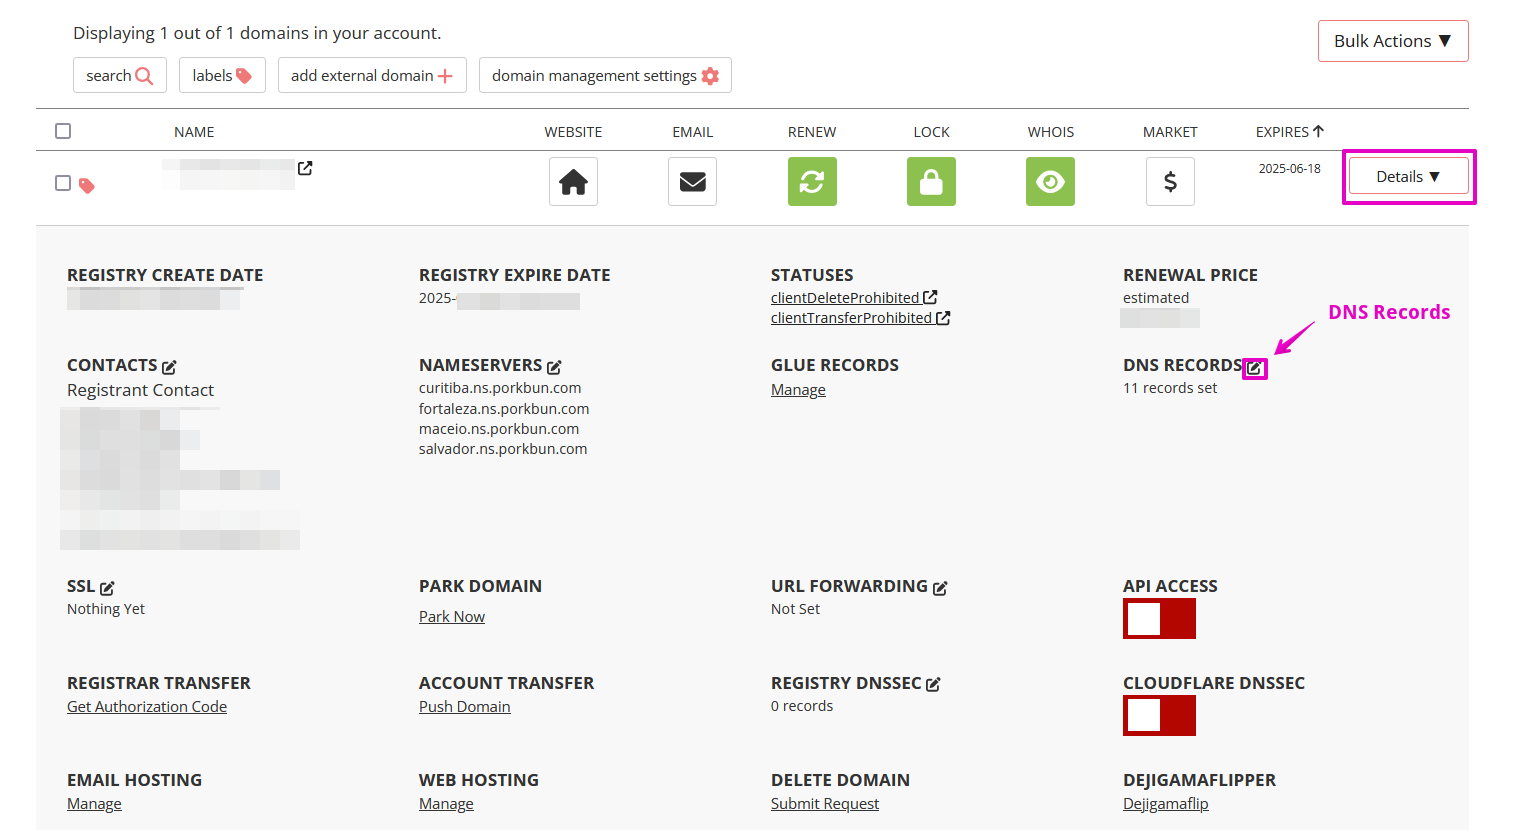
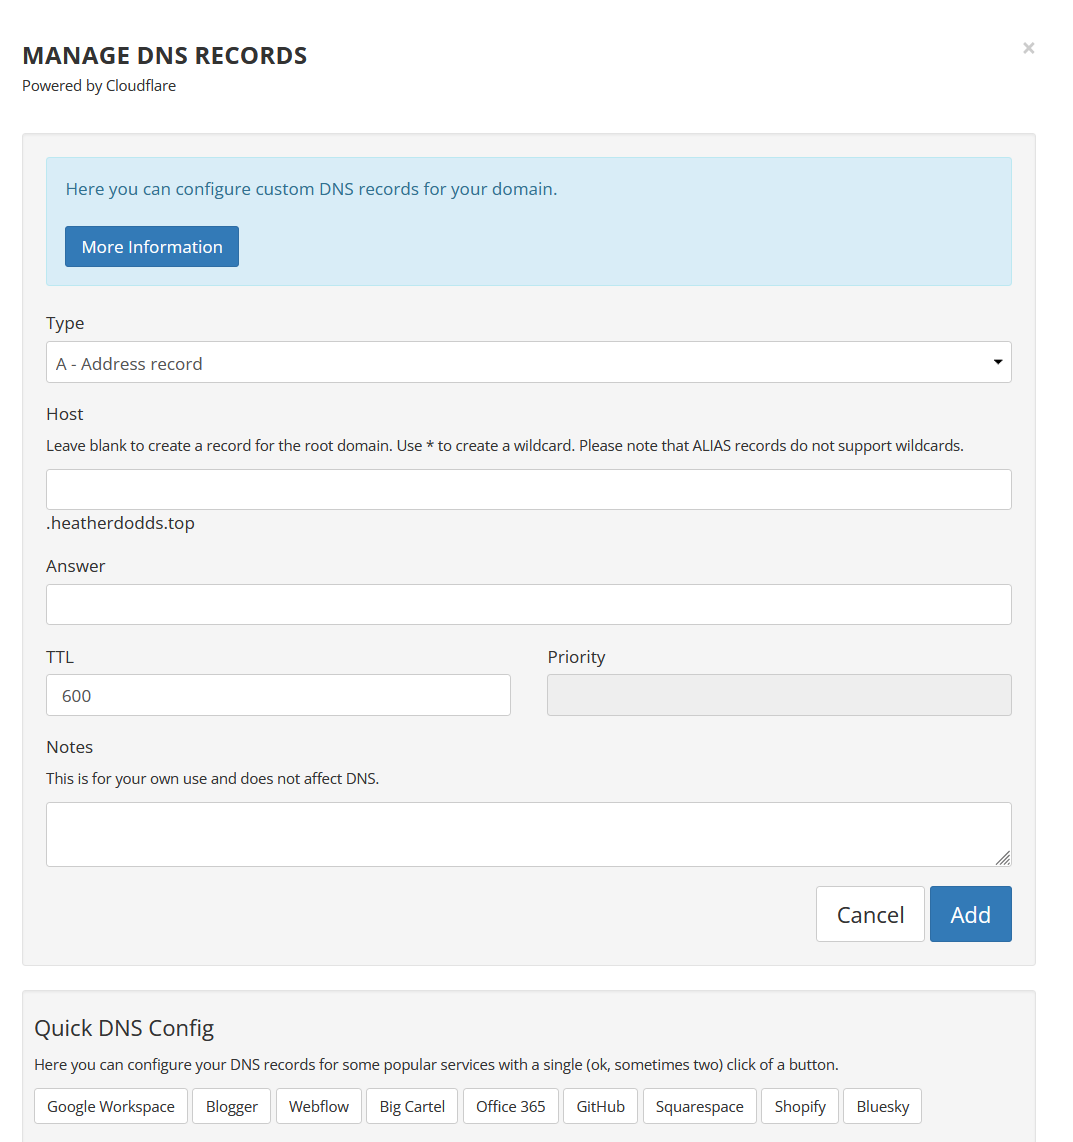
17. Select DNS Records (the active link is the little edit symbol).
Your DNS Records popup, the top will look like this:
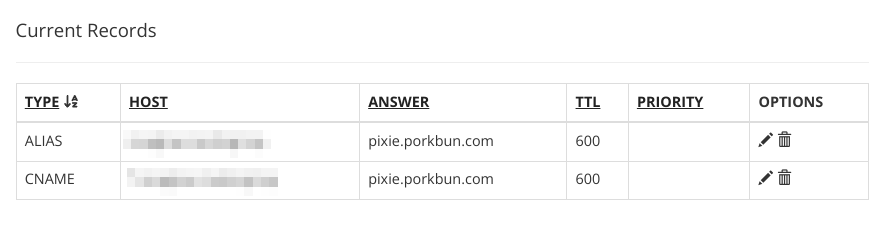
At the bottom of the popup, you should have 2 existing default records, possibly with the word “pixie” in them.
18. Delete any records that have “pixie” in them. Select the trashcan icon. Porkbun will not need them.

19. Now, you will copy and paste from Scaleway to Porkbun.
You will cut and paste entries for each of 4 entries: 1 for SPF, 1 for DKIM, 1 for MX, and 1 for DMARC.
💡 Tip: You may want to have 3 screens simultaneously open on your computer: 1. These instructions 2. Scaleway 3. Porkbun
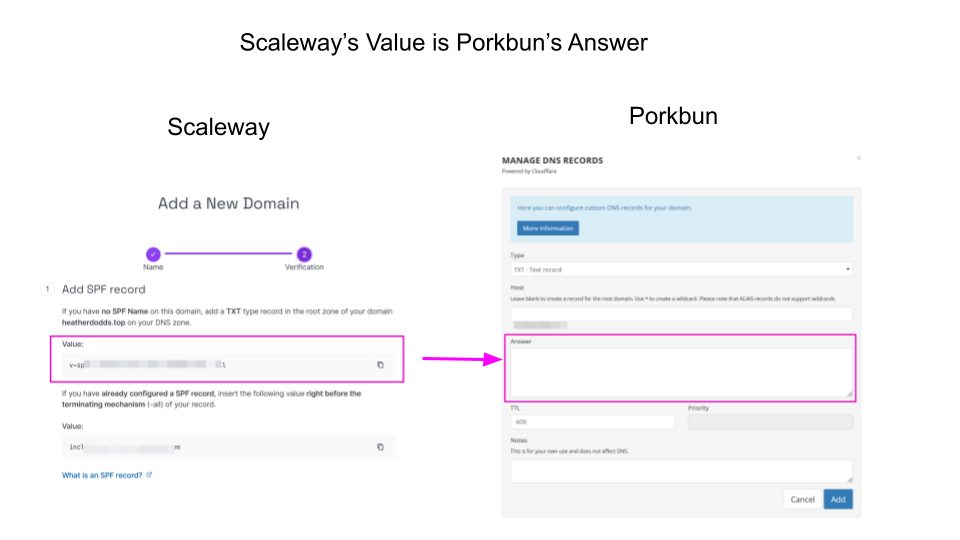
SPF
- At Porkbun, at the top of the DNS Records popup, at the Type menu, select TXT (see second capture below).
- At Porkbun, leave Host blank.
- At Scaleway, copy the Value. At Porkbun, paste it into Answer/Value.
- Leave TTL as 600.
- Leave Priority blank.
- For Notes: This is optional. We used Scaleway SPF entry
- Select Add.
Once you do this, the record should appear down below on the Porkbun DNS records popup.

The DKIM, MX, and DMARC entries follow the same procedure.
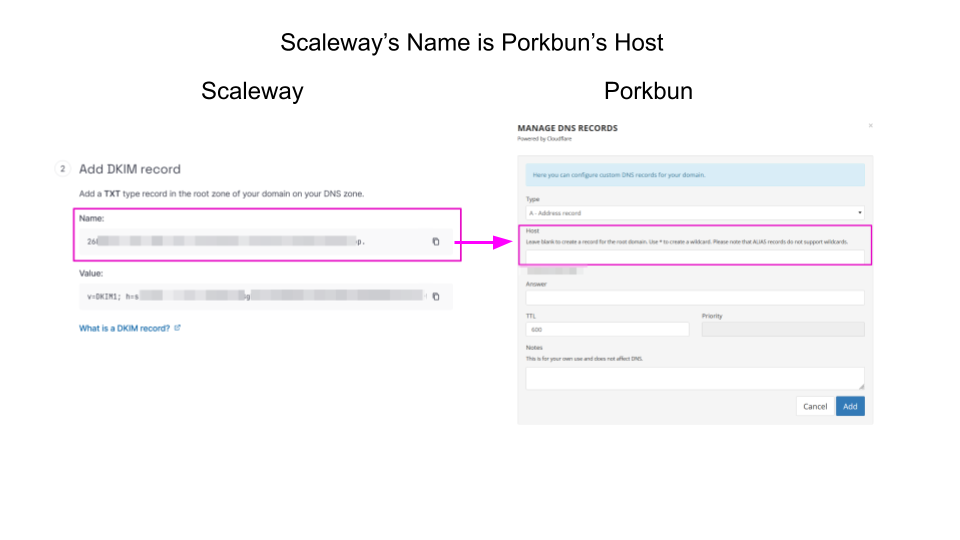
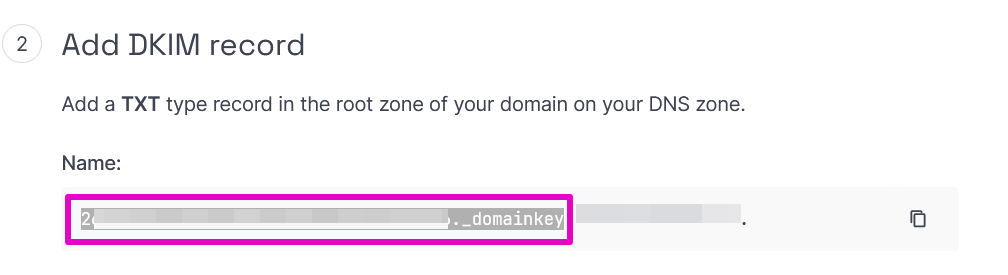
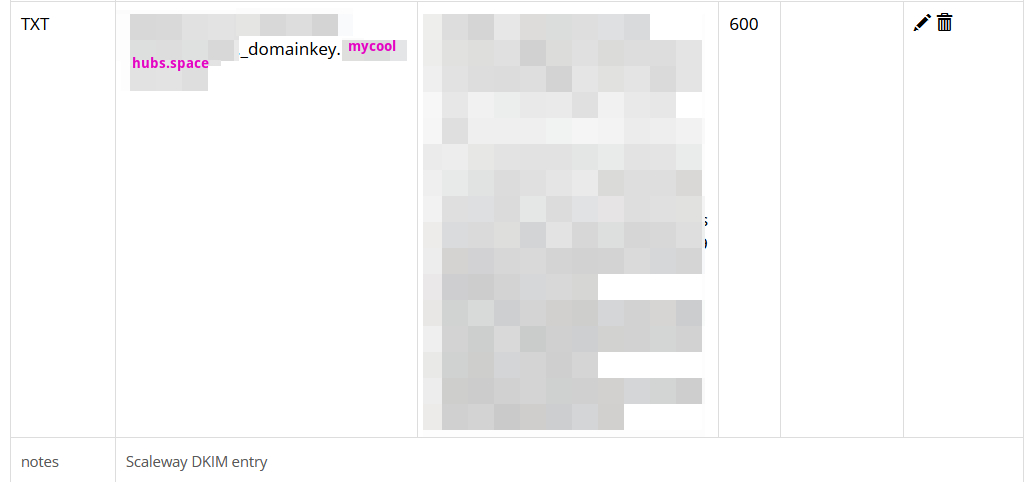
DKIM
- At Porkbun, from the Type menu, select TXT.
- At Scaleway, copy the Name data. At Porkbun, paste it into Host.
- At Scaleway, copy the Value data. At Porkbun, paste it into Answer/Value.
- Leave TTL as 600.
- Leave Priority blank.
- For Notes: This is optional. We used Scaleway DKIM entry
- Select Add.
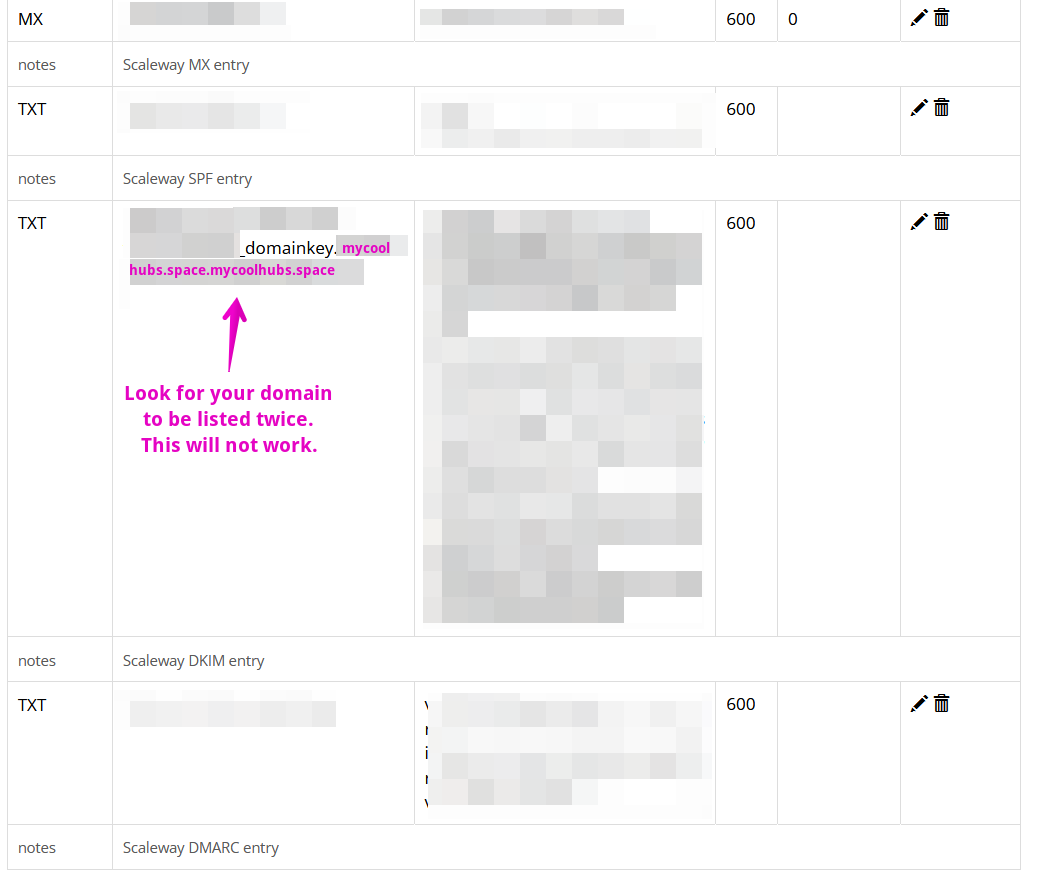
WARNING about DKIM entries and Porkbun
In our testing, we found that Porkbun added an extra domain name to the end of the DKIM record, Host field.
For example, if Scaleway offers this link: 7yadyayayayayayaydydyaady._domainkey.mycoolhubs.space
Porkbun is going to automatically change it to: 7yadyayayayayayaydydyaady._domainkey.mycoolhubs.space.mycoolhubs.space
This will not work.

We tested this and found that it is best to make sure that the domain is only listed ONE TIME at most inside a link. Porkbun is going to add it on the end automatically for you.
At Porkbun, to delete the extra domain (the mycoolhubs.space part) at the end of the link, at that entry, select the edit pencil. Then you can edit the entry either by cutting and pasting in a shorter link (Method 1 below) or by deleting the extra link added by Porkbun (Method 2 below).
Method 1
Cut like this from Scaleway and paste like this into the Porkbun host field (notice no domain is after domainkey):
7yadyayayayayayaydydyaady._domainkey
💡 Tip: don’t copy the period after domainkey
Method 2
In the Porkbun Host field, delete all of the text after domainkey. You may have to use your keyboard arrow keys to move to where the domain text is and then use delete on your keyboard.
After either Method 1 or Method 2, to save, select the floppy disk.

Porkbun will then add your domain on the end automatically once you’ve added it. That is fine.
For example, the final displayed result at Porkbun will be:
7yadyayayayayayaydydyaady._domainkey.mycoolhubs.space
MX
- At Porkbun, from the Type menu, select MX
- At Scaleway, there is no Name data. Leave Host blank.
- At Scaleway, copy the Value data. At Porkbun, paste it into Answer/Value.
- Leave TTL as 600.
- Leave Priority blank.
- For Notes: This is optional. We used Scaleway MX entry
- Select Add.
DMARC
- At Porkbun, from the Type menu, select TXT.
- At Scaleway, copy the Name data. At Porkbun, paste it into Host.
- At Scaleway, copy the Value data. At Porkbun, paste it into Answer/Value.
- Leave TTL as 600.
- Leave Priority blank.
- For Notes: This is optional. We used Scaleway DMARC entry
- Select Add.
Once your 4 entries are in, the lower part of the page will look similar to this below.
💡 Tip: We added optional ‘Notes’ to our entries. We found that it helped to keep track of what each entry was.
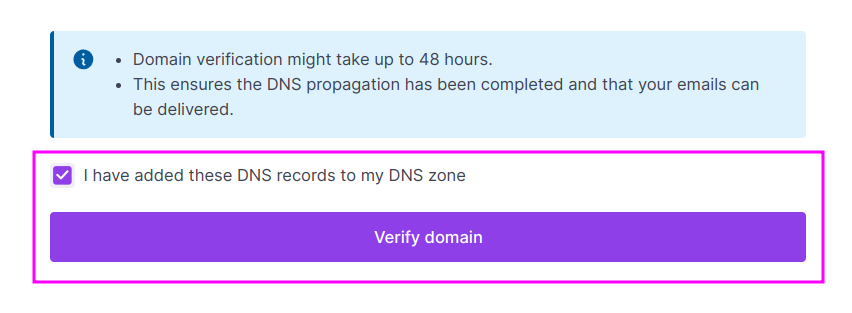
20. Back at Scaleway, select the checkbox for I have added these DNS records to my DNS zone. Select Verify domain. Scaleway says “The verification of your domain might take 48 hours.” We found that it was quick.
21. Check your email. Scaleway sends you an email with the status of your domain. Your domain will be either verified or not verified.
Example email:
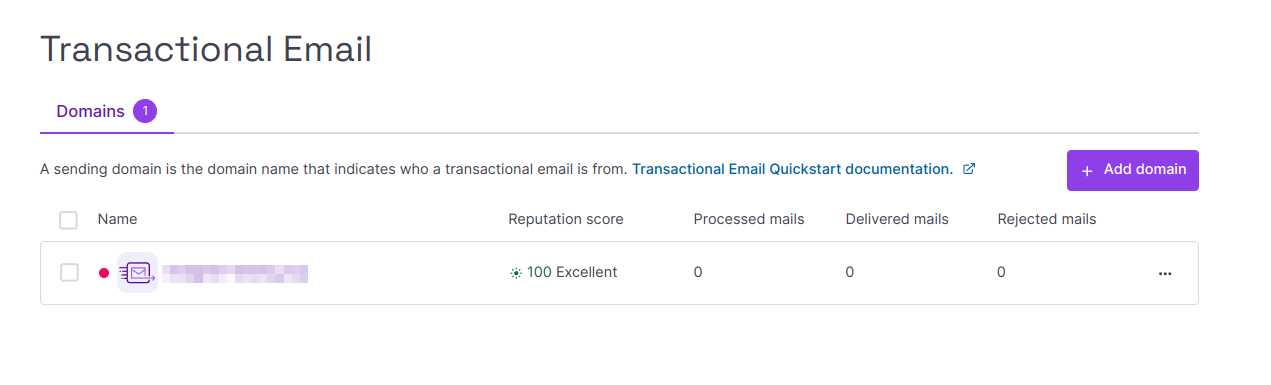
At Scaleway, on the Transactional Email page, you may have a red dot for your domain name with a popup that says Your domain is unverified. Check your email for more details.
If you see a notification that your DKIM entry is “missing or incorrect DNS records on your domain”, you may check that you entered the data correctly at Porkbun.
Also, make sure you carefully follow the steps within these instructions at Part 3, Step 19 about DKIM entries.
If you’ve cleared up any problems, just refresh this page at Scaleway and the red dot should turn into a green dot.
If you have a green dot next to your domain name, it is verified. You will be notified by email as well.
Part 4 Generate SMTP API token
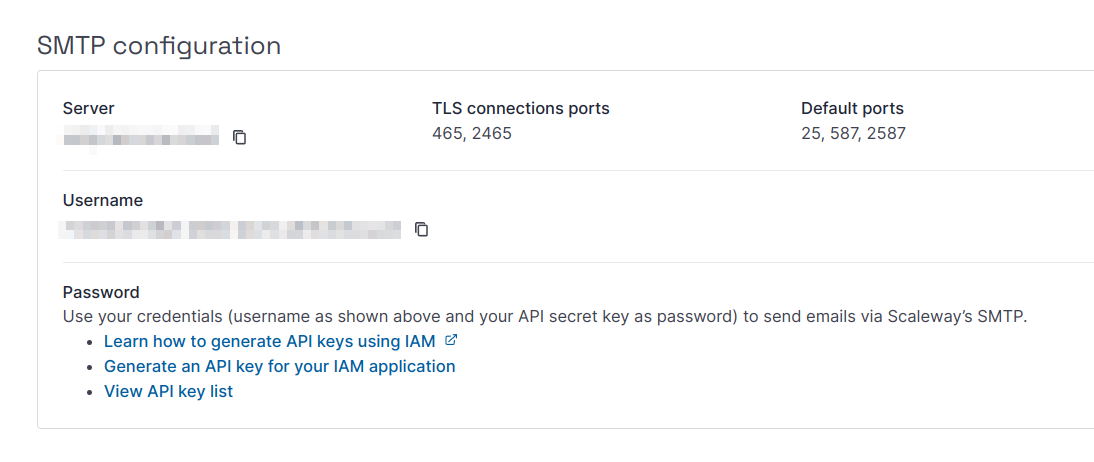
22. At Scaleway, Transactional Email. Select your domain. You will arrive at the Email activity tab.
23. Select the Overview tab.
24. At SMTP configuration, the listed items are shown below. Copy and save the server, default port, and username somewhere securely.
a. Server - copy and save
b. TLS connection ports - ignore
c. Default ports - copy and save 2587
🤔 Advice: When collecting email parameters: check what ports your email provider supports for SMTP. The standard ports are 25, 465 and 587, but your Kubernetes provider may block those ports as a spam-fighting measure. If your email provider supports non-standard ports, use one of them. (For Scaleway, use port 2587.)
d. Username - copy and save
25. For Password, go to the API key section. Select Generate an API key for your IAM application.
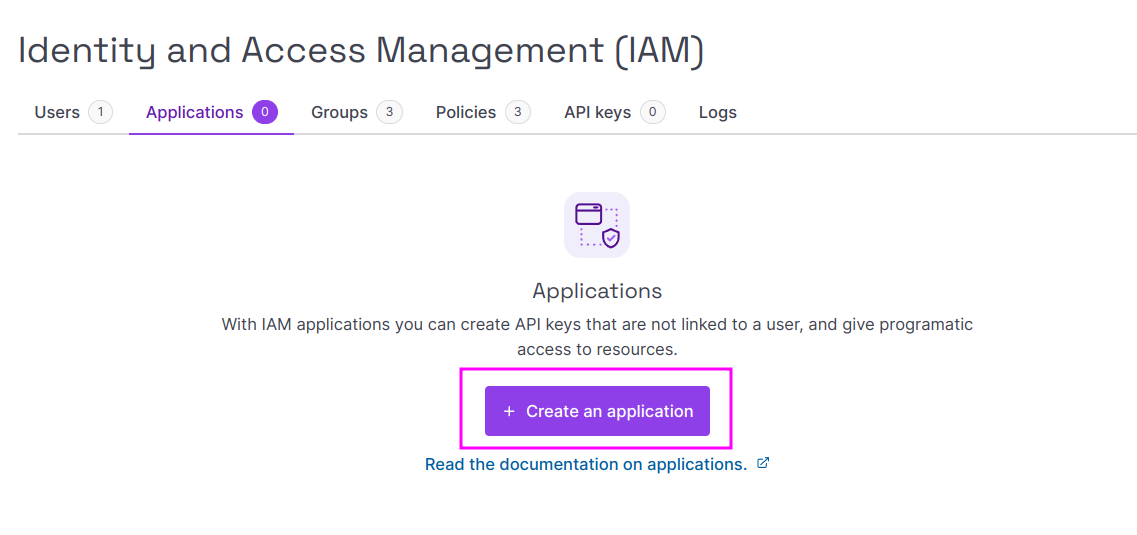
💡 Tip: In case you log off and restart here, you are heading to the Scaleway, Security & Identity menu, IAM section.
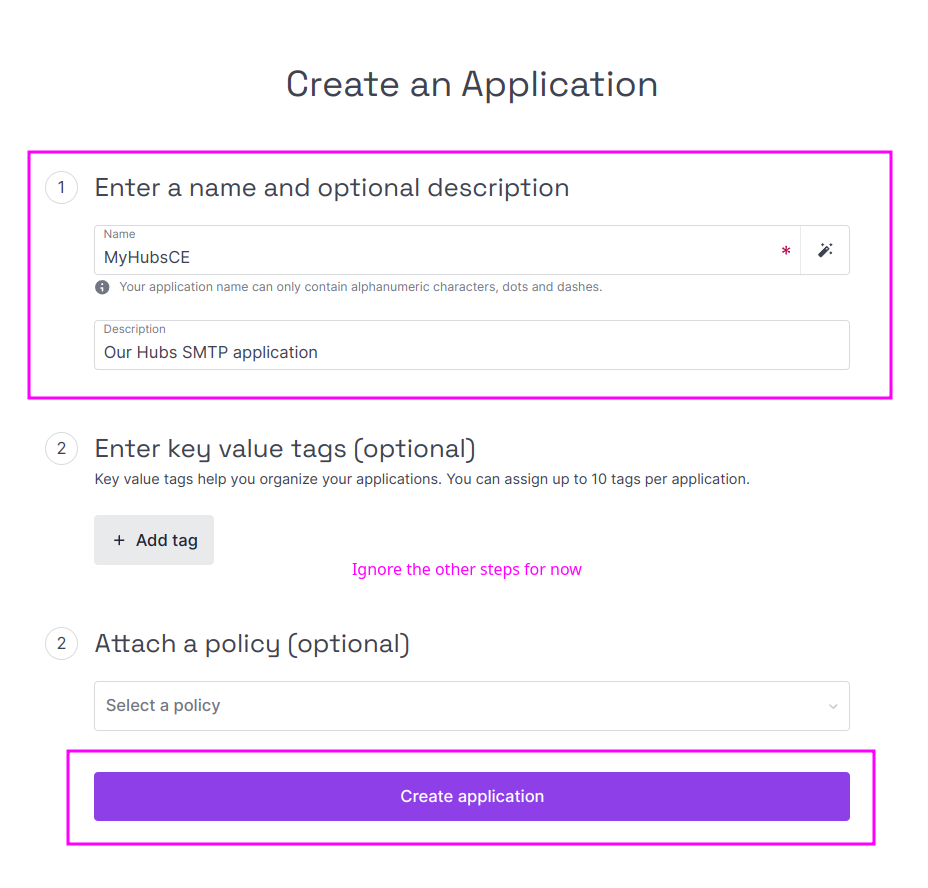
26. For Identify and Access Management, Applications tab, select Create application.
27. For Create an Application, Enter a name and optional description.
a. For Name, we used MyHubsCE.
b. For Description, we used My Hubs SMTP application.
c. Skip the Enter key value tags and Attach a policy sections.
d. Select Create application.
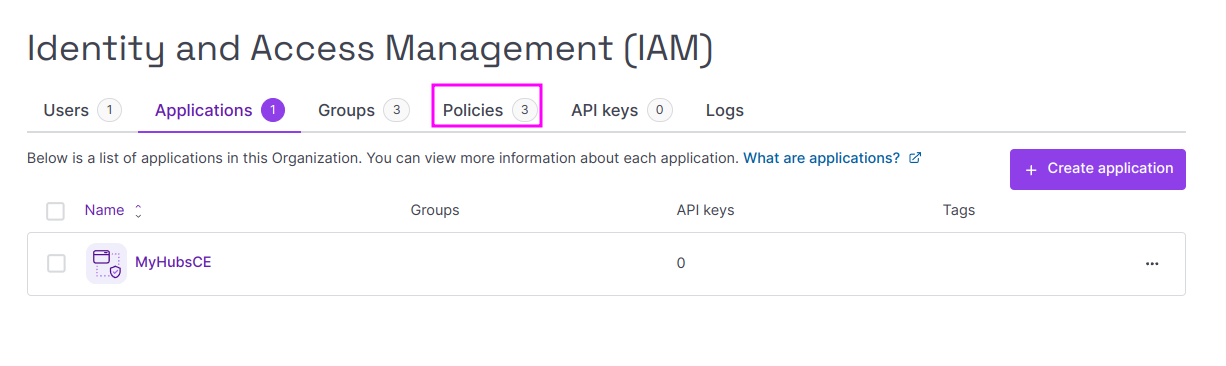
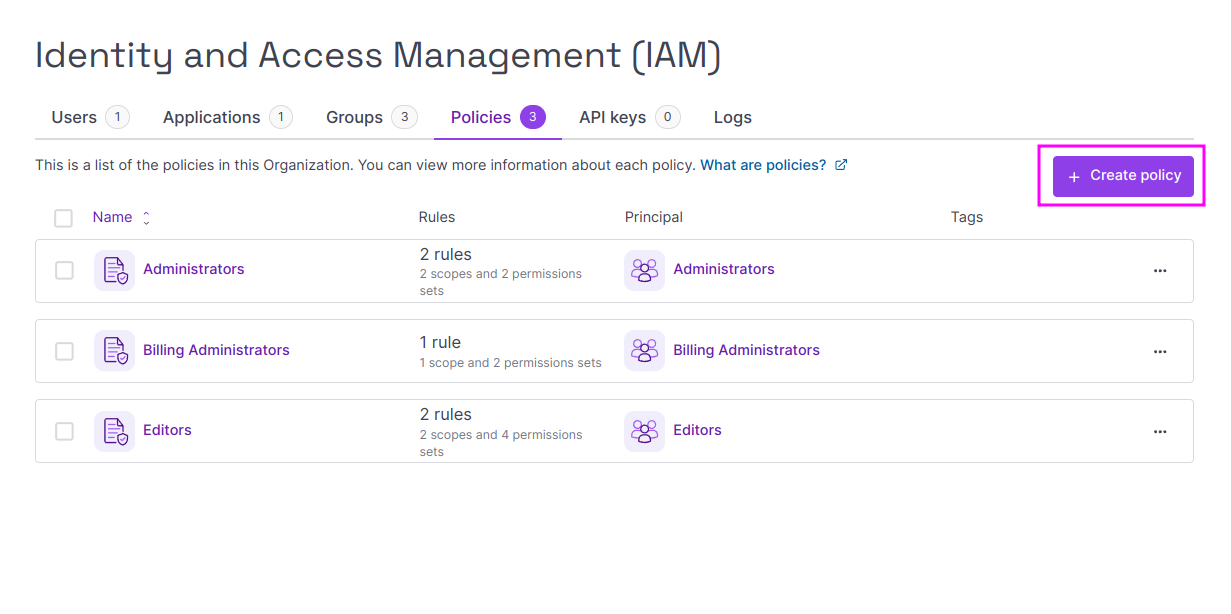
28. At Identity and Access Management (IAM), your application should be listed. Select the Policies tab. Leave the three default policies there. Then select Create policy.
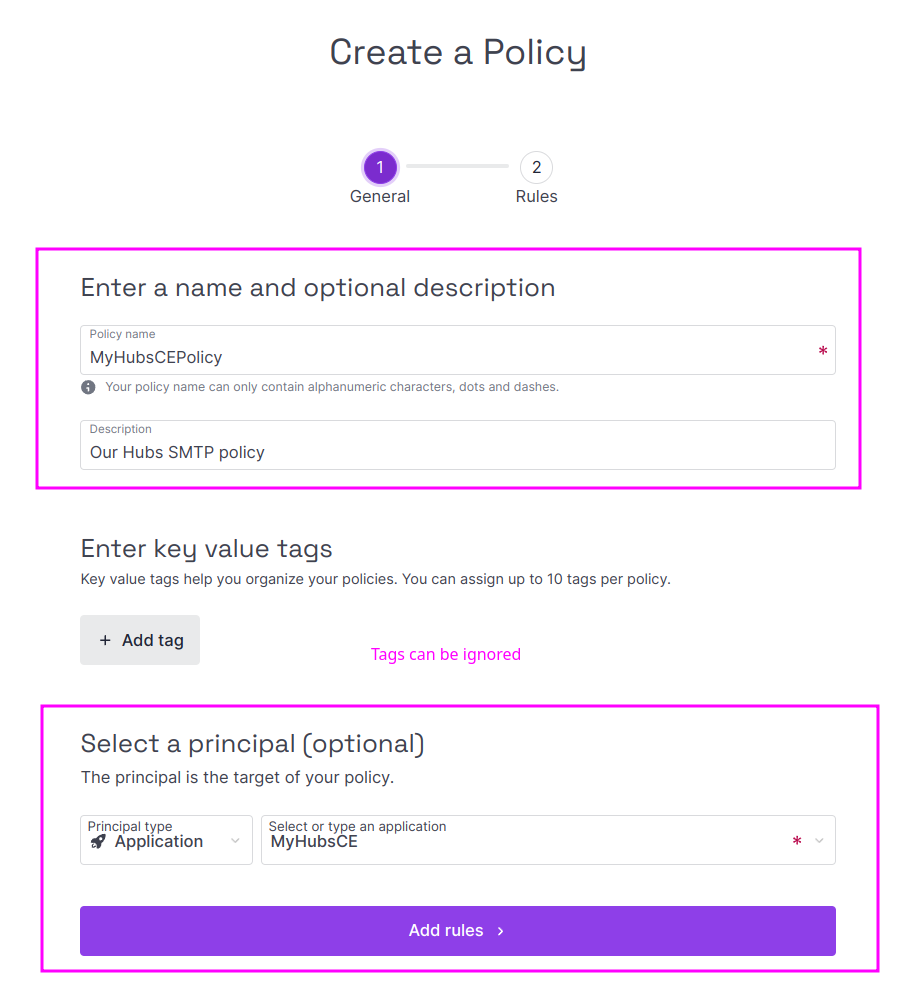
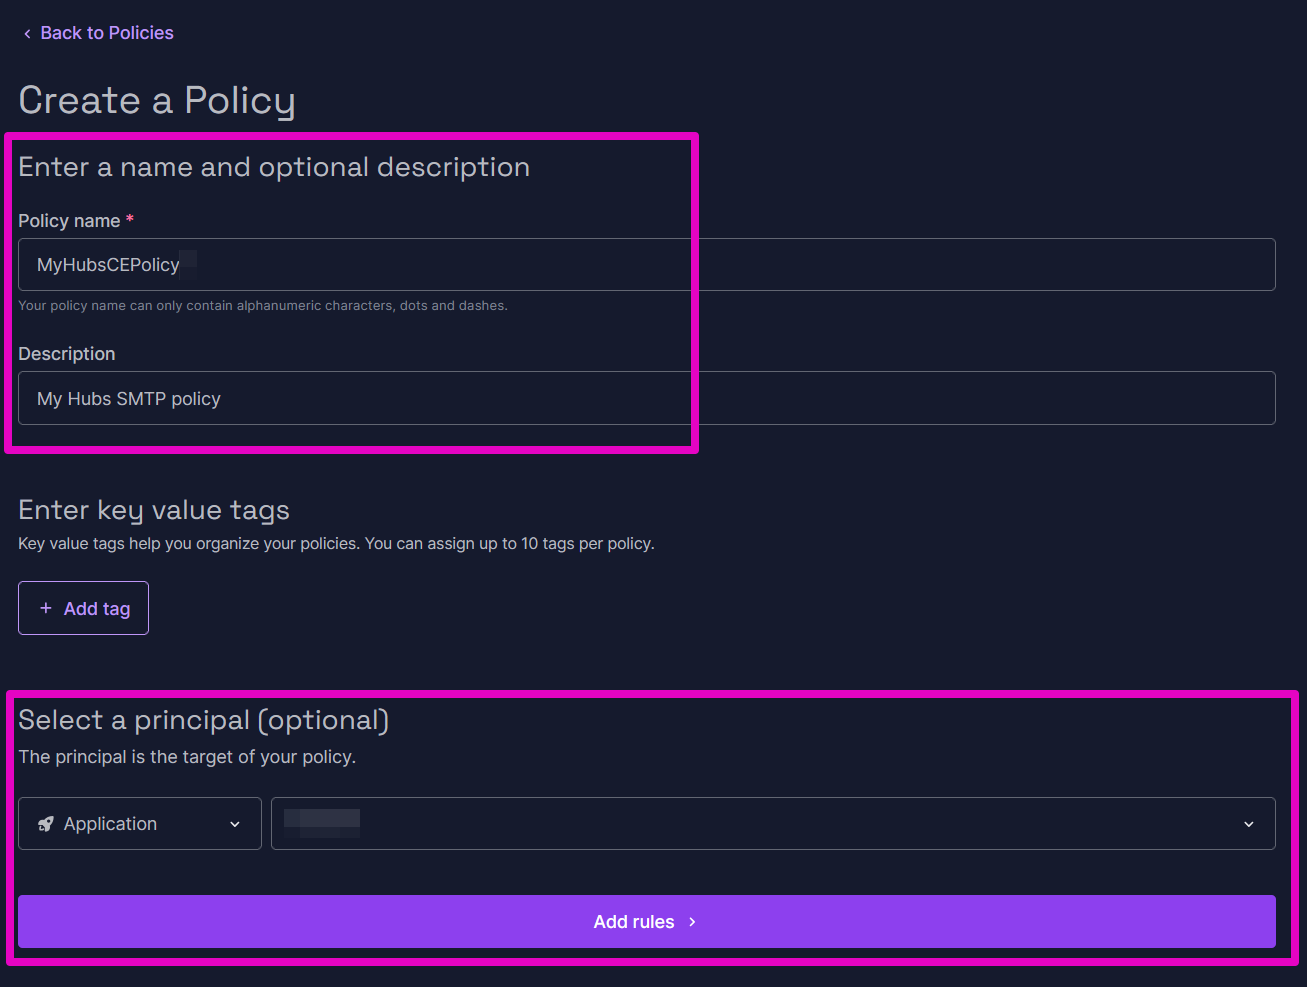
29. At Create A Policy, enter a name and optional description.
a. For Name, we used MyHubsCEPolicy.
b. For Description, we used My Hubs SMTP policy.
c. For key value tags, skip this.
d. For Select a principal, select the drop down menu, and pick Application. Then select whatever name you created for your application (in these instructions, Part 4, Step 27). For our example, we selected MyHubsCE.
e. Select Add rules.
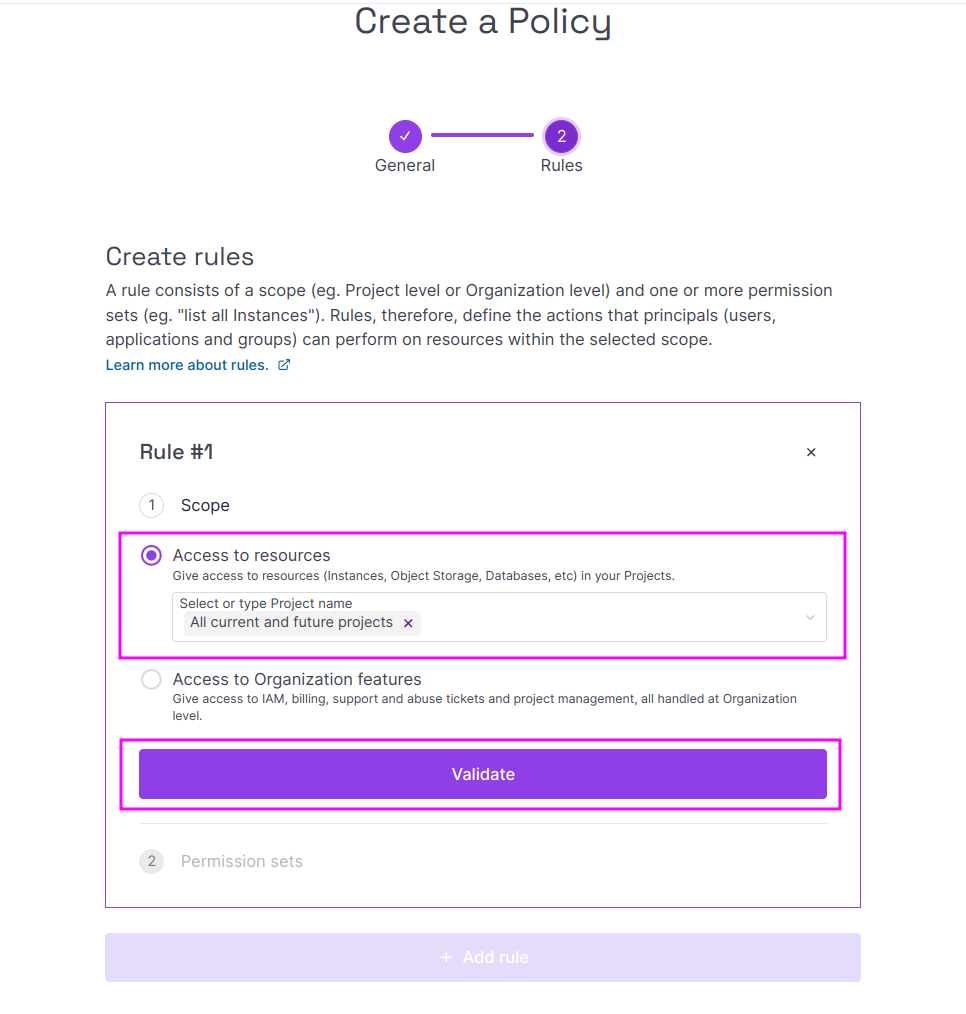
30. At Create rules, Rule #1, Scope, select Access to resources. At Select or Type Project name, select All current and future projects. Select Validate.
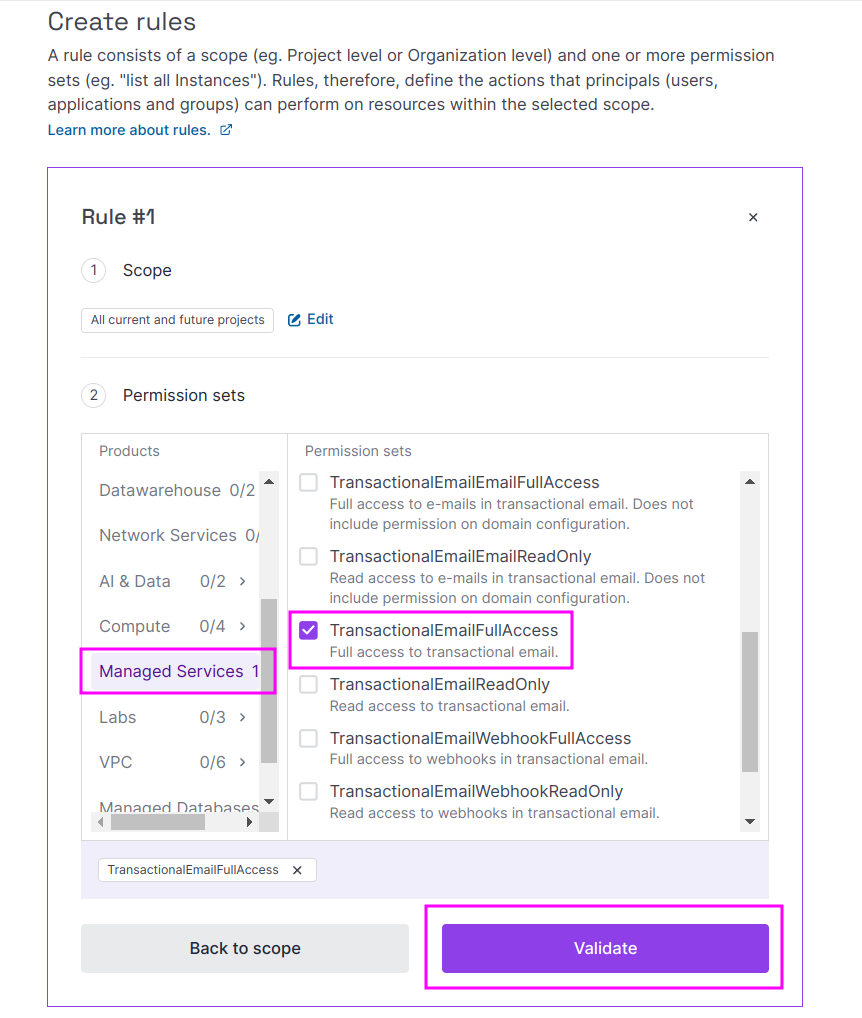
31. At Create Rules, Rule #1, Permission sets, in the Products Menu, select Domains & Web Hosting, in the Permission sets, select TransactionalEmailFullAccess.
🤔 Advice: Be careful to select TransactionalEmailFullAccess. There are other accesses that look very similar, but won’t work! Select Validate.
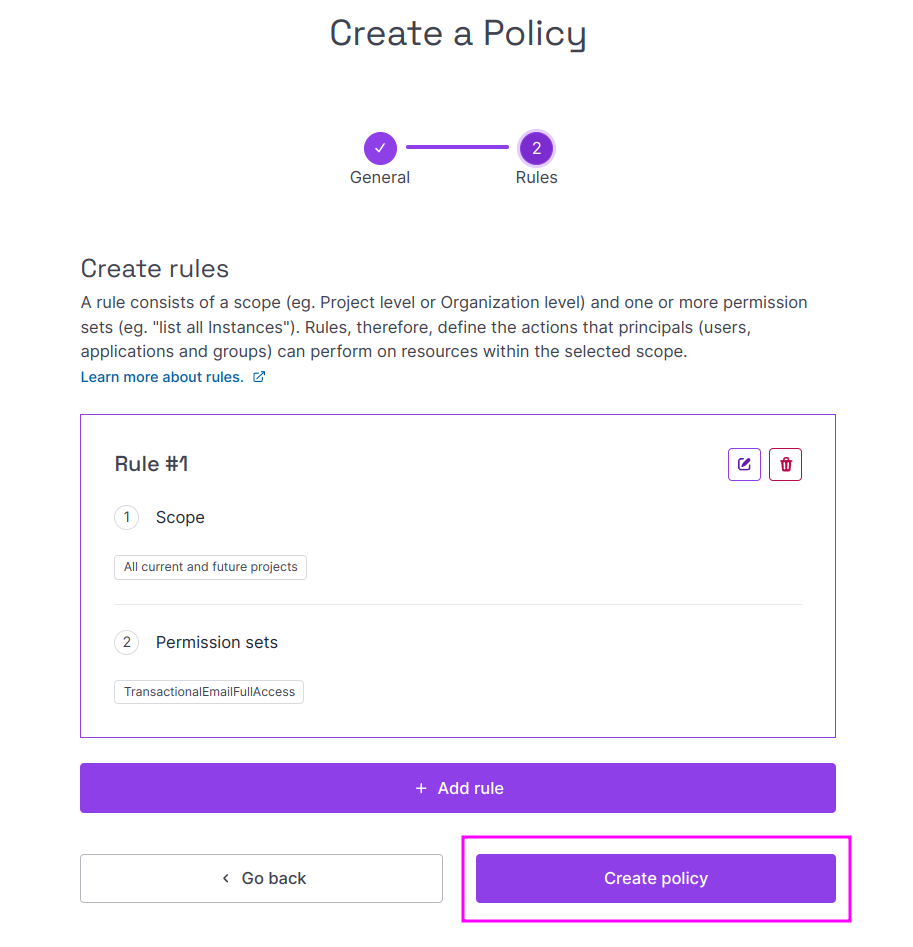
32. In Add a condition using CEL, you do not need to change or add anything here. Select Validate.
33. Select Create policy.
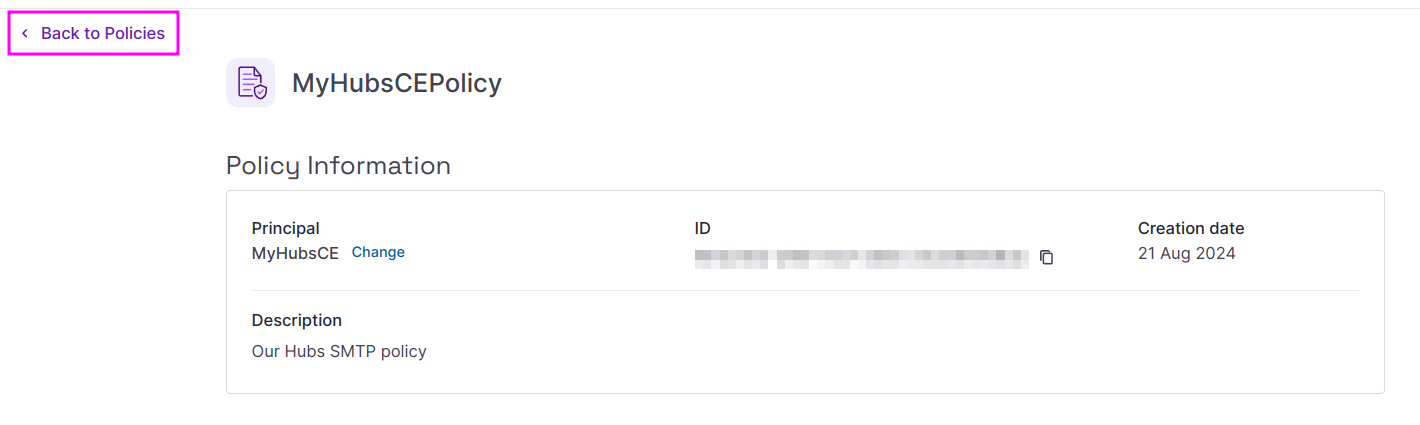
34. At MyHubsCEPolicy, select Back to Policies.
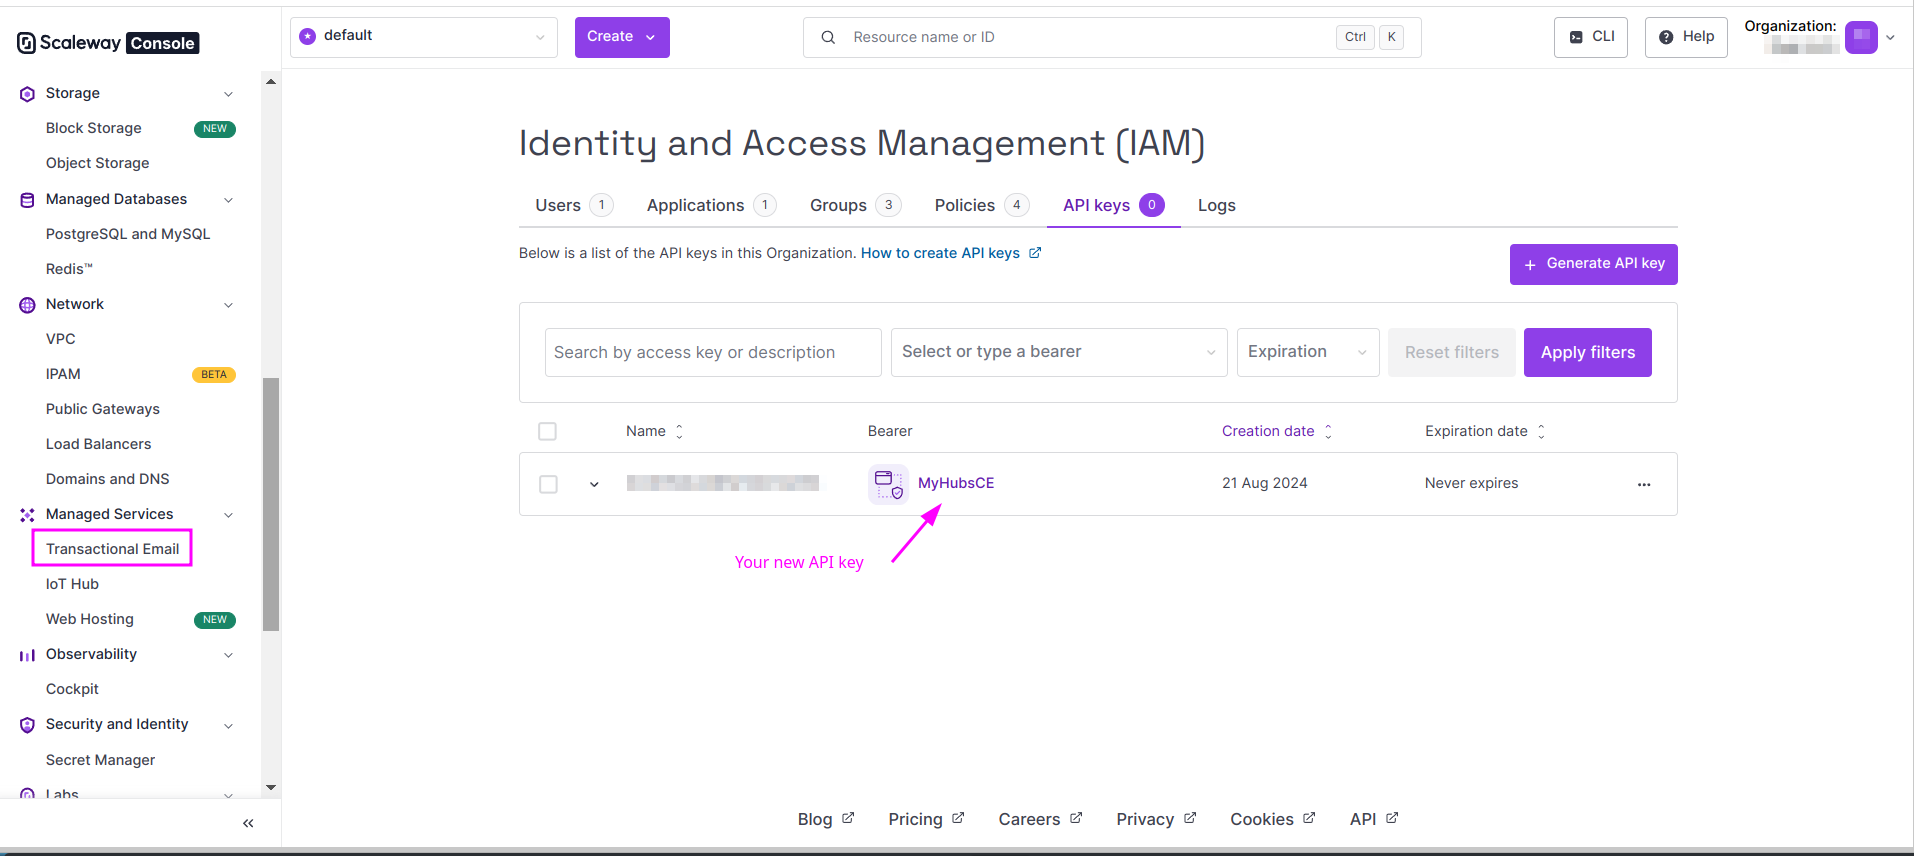
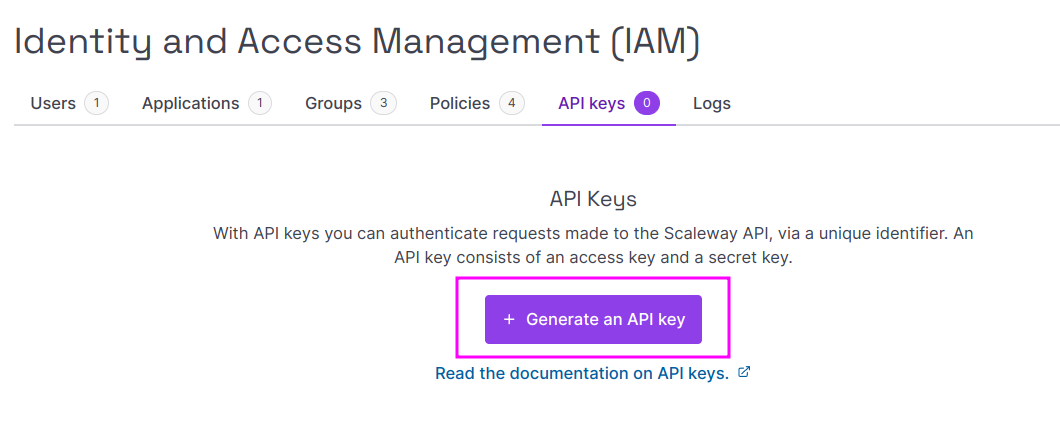
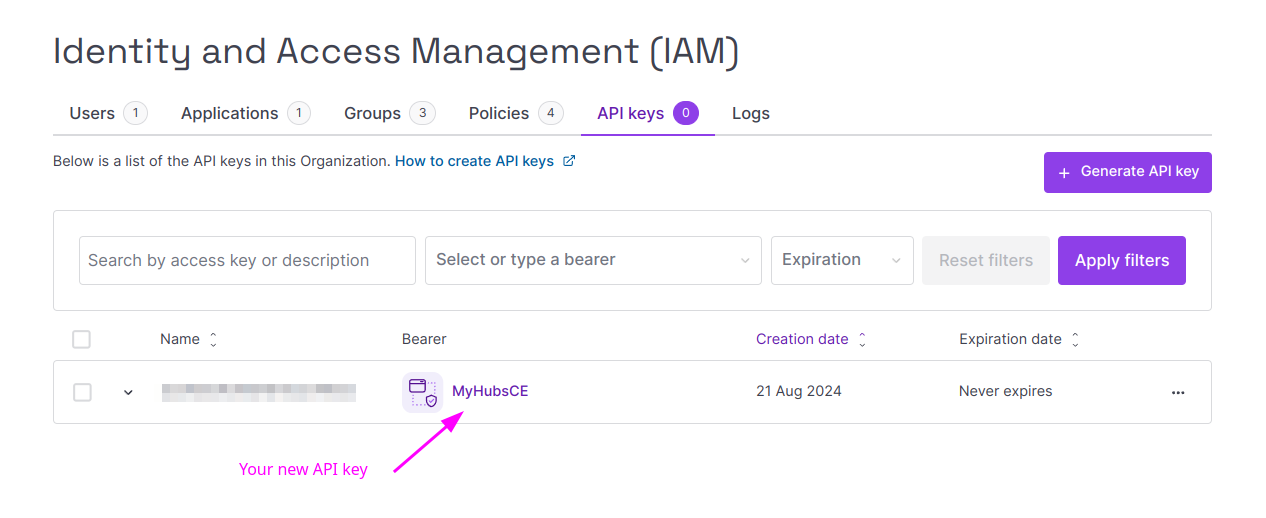
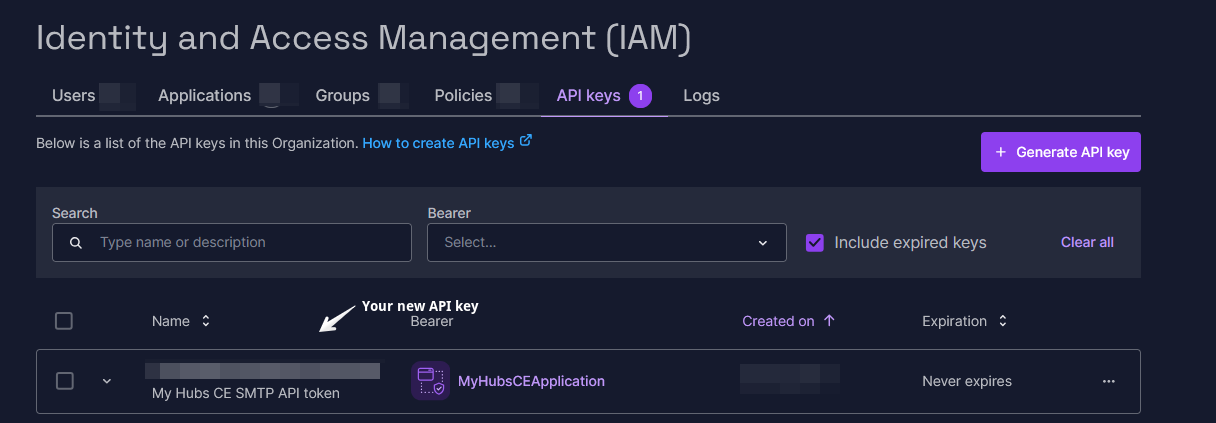
35. Select the API keys tab. Select Generate API key.

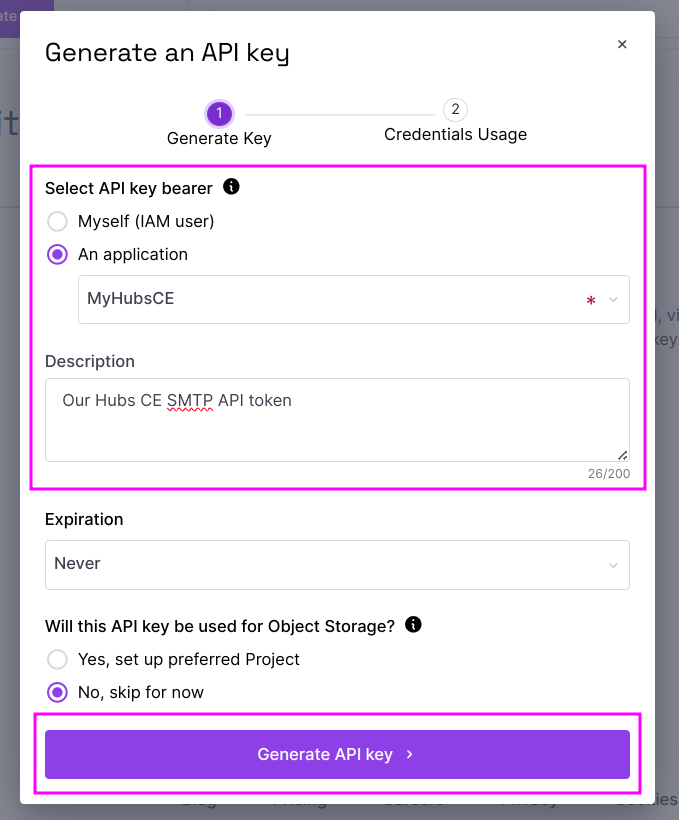
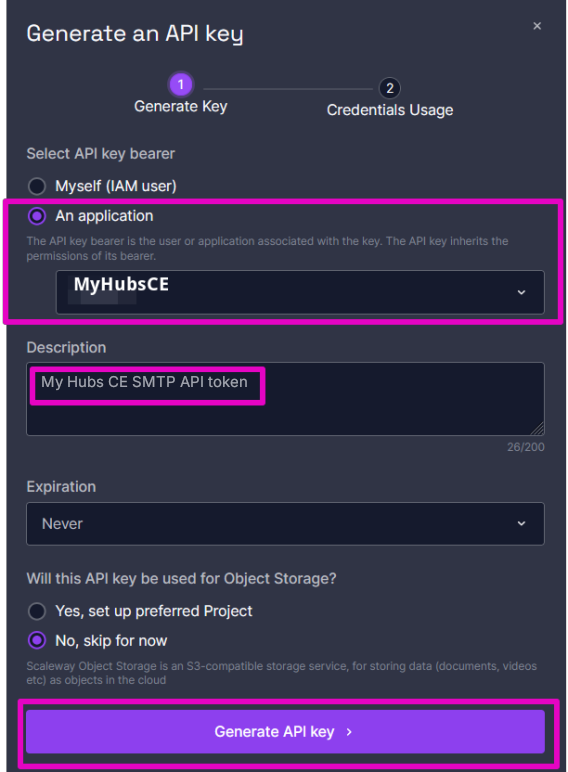
36. At the Generate an API key popup, Generate key,
a. For Select API key bearer, Select An application.
b. Select your named application from the dropdown menu.
c. For the Description, enter optional text here. We entered My Hubs CE SMTP API token.
d. For Expiration, set it to Never.
e. For Will this API key be used for Object Storage, select No, skip for now (default).
f. Select Generate API key.
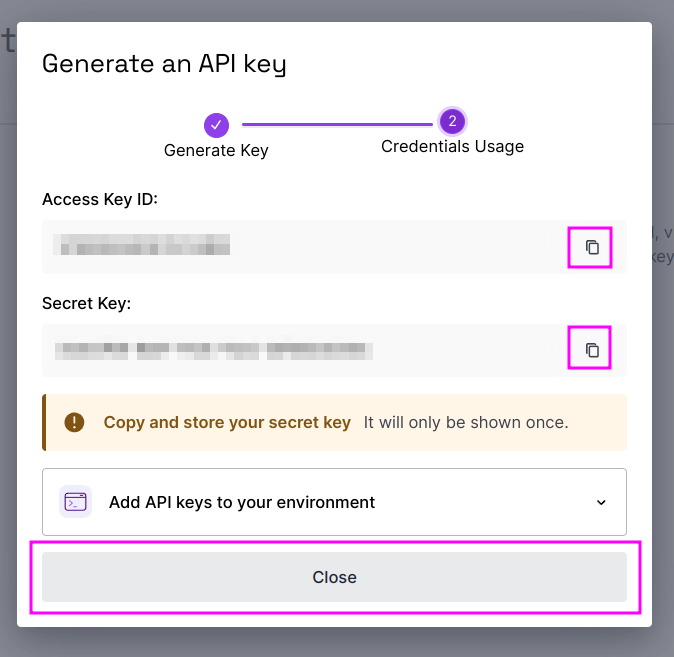
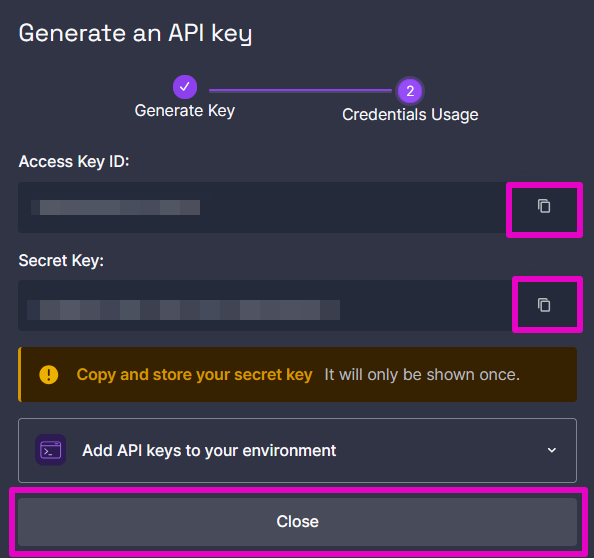
37. At Credentials Usage, Copy and save your Access Key ID and Secret Key somewhere securely. Select Close.
Result:
Yay! You’ve done it! Your new API key will be assigned to your domain. You may logout of Scaleway and return to the Beginner’s Guide.
Sources
Scaleway Transactional Email Quickstart guide
How to generate API keys for API and SMTP sending with IAM
How to create an IAM application